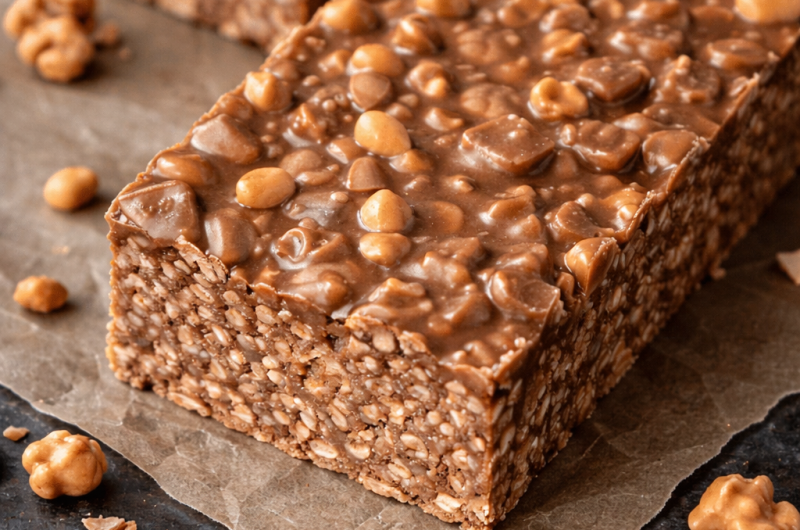
When you’re craving a quick no-bake dessert that’s rich, chocolatey, and incredibly satisfying, these No-Bake Chocolate Peanut Butter Crunch Bars are exactly what you need. They combine the timeless flavor pairing of creamy peanut butter and smooth melted chocolate with crispy rice cereal for the perfect balance of texture and taste.
This is one of those easy homemade dessert recipes that delivers maximum flavor with minimal effort. There’s no oven required, no complicated baking techniques, and no specialty equipment. Everything comes together in one bowl, gets pressed into a pan, and sets beautifully in the refrigerator.
If you love simple treats made from pantry staples, this recipe will quickly become a favorite in your kitchen.
Why Chocolate and Peanut Butter Are the Perfect Match
Few flavor combinations are as universally loved as chocolate and peanut butter. The deep, smooth richness of chocolate perfectly complements the nutty, slightly salty creaminess of peanut butter. When blended together, they create a balanced sweetness that feels indulgent but not overpowering.
Adding crispy rice cereal transforms this classic duo into something even better. The cereal adds lightness and crunch, creating a layered texture that makes each bite incredibly satisfying.
The result? A bar that’s:
- Creamy yet crunchy
- Sweet but balanced
- Rich but not heavy
- Firm enough to slice cleanly
- Perfectly snackable
What Makes This No-Bake Dessert So Easy?
One of the best features of this no-bake chocolate peanut butter bar recipe is its simplicity.
There’s no need to:
- Preheat the oven
- Use a mixer
- Worry about baking times
- Monitor doneness
Instead, you simply melt, mix, press, and chill.
The coconut oil helps the chocolate mixture melt smoothly and creates a glossy finish that firms up beautifully once refrigerated. Maple syrup adds depth and warmth while naturally sweetening the bars.
In under 15 minutes of prep time, your dessert is ready to chill.
Ingredient Breakdown – Simple Pantry Staples
Let’s explore why each ingredient plays an important role in creating the perfect homemade chocolate peanut butter crunch bars.
Chocolate Chips
The foundation of the recipe. They melt into a smooth, rich coating that binds everything together. You can use dark, semi-sweet, milk, or even white chocolate depending on your preference.
Peanut Butter
Adds creamy texture and nutty depth. Smooth peanut butter gives a silky finish, while crunchy peanut butter can add extra texture.
Crispy Rice Cereal
Provides the signature crunch. The cereal keeps the bars light and prevents them from becoming too dense.
Pure Maple Syrup
Naturally sweetens the mixture and adds subtle caramel-like undertones.
Coconut Oil
Helps melt the chocolate smoothly and allows the bars to firm up perfectly in the refrigerator.
Texture Tips: Getting That Perfect Crunch
If you want an even deeper flavor and enhanced crispness, lightly toast the crispy rice cereal in a dry skillet for 2–3 minutes before mixing. This step enhances the cereal’s nutty aroma and helps maintain crunch after chilling.
Be sure to coat every piece of cereal thoroughly so that each bite has the ideal chocolate-to-crunch ratio.
Step-by-Step Guide to Making No-Bake Chocolate Peanut Butter Bars
Step 1 – Prepare the Pan
Line an 8×8-inch baking dish with parchment paper, leaving extra paper hanging over the sides. This makes removal easy once the bars are set.
Step 2 – Melt the Chocolate Mixture
In a microwave-safe bowl, combine chocolate chips, peanut butter, maple syrup, and coconut oil.
Heat in 30-second intervals, stirring between each round. Continue until fully melted and smooth.
Avoid overheating — gradual melting prevents the chocolate from scorching.
Step 3 – Combine with Cereal
Place crispy rice cereal in a large mixing bowl.
Pour the warm chocolate mixture over the cereal. Stir gently but thoroughly until every piece is evenly coated.
Step 4 – Press Into the Pan
Transfer the mixture into the prepared baking dish.
Use a spatula or the back of a spoon to press the mixture down firmly and evenly. This ensures compact, sliceable bars.
Step 5 – Chill Until Set
Refrigerate for 60–90 minutes, or until completely firm.
The chilling process is essential for achieving clean slices and stable texture.
Step 6 – Slice and Serve
Lift the bars out using the parchment overhang.
Place on a cutting board and slice into squares or rectangles using a sharp knife.
For ultra-clean edges, wipe the knife between cuts.
Flavor Variations & Customization Ideas
These easy chocolate peanut butter snack bars are incredibly versatile.
Add Flaky Sea Salt
Sprinkle a pinch over the top before chilling for a sweet-and-salty twist.
Extra Peanut Crunch
Fold in chopped peanuts for added texture and flavor.
Chocolate Variations
Try dark chocolate for a richer taste or milk chocolate for a sweeter version.
Healthier Swap
Replace maple syrup with honey or a sugar-free syrup alternative.
Storage Tips for Maximum Freshness
- Store in an airtight container in the refrigerator for up to 7 days.
- Freeze for up to 3 months for long-term storage.
- Wrap individually for grab-and-go snacks.
Because the chocolate softens at room temperature, refrigeration keeps the bars firm and fresh.
Perfect Occasions for These Bars
These no-bake dessert bars are ideal for:
- After-dinner treats
- Afternoon snack cravings
- Lunchbox additions
- Potluck gatherings
- Holiday dessert trays
- Freezer-friendly meal prep
They’re easy to transport and always a crowd favorite.
Frequently Asked Questions
Do They Need to Stay Refrigerated?
Yes. Refrigeration keeps them firm and sliceable.
Can I Use Natural Peanut Butter?
Yes, but stir it well before using to ensure proper consistency.
Can I Make Them Dairy-Free?
Simply use dairy-free chocolate chips.
Why Are My Bars Too Soft?
They may need more chilling time. Adding a bit more cereal can also help.
Can I Double the Recipe?
Absolutely. Use a 9×13-inch baking dish for a larger batch.
Nutrition Overview (Approximate Per Serving)
- Calories: 250
- Total Fat: 14g
- Saturated Fat: 6g
- Carbohydrates: 13g
- Sugars: 12g
- Protein: 5g
No-Bake Chocolate Peanut Butter Crunch Bars
Homemade no-bake chocolate peanut butter crunch bars are the ultimate quick and indulgent dessert. Crisp rice cereal is coated in a silky blend of melted chocolate and creamy peanut butter, creating rich layers that set into perfectly sliceable bars. With minimal effort and simple pantry ingredients, this recipe delivers maximum flavor in every irresistible bite.
65
servings15
minutes250
kcal1
hour20
minutesIngredients
1 ½ cups (375 ml) chocolate chips
1 cup (250 ml) peanut butter
3 cups (750 ml) crispy rice cereal
½ cup (125 ml) pure maple syrup
¼ cup (60 ml) coconut oil
Directions
- Line an 8×8-inch baking dish with parchment paper, leaving extra over the sides for easy removal.
- In a microwave-safe bowl, combine chocolate chips, peanut butter, maple syrup, and coconut oil.
- Microwave in 30-second intervals, stirring between each, until smooth and fully melted.
- Place crispy rice cereal in a large bowl. Pour melted chocolate mixture over cereal and stir until evenly coated.
- Transfer mixture into prepared pan and press down firmly to create an even layer.
- Refrigerate for 60–90 minutes until fully set and firm.
- Lift out using parchment paper and slice into squares. Serve chilled.
Notes
- Notes
Heat chocolate gradually to prevent burning.
Chill fully before slicing for clean edges.
Store refrigerated for up to 7 days.
Freeze up to 3 months in airtight container.
Nutrition Facts
- Serving Size: 13 g
- Total number of serves: 1
- Calories: 250kcal
- Fat: 14g
- Saturated Fat: 6g
- Sodium: 80mg
- Carbohydrates: 13g
- Fiber: 1g
- Sugar: 12g
- Protein: 5g
