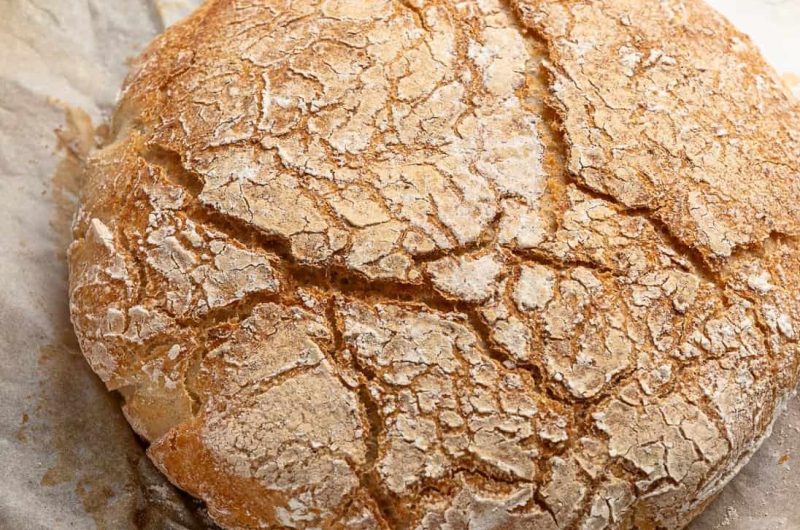
There’s something deeply comforting about the aroma of freshly baked bread wafting through your kitchen. For anyone who’s ever struggled to find a truly good gluten-free loaf—soft inside, crisp outside, and flavorful through and through—this No-Knead Gluten-Free Bread is a dream come true.
This bread recipe is perfect for anyone who wants to enjoy the taste and texture of artisan-style bread without needing any dairy, kneading, or complicated baking techniques. It’s ideal for beginners, busy home bakers, and anyone craving a simple, wholesome, and delicious gluten-free loaf.
What makes this bread stand out is its no-knead process—no heavy mixing or kneading is needed. Just a few pantry ingredients, some patience for rising, and a bit of oven magic. The result? A bakery-quality loaf that’s light, golden, and full of rustic flavor.
🌾 Why This Recipe Works So Well
Gluten-free baking can be tricky because you’re missing the gluten—the stretchy protein that gives bread its structure. However, this no-knead method allows the dough to rest and hydrate slowly, helping to build structure naturally while allowing the yeast to create air pockets that make the bread fluffy and tender.
Here’s why this recipe is foolproof:
- Slow fermentation: The long resting time helps the dough develop flavor and structure without kneading.
- Moist texture: The combination of warm water and gluten-free flour results in a perfect sticky dough that bakes into a soft, chewy crumb.
- Crispy crust: Starting in a cold oven gives the bread a longer, gradual bake time that results in a perfectly crisp outer layer.
- No special tools needed: You don’t need a stand mixer, Dutch oven, or even a bread machine—just a bowl, spoon, and oven.
🧂 Ingredients Breakdown: What You’ll Need
Each ingredient in this gluten-free bread plays an important role in the final result. Let’s look at them one by one:
🔹 Warm Water (1.5 cups / 370 ml)
The temperature of the water is critical for activating the yeast. It should be lukewarm—not too hot or cold. Water that’s too hot can kill the yeast, while water that’s too cold won’t activate it. The perfect range is around 105°F–110°F (40°C–43°C).
🔹 Sugar (1 teaspoon / 4 grams)
A small amount of sugar helps feed the yeast, encouraging it to bubble and rise. You can use white sugar, cane sugar, or even honey if preferred.
🔹 Active Dry Yeast (½ teaspoon / 2 grams)
Yeast is what gives your bread its airy texture and lightness. Active dry yeast is ideal for this recipe because it works slowly during the long rise, developing flavor and structure naturally.
🔹 Gluten-Free Flour (3 cups / 420 grams)
This is the backbone of your bread. For best results, use a high-quality gluten-free blend like Caputo Fioreglut or King Arthur Gluten-Free All-Purpose Flour. These blends contain a balance of starches and flours that mimic traditional wheat flour.
💡 Tip: Avoid single flours like almond or coconut flour—they behave differently and won’t yield the same structure.
🔹 Salt (1 teaspoon / 5 grams)
Salt isn’t just for taste—it also controls yeast activity and strengthens the dough’s structure. A pinch of sea salt enhances the bread’s natural flavor beautifully.
🕒 Step-by-Step: How to Make the Perfect Gluten-Free Bread
Follow these simple steps to create your loaf from scratch:
Step 1: Activate the Yeast
In a small bowl, mix warm water, sugar, and yeast. Stir gently and let it rest for 5 minutes. You’ll know it’s working when the surface turns foamy or bubbly. If nothing happens, the yeast may be expired, or the water temperature may be off—start over with fresh yeast.
Step 2: Combine the Dry Ingredients
In a large mixing bowl, whisk together the gluten-free flour and salt. This ensures an even distribution of ingredients and prevents lumps later.
Step 3: Mix the Dough
Slowly pour the yeast mixture into the flour mixture while stirring continuously. You should end up with a thick, sticky dough—slightly tacky but not runny. Gluten-free doughs are different from regular ones—they don’t need kneading, just mixing until combined.
Step 4: Rest and Rise
Cover the bowl with plastic wrap or a clean towel and let it rest at room temperature for about 5 hours. Choose a draft-free spot, such as inside a turned-off oven or on a countertop away from air vents. During this time, the yeast will work its magic, expanding the dough and creating tiny air bubbles.
Step 5: Shape the Loaf
Once risen, dust your work surface with a bit of gluten-free flour. Gently transfer the dough onto the surface and shape it into a round or oval loaf. Avoid pressing too hard—handle it lightly to preserve the air inside.
Step 6: Prepare for Baking
Line a baking dish or oven-safe pot with parchment paper. Place your shaped dough inside, and cover it with a lid or double layer of foil.
Step 7: Bake from a Cold Oven
Place the dish in the cold oven (do not preheat), set the temperature to 450°F (230°C), and bake for 40 minutes. This unique step allows the bread to heat gradually, helping it rise perfectly before forming the crust.
Step 8: Uncover and Finish Baking
After 40 minutes, remove the lid or foil and continue baking for another 25–30 minutes until the crust turns golden brown and crisp.
Step 9: Cool and Slice
Allow the bread to cool for at least 10 minutes before slicing. This helps the interior set and prevents it from becoming gummy.
🍞 Flavor Variations & Add-Ins
Make this gluten-free bread your own with fun flavor twists:
- Herb Bread: Add 1 tablespoon of chopped rosemary, thyme, or parsley for a fragrant touch.
- Garlic Bread: Mix ½ teaspoon of garlic powder into the dough or brush the crust with garlic-infused olive oil before baking.
- Seeded Bread: Sprinkle sesame seeds, poppy seeds, or sunflower seeds on top before baking for extra crunch.
- Cheesy Version: Stir in ¼ cup of shredded parmesan or cheddar for a savory, cheesy loaf.
🧺 Tips for Perfect Results Every Time
- Use fresh yeast. Expired yeast won’t rise properly and can ruin the texture.
- Avoid overmixing. Once ingredients are combined, stop stirring to keep the dough light.
- Rest properly. The resting stage is key—this allows gluten-free flours to hydrate and develop structure naturally.
- Cool before cutting. Cutting too soon can make the inside sticky or dense.
- Store smartly. Keep leftovers in an airtight container at room temperature for up to 2 days, or refrigerate for up to 5 days.
🧊 Storage, Freezing & Reheating
- Room Temperature: Store the cooled bread in an airtight container for up to 48 hours.
- Refrigerator: Lasts up to 5 days when wrapped in foil or a zip bag.
- Freezer: Freeze slices for up to 2 months. Reheat in a toaster or oven at 350°F (175°C) for 10 minutes to bring back the crispness.
🧘♀️ Why You’ll Love This Bread
- Gluten-free and dairy-free: Perfect for anyone with sensitivities.
- No special tools required: Simple ingredients and equipment.
- Versatile: Enjoy it for sandwiches, toast, or as a side with soups and stews.
- Beginner-friendly: No kneading or complex steps—just mix, rest, and bake!
🧮 Nutrition (Per Slice)
- Calories: 122
- Carbohydrates: 27g
- Protein: 4g
- Fat: 1g
- Fiber: 4g
- Sodium: 234mg
- Iron: 1mg