
If you’re looking for a vibrant, crowd-pleasing dessert that’s as easy to make as it is stunning to serve, these No-Bake Jello Cheesecake Cups are the answer. Made with a buttery graham cracker crust, a light and fluffy cream cheese layer, and a sparkling Jello topping, each bite delivers a delightful mix of texture and flavor.
Perfect for birthday parties, summer BBQs, holiday potlucks, or a fun weekend treat for kids, these colorful dessert cups are portable, customizable, and simply irresistible.
🍓 Why You’ll Love These No-Bake Jello Cheesecake Cups
These cheesecake dessert cups are:
- No-bake – No oven required, keeping your kitchen cool.
- Quick and easy – Only 30 minutes of active prep time.
- Great for parties – Individual cups make serving easy and mess-free.
- Bright and fun – Layers of color and creamy texture in every bite.
- Customizable – Change the Jello flavor, add toppings, or use themed colors.
Whether you’re making these with kids or prepping ahead for a celebration, they’re always a hit.
🍪 Layer 1: Graham Cracker Crust – Buttery and Crunchy
The base of this dessert is a sweet graham cracker crust that balances the creamy and fruity layers on top.
Pro Tip: Use a food processor to pulse the crackers into fine crumbs, or crush them in a zip-top bag with a rolling pin.
The addition of a little sugar and melted butter transforms the crumbs into a rich and crumbly base. Once pressed into clear cups, they create a delicious first bite that holds everything together.
✅ Make-Ahead Tip: Prep the crust ahead and refrigerate while making the filling.
🧁 Layer 2: Creamy Cheesecake Filling – Light, Fluffy & Delicious
The middle layer is a whipped no-bake cheesecake mixture made from softened cream cheese, vanilla, powdered sugar, and freshly whipped cream. The result is incredibly smooth and rich, yet airy enough to balance the firmness of the crust and the fruity Jello topping.
📝 Cheesecake Layer Tips:
- Soften cream cheese to room temperature to avoid lumps.
- Use cold heavy cream for easier whipping and better volume.
- Fold gently when combining whipped cream and cream cheese for a light, mousse-like texture.
This layer adds a luscious, creamy bite that mimics traditional cheesecake—without any baking required.
🍒 Layer 3: Vibrant Jello Topping – Fruity, Fun, and Kid-Approved
For the finishing touch, a bright layer of fruit-flavored gelatin adds both flavor and flair. The slight jiggle of the Jello contrasts perfectly with the rich cheesecake layer beneath.
Flavor Options:
- Strawberry Jello – Classic and crowd-favorite.
- Raspberry or Cherry – Adds bold color and sweet-tart flavor.
- Lime or Orange – Great for citrusy summer versions.
- Mix and Match – Layer two colors for a fun rainbow effect!
To keep the cheesecake layer intact, make sure the Jello mixture is slightly cooled before pouring it on top. Using ice in the Jello prep helps it set faster and creates the perfect pourable consistency.
🥄 Step-by-Step: How to Assemble Jello Cheesecake Cups
Step 1: Prepare the Crust Base
- Mix graham cracker crumbs, melted butter, and sugar until combined.
- Spoon 2 tablespoons into each clear dessert cup.
- Press firmly with the back of a spoon to form a crust.
- Chill cups while you prepare the filling.
Step 2: Make the Cheesecake Filling
- Beat softened cream cheese until smooth and fluffy.
- Mix in powdered sugar and vanilla extract.
- In another bowl, whip the heavy cream until stiff peaks form.
- Gently fold the whipped cream into the cream cheese mixture.
- Pipe or spoon the mixture into each cup over the crust (halfway to 2/3 full).
- Smooth the tops and chill while making Jello.
Step 3: Prepare the Jello Layer
- Dissolve Jello powder in boiling water, stir for 2 minutes.
- Add cold water and ice cubes. Stir until ice melts and the mixture thickens slightly.
- Let it cool a bit more if needed—should be pourable but not hot.
- Pour carefully over the cheesecake layer.
- Refrigerate until fully set (2–4 hours).
Step 4: Garnish & Serve
- Just before serving, top each cup with:
- A swirl of whipped cream
- Sliced strawberries or fresh berries
- Crushed graham crackers
- A mint leaf for color
Serve chilled with a spoon for a perfect, refreshing bite.
🎨 Serving Tips for a Stunning Presentation
For maximum visual appeal:
- Use clear plastic or glass dessert cups to highlight the beautiful layers.
- Choose Jello colors that match your party or holiday theme.
- Serve with mini dessert spoons or wooden tasting spoons for a polished look.
🧑🍳 Expert Tips for Perfect Jello Cheesecake Cups
✅ Make sure cream cheese is softened: Cold cream cheese will stay lumpy and make it hard to blend.
✅ Whip cream until stiff peaks: This keeps the cheesecake light, not dense.
✅ Let Jello cool before pouring: Hot Jello can melt the cheesecake layer.
✅ Don’t overfill cups: Leave a little space at the top for whipped cream and toppings.
✅ Set in the fridge: Do not rush the chilling process. Allow 2–4 hours minimum for Jello to firm up.
🔄 Flavor Variations & Customizations
Tropical Paradise
- Use pineapple Jello
- Add diced mango or pineapple chunks
- Top with toasted coconut
Berry Blast
- Use raspberry or blueberry Jello
- Add fresh berries on top
Black Forest Vibe
- Add mini chocolate chips to the cheesecake layer
- Use cherry Jello
- Top with chocolate curls
Low Sugar Version
- Use sugar-free Jello
- Replace powdered sugar with monk fruit or stevia
📦 Storage Tips
- Store covered in the refrigerator for up to 3–4 days.
- Do not freeze — the Jello texture won’t hold up.
- Keep whipped cream and fruit toppings off until right before serving to maintain freshness and texture.
🔁 Make-Ahead Friendly
These no-bake cheesecake Jello cups are a party planner’s dream. You can assemble them up to 24 hours ahead of time. Just hold off on the final toppings until you’re ready to serve.
Perfect for:
- Birthday parties
- BBQs and picnics
- Baby showers or bridal brunches
- Holidays like Easter or the 4th of July
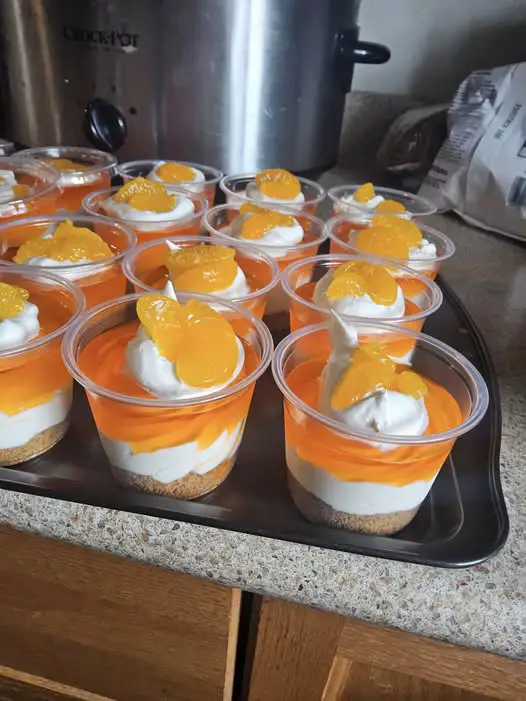
Jello Cheesecake Cups – Colorful Layered Dessert in Cups
Jello Cheesecake Cups are a fun, colorful, and delightful no-bake dessert that combines the creamy richness of cheesecake with the fruity, vibrant flair of Jello. Whether you’re hosting a summer party, making something kid-friendly, or simply want a light and refreshing treat, these individual-sized cups are a show-stopper.
8
servings30
minutes3
hours310
kcal3
hours30
minutesIngredients
- For Crust:
1 ½ cups graham cracker crumbs
5 tbsp unsalted butter, melted
2 tbsp granulated sugar
- For Cheesecake Layer:
1 (8 oz) package cream cheese, softened
½ cup powdered sugar
1 tsp pure vanilla extract
1 cup cold heavy whipping cream
- For Jello Layer:
1 box (3 oz) flavored Jello (strawberry, raspberry, cherry, etc.)
1 cup boiling water
½ cup cold water
½ cup ice cubes
- Optional Toppings:
Whipped cream
Fresh fruit (berries, kiwi)
Mint leaves
Extra crushed graham crackers
Directions
- Mix graham cracker crumbs, melted butter, and sugar. Spoon into dessert cups and press down firmly. Chill.
- Beat softened cream cheese. Add powdered sugar and vanilla.
- In a separate bowl, whip cold cream to stiff peaks.
- Fold whipped cream into cream cheese mixture.
- Spoon or pipe over crusts in cups.
- Dissolve Jello in boiling water (2 min). Add cold water and ice cubes. Stir until slightly thickened.
- Cool, then gently pour over cheesecake layer. Chill until set (2–4 hours).
- Serve:
Top with whipped cream, berries, mint, or graham crumbs before serving. Enjoy chilled!
Nutrition Facts
- Serving Size: 1
- Total number of serves: 1
- Calories: 310kcal
- Saturated Fat: 13g
- Cholesterol: 65mg
- Sodium: 180mg
- Carbohydrates: 26g
- Sugar: 18g
- Protein: 3g


