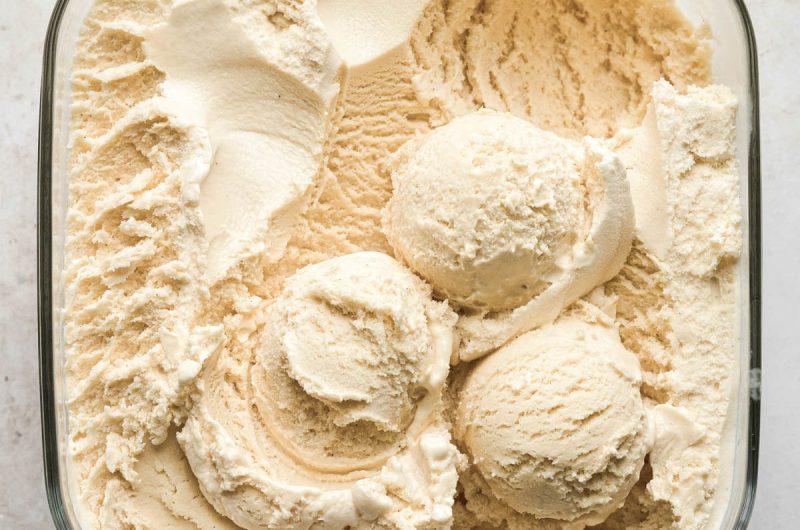
Looking for the best homemade vanilla ice cream without dairy or added sugar? Whether you’re following a low-carb, keto, or carnivore lifestyle—or simply trying to reduce processed ingredients—this ultra-creamy, high-protein vanilla ice cream is your guilt-free dessert solution.
This delicious ice cream is packed with protein, silky in texture, and made using only clean, wholesome ingredients. The best part? It requires no fancy machines—just a few steps and you’ll have a freezer-friendly treat that’s scoopable straight from the container.
Let’s dive into the how and why this ice cream will be your go-to dessert for every occasion.
💡 What Makes This Vanilla Ice Cream Recipe a Must-Try?
✔ 100% Dairy-Free
Skip the cream and milk. This frozen treat uses eggs and beef gelatin to deliver a luscious texture without dairy, ideal for anyone with lactose intolerance or dairy allergies.
✔ Naturally Sugar-Free & Keto Approved
Allulose is the secret weapon in this recipe. It’s a natural, low-carb sweetener that not only sweetens but also helps prevent the formation of ice crystals. That means a soft, scoopable consistency even after days in the freezer.
✔ Carnivore-Compatible & High in Protein
If you’re on a carnivore diet and miss indulgent desserts, this one’s for you. It’s entirely animal-based, made with nutrient-rich eggs and collagen-packed gelatin, offering around 10g of protein per serving.
✔ Super Creamy Without an Ice Cream Machine
Thanks to a combination of whipped egg yolks and egg whites, you get that soft, airy texture without needing an ice cream maker. But if you do own one, churning gives it a classic finish.
🛒 Key Ingredients Breakdown
- 2 large eggs (140g weighed in shell): The foundation of richness, creaminess, and protein. Egg yolks create depth while egg whites add airiness.
- 20g allulose: A low-glycemic, keto-friendly sweetener that mimics the behavior of sugar, giving your ice cream smooth texture and zero aftertaste.
- 1 tsp vanilla extract: For that bold, classic vanilla flavor.
- Seeds from ½ vanilla pod (optional): Boosts aroma and visual appeal with real vanilla specks.
- ½ tsp beef gelatin powder: Helps achieve a scoopable, soft texture, acting as a thickening agent without any dairy or starch.
✅ Pro Tip: Make sure your eggs are fresh and at room temperature for best results.
🥣 Step-by-Step Guide: How to Make Creamy Vanilla Ice Cream Without Sugar or Dairy
Step 1: Separate the Eggs Like a Pro
Start by cracking the eggs and separating the yolks into a small mixing bowl and the whites into a larger bowl. Keep yolks and whites completely apart—this is key for achieving that dreamy, fluffy consistency later.
Step 2: Whip Up the Yolks
Add the allulose, vanilla extract, gelatin powder, and vanilla pod seeds (if using) to the egg yolks. Using a hand mixer, beat the mixture until it turns pale, light, and frothy. The sweetener should dissolve and the mixture should thicken slightly.
Step 3: Beat the Egg Whites to Perfection
In the larger bowl, whip the egg whites until they form soft peaks. This adds volume and structure to your ice cream without using cream or milk.
🧁 Bonus Tip: Clean beaters are essential. Even a drop of yolk in the whites can prevent them from whipping properly.
Step 4: Gently Combine for a Fluffy Base
Carefully fold the whipped yolk mixture into the beaten egg whites. Use a spatula or low-speed mixer to mix just enough to combine. Do not over-mix or you’ll lose the airy texture.
Step 5: Freeze or Churn (Your Choice!)
Pour the mixture into a freezer-safe container (glass or ceramic is ideal). You can:
- Freeze directly and stir every 30 minutes for the first 2 hours (for smoother consistency).
- Or churn it in an ice cream maker before freezing for that classic, creamy texture.
Step 6: Let It Set & Serve Cold
Freeze the mixture until fully set, usually 4–6 hours. When ready, scoop and enjoy! Unlike most homemade ice creams, this one stays soft enough to scoop directly from the freezer—no need to thaw in advance.
🧊 Optional Variations & Flavor Enhancements
- Nutty Crunch: Sprinkle chopped almonds or crushed pecans on top before freezing.
- Choco-Swirl: Add a ribbon of sugar-free dark chocolate or cocoa nibs for extra flavor.
- Spice it Up: A pinch of ground cinnamon or nutmeg adds warmth and depth.
- Coconut Twist: Add ½ tsp coconut extract for a tropical flair.
📝 Expert Tips for Perfect Texture
- Avoid Graininess: Allulose is best for smooth results. If substituting, look for powdered versions of monk fruit or erythritol.
- Use Cold Utensils: For extra fluff, chill your mixing bowls beforehand.
- Scoop with Ease: Run your ice cream scoop under warm water before serving.
🥄 Delicious Serving Suggestions
- Enjoy solo for a high-protein snack or post-workout treat.
- Pair with sugar-free caramel sauce or keto chocolate drizzle.
- Top with crushed walnuts or keto granola for added crunch.
❓ Frequently Asked Questions
1. What can I use instead of allulose?
You can try monk fruit sweetener or erythritol. Just keep in mind that they may not prevent iciness as well as allulose.
2. Is an ice cream machine required?
Nope! It improves texture but isn’t essential. Manual freezing with intermittent stirring works great too.
3. Can I double or triple the batch?
Absolutely. Just maintain ingredient ratios and use a larger mixing bowl for best results.
4. How long does it last in the freezer?
Store in an airtight container for up to 2 weeks. It’s best enjoyed within the first 7–10 days for optimal texture.
5. Is this keto and carnivore compliant?
Yes! It contains zero net carbs, no plant-based ingredients (if you skip vanilla pod), and is high in clean animal protein.
Vanilla Ice Cream
2
5
minutes5
minutes95
kcal10
minutesIngredients
2 large eggs (140g, in shell)
20g allulose (or keto sweetener)
1 tsp vanilla extract
Seeds from ½ vanilla pod (optional)
½ tsp beef gelatin powder
Directions
- Place yolks in a small bowl, whites in a large bowl.
- Add allulose, vanilla, and gelatin to yolks. Whip until fluffy and pale.
- Beat egg whites to soft peaks.
- Gently combine yolk mixture with egg whites.
- Pour into a freezer-safe dish.
(Optional: Churn in ice cream maker.) - Freeze until firm. Scoop and enjoy straight from the freezer.
Notes
- No thawing needed: Soft texture straight from freezer.
Want a sorbet feel? Add 50ml water to yolk mixture before combining.
Churn or Stir: For extra smooth texture, churn or stir during first 2 hours.


