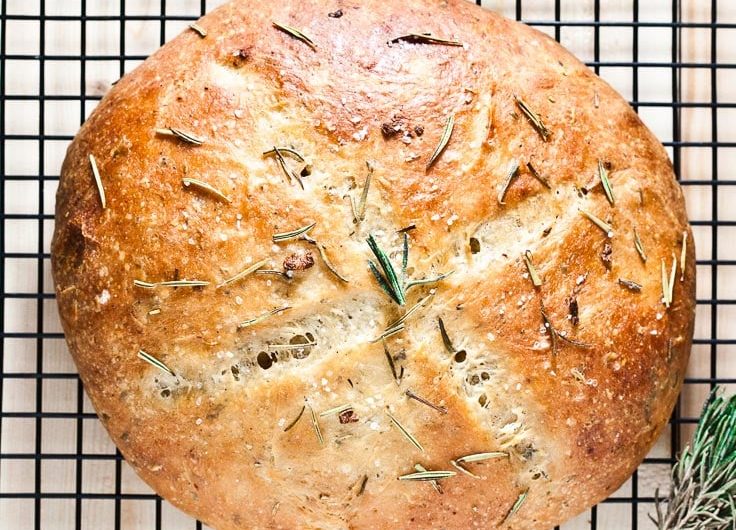
If you’ve ever dreamed of pulling a warm, golden, crackly loaf of bread out of your own oven — the kind that looks like it came straight from a European bakery — this rustic no-knead rosemary garlic bread will make that dream come true.
You don’t need fancy tools, a mixer, or even kneading skills. Just a few pantry staples, a Dutch oven (or heavy pot), and a little patience while time does all the magic.
This recipe produces a beautifully crusty loaf with a chewy, airy interior, infused with the fragrant aroma of fresh rosemary and roasted garlic. It’s the kind of bread that makes your whole kitchen smell irresistible.
Whether you’re serving it alongside a hearty soup, pasta, stew, or simply dipping slices into olive oil and balsamic vinegar, this bread is pure comfort food made simple.
Why This No-Knead Bread Is So Popular
The no-knead bread technique became famous for a reason — it uses time instead of elbow grease to develop gluten and flavor. Instead of kneading the dough for 10 minutes, you mix everything in a bowl, let it rest overnight, and wake up to a beautifully risen, bubbly dough ready to bake.
When baked in a preheated Dutch oven, the dough transforms into a loaf with a perfectly crisp crust and a soft, chewy inside — exactly like bakery-quality artisan bread.
And when you add fresh rosemary and roasted garlic, it becomes more than just bread — it’s an experience.
The Secret Ingredients Behind the Magic
1. Flour
All-purpose flour works beautifully here, but bread flour can give the loaf extra chew and structure. You can even mix both for balance.
2. Salt
Salt doesn’t just season the dough — it also controls fermentation and strengthens gluten formation.
3. Instant Yeast
Instant yeast is perfect for slow-rising doughs. It works gradually, allowing the bread to develop rich, complex flavor overnight.
4. Warm Water
Warm water activates the yeast and helps bring the ingredients together into a sticky dough. It should be around 105–110°F (40–43°C) — warm to the touch, not hot.
5. Fresh Rosemary
Rosemary gives the bread a beautiful herby fragrance. Its earthy, pine-like aroma makes this bread especially good with Italian or Mediterranean dishes.
6. Roasted Garlic
Slow-roasted garlic becomes creamy, sweet, and mellow — not sharp or overpowering. Mashed into the dough, it melts into the bread, adding depth and a subtle nuttiness.
7. Olive Oil (Optional but Recommended)
A drizzle of olive oil adds richness and enhances the flavor. It also gives the crust a beautiful golden sheen.
Step-by-Step Guide to Making Rosemary Garlic Artisan Bread
Step 1: Mix the Dough
In a large mixing bowl, combine flour, salt, and yeast. Add warm water, then stir in chopped rosemary, mashed roasted garlic, and olive oil if using. The dough will be sticky — that’s exactly what you want.
There’s no need to knead. Just make sure all the flour is incorporated.
Pro Tip: Use a wooden spoon or silicone spatula for easy mixing.
Step 2: First Rise (Overnight Rest)
Cover the bowl tightly with plastic wrap or a clean kitchen towel. Let it sit at room temperature for 12–18 hours.
During this time, the yeast works slowly, developing flavor and structure. When ready, the dough should look puffy, bubbly, and doubled in size.
This long fermentation is what gives the bread its artisan-style texture — full of beautiful air pockets.
Step 3: Shape the Dough
Dust your countertop or board with flour and gently turn out the dough. Don’t punch it down — you want to keep those air bubbles intact.
Shape it lightly into a round loaf. You’re not kneading — just folding it onto itself a few times until it forms a smooth ball.
Place it on parchment paper, cover with a towel, and let it rest for 30–40 minutes while the oven preheats.
Step 4: Preheat the Oven and Dutch Oven
While the dough rests, place your Dutch oven (with lid) into the oven and preheat to 450°F (230°C). This ensures the pot is piping hot, which helps the bread rise rapidly in the oven (called oven spring).
Step 5: Bake the Bread
Carefully remove the hot pot from the oven. Lift the parchment paper with the dough and place it directly inside the pot. Cover with the lid and bake for 30 minutes.
After 30 minutes, remove the lid and continue baking for another 10–15 minutes, until the crust turns a deep golden brown and sounds hollow when tapped.
Pro Tip: For a rustic look, lightly sprinkle sea salt or extra rosemary on top before baking.
Step 6: Cool and Slice
Once baked, transfer the bread to a wire rack and let it cool completely before slicing. Cutting too early can release steam and make the texture gummy.
Tips for Success
- Plan Ahead: The dough needs 12–18 hours to rise, so mix it the night before baking.
- Hydration is Key: The dough should be wet and sticky — resist adding extra flour.
- Use a Dutch Oven: It traps steam, creating that perfect crisp crust.
- Fresh Herbs Matter: Use fresh rosemary instead of dried for stronger flavor and aroma.
- Don’t Skip Resting: Cooling the bread allows the interior to set properly.
How to Roast Garlic for This Recipe
To make roasted garlic:
- Preheat your oven to 375°F (190°C).
- Cut the top off a garlic bulb to expose the cloves.
- Drizzle with olive oil, wrap in foil, and roast for 30–40 minutes until soft and golden.
- Squeeze out the softened garlic cloves and mash them before adding to the dough.
Roasted garlic adds a buttery, caramelized flavor that complements the rosemary beautifully.
Variations to Try
- Rosemary Parmesan Bread: Add ¼ cup of grated Parmesan for a cheesy twist.
- Olive and Herb Loaf: Mix in chopped black olives and thyme for a Mediterranean flavor.
- Whole Wheat Version: Substitute half of the flour with whole wheat for a heartier loaf.
- Garlic Butter Crust: Brush melted garlic butter on the loaf right after baking.
- Cranberry Rosemary Bread: Add dried cranberries and nuts for a festive touch.
How to Serve Rosemary Garlic Bread
- With Soups: Pair with tomato basil soup, minestrone, or creamy mushroom soup.
- With Pasta: Serve alongside spaghetti bolognese, Alfredo, or pesto pasta.
- With Dips: Enjoy warm slices dipped in olive oil and balsamic vinegar.
- As a Sandwich Base: Use slices for grilled cheese or paninis.
- With Breakfast: Toast and top with butter, avocado, or cream cheese.
Storage & Reheating
- At Room Temperature: Store in a paper bag or bread box for up to 2 days.
- For Longer Storage: Wrap tightly in foil and freeze for up to 2 months.
- To Reheat: Warm in the oven at 350°F (175°C) for 10 minutes to restore crispness.
Avoid refrigerating fresh bread — it can dry it out quickly.
Why You’ll Love Making Bread at Home
Baking your own bread is incredibly rewarding. The smell of fresh rosemary and garlic wafting through your home is comforting and nostalgic.
This no-knead method also proves that you don’t need professional skills to make bakery-quality bread — just good ingredients and a bit of time.
Once you master this recipe, you can customize it endlessly — with herbs, seeds, or even cheese.
The result? A loaf that’s golden, rustic, and perfectly crisp on the outside with a soft, tender crumb inside — every single time.