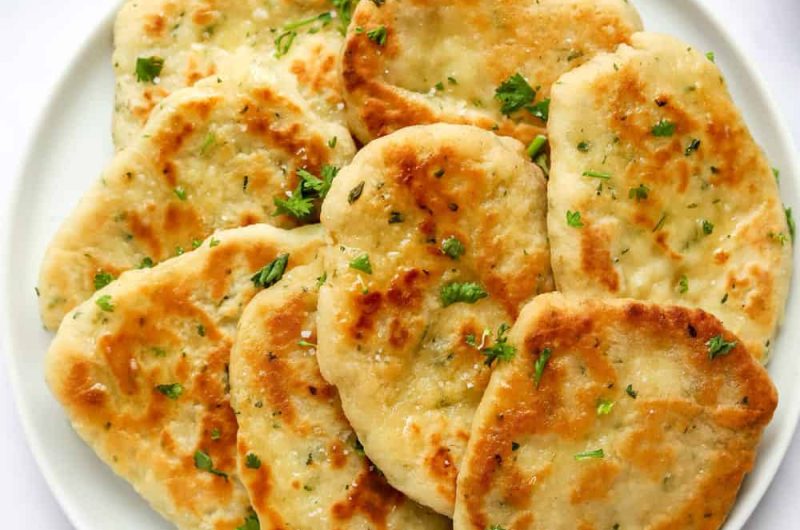
If you’ve been on the hunt for a gluten-free, yeast-free flatbread that truly delivers on texture, you’re in luck. In this version of homemade naan, you get an unbelievably soft, pillowy bread with a little chew, and it puffs up beautifully. Thanks to the clever use of baking powder (instead of yeast), the prep time is significantly shorter — about 45 minutes from start to finish — but the result feels just as satisfying as a traditional leavened bread.
This is perfect for weeknight dinners, or anytime you want a comforting bread without gluten or kneading drama. The dough is surprisingly easy to handle: it rolls out smoothly, holds together well, and cooks up in a skillet or pan with charming golden-charred spots that give it a rustic appeal.
Key texture considerations
Getting a good texture — soft inside, a little chew, gentle puffing — depends on a few vital factors. First, the combination of flours and starches: the millet flour (or brown rice alternative) lends body and structure, while the tapioca (or potato/arrowroot) starch lightens things and helps achieve that springy effect. The whole psyllium husk (or powder version) acts as a binder and provides elasticity in a gluten-free matrix, which is crucial since there’s no wheat gluten here.
Additionally, the warm water and gel-like psyllium mixture helps create steam in the dough when it hits the hot pan, giving that puff and lift. The yogurt and olive oil add moisture and richness, improving flavour and softness. Cooking at the right temperature ensures you get those brown spots — they’re not just for looks, they indicate flavour development and proper cooking.
Time commitment & yield
- Prep time: ~25 minutes
- Cooking/baking time: ~20 minutes
- Total time: ~45 minutes
- Yields: about 8 naan breads
For many households, 8 pieces is just right for sharing with a main dish, or for larger gatherings double the batch. Since the dough comes together quickly, it’s also ideal for spontaneous cooking when you don’t want to wait hours for rising.
Ingredient breakdown & what they each contribute
- 20 g (4 tbsp) whole psyllium husk (or if using powder form, 17 g): This forms a gel in warm water, giving the dough structure and elasticity, which helps mimic the “give” of gluten.
- 360 g warm water: The warmth activates the psyllium gel and helps the dough hydrate fully.
- 235 g (1⅞ cups) millet flour: A light, whole-grain friendly flour that helps form the body of the naan. If you swap with brown rice flour (same weight), note the texture will be slightly less fluffy and maybe denser.
- 130 g (1 cup + 2½ tbsp) tapioca starch: Gives spring and chew, helps with softness and that “puff” when cooked. You could substitute cornstarch (US) / cornflour (UK), potato starch, or arrowroot starch with nearly equal weight.
- 1 tbsp caster/superfine or granulated sugar: Just a touch of sweetness to balance the savoury flavours and aid browning.
- 1½ tsp baking powder: The leavening agent in place of yeast, enabling the dough to rise and puff when cooking.
- 1 tsp salt: For flavour; essential for good bread taste.
- 75 g (⅓ cup) unsweetened plain or Greek-style yoghurt, room temperature: Adds moisture, tangy flavour, richness, and helps the dough bind.
- 25 g (2 tbsp) olive oil: Adds softness and helps the dough roll and handle well. You can substitute sunflower or vegetable oil if preferred.
- 45 g (3 tbsp) ghee or butter, melted + finely chopped parsley or cilantro: Used after cooking to brush on the hot naan, giving extra richness and herbal aroma.

Step-by-Step: Crafting the dough
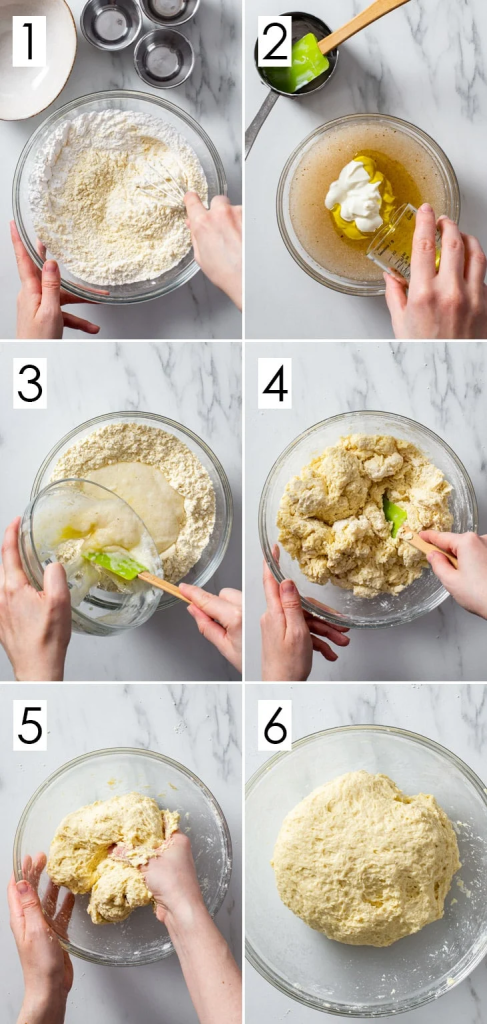
1. Create the psyllium gel
In a bowl, stir together the psyllium husk and warm water. Within 30-45 seconds you’ll see a thick gel forming. This is the key glue in the dough, giving it structure and elasticity.
2. Mix dry ingredients
In a large mixing bowl (or the bowl of a stand mixer fitted with a dough hook if you prefer), whisk together the millet flour, tapioca starch, sugar, baking powder and salt until evenly blended.
3. Combine wet ingredients
Add the plain or Greek-style yogurt and the olive oil into the psyllium gel. Stir until combined, then pour this wet mixture into the dry ingredient bowl.
4. Bring the dough together
Using a wooden spoon or a rubber spatula, mix until the dough begins to come together. Then turn it out (or continue in the mixer) and knead by hand: squeeze through your fingers, scrape the bowl sides, ensure no dry flour pockets remain. The dough should pull away from the bowl and be supple and springy, not overly sticky. A slightly rough surface is fine — it’s a gluten-free dough, so perfection isn’t required.
Divide, shape & roll
On a lightly floured surface (use millet flour or rice flour), form the dough into a ball. Divide it into 8 equal parts (each ~110 g if you want to be precise). Shape each portion into a small ball. Don’t worry about surface smoothness — gluten-free dough tends to be a little rustic. As you work, keep the remaining dough covered with a dish towel to prevent drying.
Roll each ball out into a naan shape: either round or oval, about 7-8 inches (18-20 cm) across and about ⅛-¼ inch (4-6 mm) thick. Rotate as you roll, dusting surface and dough top as needed to avoid sticking. Pro tip: Roll all the breads first, stack them between sheets of parchment or baking paper, and cover with a towel so they don’t dry out while you finish rolling all of them.

Cooking on the stovetop
Pre-heat a large skillet or well-seasoned cast-iron pan over medium-high heat. To test readiness, drop a tiny bit of water: if it sizzles/reacts, you’re ready.
Place a rolled naan into the hot pan and cook for about 1-2 minutes, until bubbles form and the underside shows deep golden or slightly charred spots. If you notice it cooking too fast (before puffing), lower the heat.
Flip it and cook the other side for about 1 minute until nicely browned. Repeat with all breads. As you go, keep an eye on heat: too low and you get no puff, too high and you might burn before the inside cooks.

Finishing touches
Right after cooking each piece, brush it with melted ghee or butter. Sprinkle with finely chopped parsley or cilantro for a fragrant finish. Alternatively, you can wrap the breads in a clean dish towel immediately after cooking — this traps steam and keeps them warm and soft while you finish the batch. Then brush with melted butter/ghee right before serving.
Serving and storing
These naan breads are best just off the pan — warm, soft, with steam still in the layers. That said, they remain beautifully soft even after cooling. Store in an airtight container for 2-3 days. For days 2 and 3, re-heating helps restore the original texture.
Re-heating options:
- Microwave: ~30-45 seconds.
- Stovetop: Heat a non-stick or cast-iron pan on medium, lightly spray or sprinkle the naan with water, cook ~45-60 seconds each side with lid on.
- Oven: Pre-heat oven to ~350 °F (180 °C). Sprinkle or lightly spray the naan with water so they don’t dry, then warm for ~3-5 minutes.
Substitutions and troubleshooting
Other flour alternatives
If you don’t have millet flour, you can replace it (by weight) with finely ground brown rice flour, sorghum flour, corn flour (US) / maize flour (UK), light buckwheat flour or white teff flour. Be aware: these tend to absorb more moisture, so add an extra ~45-60 g (3-4 tbsp) of warm water slowly until the dough is soft and supple (not sticky).
Why isn’t my naan puffing up?
- Rolled too thin: If you roll the dough thinner than ~⅛″ (4 mm), it may fully cook or dry before bubbles appear.
- Too thick: If it’s too thick, the centre may remain under-cooked and it won’t puff.
- Dough too dry: If your dough is dry (maybe due to measuring by volume instead of weight), puffing will be limited. Use a food scale for best results.
- Heat too low: Without high enough heat, the baking powder won’t activate fully, and steam won’t form — so no puffing.
- Heat too high: If the underside browns or burns too quickly before bubbles form, reduce the heat.
Pairing suggestions & extra tips
This gluten-free, no-yeast naan is perfect alongside hearty curries, stews, soups, dips, or even as a base for quick pizzas or sandwich wraps. Because it’s yeast-free, it’s also a great option for those who prefer faster breads.
For a flavour twist, you can:
- Press some garlic and chopped cilantro/parsley into the dough before cooking.
- Brush with herb-infused melted ghee or butter after cooking.
- Use the naan as a side for grilled proteins, roasted veggies, or even for breakfast wraps with eggs and spinach.
With a little practice, you’ll gain confidence in how the dough behaves, how thick to roll, and what heat your pan needs. Soon this will become your go-to gluten-free bread that rivals store-bought wheat naan — only fresher, faster and just as delicious.