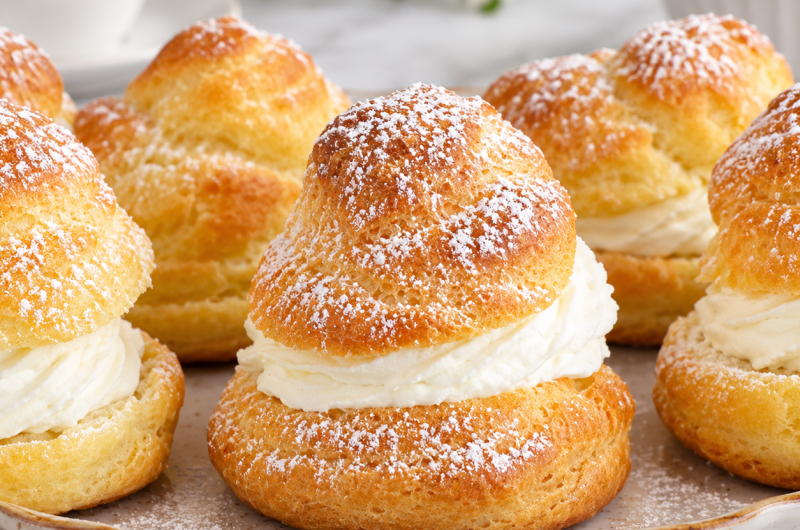
Sourdough cream puffs are delicate French-style pastries made with choux pastry and sourdough starter. They have a lightly crisp outer shell, a hollow center, and a soft structure that is perfect for filling with whipped cream, pastry cream, or chocolate custard. Unlike traditional sourdough bread, these pastries do not need a long fermentation or an extended rising period after shaping. Instead, the dough is cooked on the stovetop, mixed with eggs, and baked at a high temperature so steam can expand the pastry. The sourdough starter adds depth to the flavor while keeping the recipe useful for bakers who enjoy experimenting with homemade sourdough desserts. These cream puffs are suitable for afternoon tea, family gatherings, birthday celebrations, brunch tables, and special occasions when you want a homemade dessert that looks elegant without requiring complicated decorating skills.
2. Why Use Sourdough Starter in Choux Pastry?
Sourdough starter brings a subtle fermented flavor to cream puffs and offers another way to use an active starter in sweet baking. The flavor is generally mild when the starter is ripe and balanced, allowing the butter, eggs, milk, and whipped cream to remain the main flavors. In this recipe, the starter is incorporated directly into the pastry mixture rather than being used as the primary leavening agent for a traditional loaf. The pastry rises mainly because the moisture in the dough turns into steam during baking, creating the hollow interior that makes cream puffs so useful for filling. Using sourdough starter also gives home bakers a chance to explore recipes beyond pancakes, waffles, and bread. For the best texture, measure the starter carefully and follow the egg quantity gradually, because the moisture level of the starter can affect how the choux pastry comes together.
3. Understanding the Texture of Perfect Cream Puffs
The best sourdough cream puffs have a golden exterior that feels dry and lightly crisp, while the inside remains airy and hollow. This texture depends on the correct balance of moisture, eggs, and heat during baking. If the dough contains too much egg, the piped mounds may spread excessively or struggle to hold their shape. If too little egg is incorporated, the pastry may become stiff and fail to expand properly. The cooked dough should be smooth, thick, and glossy before piping, and it should form a soft V-shaped ribbon when lifted with a mixer attachment. Once baked, the pastries need enough time in the oven to dry out so they do not collapse as they cool. Learning these visual signs is more reliable than depending only on mixing times, because ingredient temperatures, starter consistency, and egg size can vary between kitchens.
4. Ingredients Needed for Sourdough Cream Puffs
This sourdough cream puff recipe uses a short list of ingredients to produce a light pastry shell and an optional sweet whipped cream filling. The main ingredients are sourdough starter, milk, melted unsalted butter, granulated sugar, salt, and eggs. The filling requires heavy whipping cream, a small amount of sugar, and vanilla extract, with powdered sugar used as a finishing touch. Each ingredient has an important purpose: milk provides moisture, butter contributes richness, and eggs help the pastry expand while creating its structure. Sugar adds a gentle sweetness without making the shells taste like cake, and salt balances the overall flavor. The whipped cream provides a cool, soft contrast to the crisp pastry. Because the ingredient list is simple, accurate measuring is especially important. Use a kitchen scale when possible, particularly for the starter and eggs, to help achieve consistent results every time you prepare this homemade pastry recipe.
5. Choosing the Right Sourdough Starter
For this recipe, use approximately 40 grams of ripe, active sourdough starter. An active starter should show signs of fermentation, such as bubbles, a slightly expanded appearance, and a pleasant, mildly tangy aroma. If your starter has been sitting in the refrigerator for several days, feed it ahead of time and allow it to become active before beginning. A starter that is very acidic or has separated significantly may contribute a stronger sour flavor and can affect the consistency of the dough. The original ingredient list also specifies a ripe starter, so it is best to follow that guidance rather than substituting a large quantity of dry flour or other ingredients. Since the starter is added to the choux mixture, it does not need to perform exactly the same role it would in sourdough bread. The goal is to incorporate it smoothly while maintaining the moisture balance required for airy pastry shells.
6. Preparing Your Kitchen and Baking Equipment
Before mixing the dough, gather a medium saucepan, mixing bowl, whisk, spatula, electric hand mixer, piping bag, baking sheet, parchment paper, and cooling rack. Having everything ready makes the process easier because choux pastry should be piped soon after it reaches the correct consistency. Line the baking sheet with parchment paper so the pastry mounds can release easily after baking. A piping bag gives you better control over the size and shape of the cream puffs, although a sturdy zip-top bag with one corner snipped off can work as an alternative. Keep a clean bowl ready for the whipped cream and chill it beforehand if your kitchen is warm. A kitchen scale is also helpful for weighing the starter and eggs. Organizing your equipment before heating the mixture reduces interruptions and allows you to work while the dough is still at the ideal temperature for adding eggs.
7. Cooking the Starter, Milk, and Butter Mixture
The first important step is combining the sourdough starter and milk in a saucepan until the mixture looks smooth. Add the melted unsalted butter, granulated sugar, and salt, then stir until everything is evenly distributed. Place the saucepan over medium heat and continue stirring with a spatula, making sure to scrape the bottom and corners so the mixture does not stick. As the ingredients warm, the dough will gradually thicken and form soft clumps before coming together into a cohesive mass. Continue cooking until there are no obvious wet patches and the mixture looks like a smooth ball of dough. This stovetop stage is essential because it helps prepare the mixture to absorb the eggs later. Transfer the cooked dough to a mixing bowl and allow it to cool slightly before adding the eggs. If the mixture is too hot, it may cook the eggs prematurely and prevent the pastry from developing a smooth, even texture.
8. Adding Eggs Without Making the Dough Too Loose
Eggs are one of the most important ingredients in choux pastry because they provide moisture, structure, and the ability to expand during baking. The recipe calls for three large eggs, weighing approximately 160 grams without their shells. Beat the eggs together in a separate bowl, then add them gradually to the cooled dough while mixing. Do not pour in all the egg at once, because different starters and cooking conditions can change how much liquid the dough can absorb. Allow each addition to become fully incorporated before adding more. As the dough develops, it should become smooth, glossy, and soft enough to pipe while still holding its shape. Lift the mixer beaters to check the consistency; the pastry should fall in a thick ribbon that forms a V shape. If the mixture is already at this stage, avoid adding unnecessary extra egg. Correct consistency helps the puffs rise evenly and develop a hollow center instead of spreading into flat rounds.
9. How to Pipe Evenly Shaped Pastry Mounds
Once the choux pastry is ready, transfer it to a piping bag or a sturdy zip-top bag. Cut an opening large enough to create pastry mounds approximately two inches wide and one inch tall. Pipe each mound onto the prepared baking sheet, leaving around one and a half inches between portions to allow for expansion in the oven. Try to keep the portions similar in size so they bake at approximately the same rate. If small peaks form on the tops of the piped mounds, lightly dampen your fingertips and press them down gently. This helps the finished cream puffs develop a more even shape and prevents pointed tips from browning too quickly. Avoid spreading the dough with a spoon after piping, because excessive handling can affect the shape. Work steadily and bake the tray soon after piping, as allowing the uncooked mixture to sit for too long may weaken its structure and lead to less consistent results.
10. Baking Sourdough Cream Puffs for a Crisp Shell
Preheat your oven to 400°F (about 200°C) before placing the piped pastry inside. Bake the cream puffs at this temperature for the first 20 minutes to encourage rapid steam expansion. During this stage, the dough rises and develops its hollow center. Without opening the oven door, reduce the temperature to 350°F (about 175°C) and continue baking for another 20 minutes. The lower temperature helps the shells dry out and turn a light golden brown. Avoid opening the oven while the pastries are rising because a sudden temperature drop may cause them to collapse. The finished puffs should look dry and firm on the outside rather than pale or damp. If they still appear soft or underbaked after the suggested time, allow them additional time in the oven, watching carefully to prevent excessive browning. Proper baking is essential because the shells must be strong enough to hold their shape once filled with whipped cream.
11. Cooling the Pastry Before Adding the Filling
After baking, move the cream puffs to a cooling rack and let them cool completely before cutting or filling them. The shells continue to release steam as they cool, and filling them while warm can cause the whipped cream to melt and lose its structure. The original recipe allows approximately 20 minutes for cooling, although larger pastries or a warm kitchen may require longer. A fully cooled shell should feel dry on the outside and should not release noticeable heat when handled. Once cool, cut each puff horizontally with a small serrated knife to create a top and bottom. Work gently to avoid crushing the delicate pastry. If a few shells are slightly soft inside, you can return them to a low oven briefly to help dry them, then cool them again before filling. This extra care is particularly useful if you plan to serve the cream puffs at a gathering, where a crisp shell and a stable filling will improve both appearance and texture.
12. Making Light and Fluffy Vanilla Whipped Cream
The optional whipped cream filling gives sourdough cream puffs their classic creamy center. Pour 120 grams of cold heavy whipping cream into a clean mixing bowl. Add five to ten grams of granulated sugar and approximately two grams of vanilla extract. Begin whipping at a moderate speed, then continue until the cream forms medium peaks. At this stage, the cream should hold its shape when you lift the beaters, but the tip should bend gently rather than remain completely stiff. Stop mixing as soon as the correct consistency is reached, because overwhipped cream can become grainy and eventually separate. For better results, keep the cream refrigerated until you are ready to whip it, especially if your kitchen is warm. Transfer the finished cream to a piping bag and fill the bottom halves of the cooled pastry shells. A piping bag creates a neat, even layer, but a spoon can also be used if you prefer a simple homemade appearance.
13. Filling and Finishing the Cream Puffs
Arrange the cooled pastry bottoms on a tray and pipe the whipped cream into each one, leaving enough room to place the tops back on without squeezing the filling out. Replace the pastry tops gently and avoid pressing too firmly, since the shells can crack under pressure. Finish with a light dusting of powdered sugar just before serving. For a richer dessert, you can also drizzle the tops with melted chocolate or dip the pastry lids into chocolate and let them set before assembling. These finishing touches make the cream puffs suitable for celebrations, dessert platters, afternoon tea, and holiday gatherings. If you want a different flavor, use the same pastry shells with vanilla pastry cream, chocolate pastry cream, or another suitable filling. The basic sourdough choux pastry offers a neutral, lightly rich base that pairs well with many sweet fillings. For the best presentation, fill the pastries close to serving time so the shells retain as much crispness as possible.
14. Flavor Variations for Homemade Sourdough Cream Puffs
One advantage of homemade cream puffs is that the filling can be changed to suit different occasions. Vanilla whipped cream is simple and light, while chocolate pastry cream creates a more decadent dessert. A classic custard filling offers a smooth, rich center, and fresh berries can be served alongside the pastries for a fruity contrast. For a chocolate finish, drizzle melted chocolate over the assembled cream puffs or dip the tops before adding them to the filling. If you prefer less sweetness, keep the filling lightly sweetened and use only a small amount of powdered sugar for decoration. You can also make a savory variation by leaving out the sweet filling and using an appropriate savory mixture, such as chicken salad, provided the pastries are prepared and stored safely. These variations allow one batch of choux pastry to serve different purposes without changing the main method. For sweet versions, add the filling only after the pastry shells are completely cool.
15. Serving Ideas for Any Occasion
Sourdough cream puffs look attractive when arranged on a serving plate with a light dusting of powdered sugar. Serve them with coffee, tea, or a small cup of espresso for an afternoon treat, or include them on a dessert table alongside fresh fruit and other bite-sized sweets. For a special occasion, arrange the pastries on a tiered stand and finish them with chocolate drizzle immediately before serving. They are also a lovely choice for brunch, baby showers, family celebrations, and holiday gatherings because each pastry can be picked up and enjoyed individually. If you are preparing a dessert platter, consider serving several filling options so guests can choose their favorite flavor. Keep filled cream puffs chilled until serving time, particularly when the filling contains dairy. For the best texture, avoid assembling them too far in advance. The pastry shell is at its crispest shortly after filling, while prolonged contact with whipped cream can gradually soften the interior.
16. How to Store Sourdough Cream Puffs
Storage depends on whether the cream puffs are filled or unfilled. Once filled with whipped cream, place them in an airtight container and refrigerate them for up to two or three days, following the original recipe’s storage guidance. For the best texture, enjoy them as soon as possible because the moisture from the filling will gradually soften the pastry shells. Unfilled shells can be stored in an airtight container after they have cooled completely, although they may need a short period in the oven to restore their crispness before serving. The original recipe also indicates that the cream puffs can be frozen for several weeks. For better results, freeze the unfilled shells in a suitable freezer-safe container, then thaw and briefly re-crisp them in the oven before filling. Filled cream puffs may lose some texture after freezing and thawing, so freezing the shells separately is generally the better choice when preparing ahead. Always keep dairy-based fillings refrigerated and avoid leaving filled pastries at room temperature for extended periods.
17. Common Mistakes and How to Avoid Them
Several small mistakes can affect the final texture of sourdough cream puffs. Adding eggs while the cooked dough is too hot may cause the mixture to become uneven, so allow it to cool before mixing. Adding the eggs too quickly can make the dough runny, which may cause the piped shapes to spread. To prevent this, incorporate the beaten eggs gradually and check the consistency frequently. Another common issue is removing the pastries from the oven before their shells are sufficiently dry. Underbaked shells may collapse as they cool, so look for a firm exterior and an even golden color. Opening the oven door during the initial rise can also interfere with expansion. Finally, filling the shells while warm may melt the cream and soften the pastry immediately. Follow the baking temperatures carefully, allow enough cooling time, and pipe the filling shortly before serving. These straightforward steps make the process more predictable and help you achieve light, attractive pastries.
18. Notes for Reliable Results
For the most consistent results, measure the starter and eggs by weight rather than relying only on volume measurements. The recipe specifies 160 grams of beaten egg for approximately 460 grams of cooked dough, so add the egg gradually and stop when the mixture reaches the correct piping consistency. Use a ripe, active starter or a thick starter discard, as suggested in the original notes, and avoid letting the prepared choux mixture stand for an extended period before baking. The dough should be piped soon after mixing to help preserve its structure. Keep the whipped cream cold, and fill the pastries only when the shells have cooled completely. If the pastry shells become soft during storage, unfilled shells can be briefly warmed in the oven and cooled again before filling. For a neat finish, dust the powdered sugar over the assembled cream puffs just before serving. These practical details help you make sourdough cream puffs with crisp shells, a hollow center, and a smooth, creamy filling.
19. Frequently Asked Questions About Sourdough Cream Puffs
Can I use sourdough discard instead of active starter? The recipe is designed for ripe, active starter, but the supplied notes allow thick discard as an alternative. Keep in mind that the acidity and consistency of discard can vary, so the flavor and dough texture may differ slightly. Why did my cream puffs collapse? They may have needed more baking time, or the oven door may have been opened too early. The shells need to dry sufficiently before cooling. Can I prepare them ahead of time? Yes. Bake the shells ahead and store them unfilled, then prepare the whipped cream and assemble them nearer to serving time. Can I use another filling? Yes. Vanilla pastry cream, chocolate pastry cream, and other suitable fillings can be used instead of whipped cream. Why is my dough too runny? The eggs may have been added too quickly or the mixture may have needed a more careful check of its consistency. Add eggs gradually and stop when the dough forms a smooth V-shaped ribbon.
20. Why This Sourdough Cream Puff Recipe Is Worth Making
Sourdough cream puffs combine classic choux pastry techniques with a practical use for sourdough starter. The finished pastries are light enough for an afternoon snack but elegant enough to serve at a celebration, and the optional vanilla whipped cream keeps the filling simple and familiar. While choux pastry requires attention to temperature, egg consistency, and baking time, the method becomes easier once you understand the visual signs at each stage. The most important steps are cooking the dough until it forms a smooth ball, incorporating the eggs gradually, baking the shells until dry, and allowing them to cool fully before filling. Once you are comfortable with the basic recipe, you can experiment with different fillings and toppings without changing the pastry method. Whether you serve them with coffee, arrange them on a dessert platter, or make them for a special family gathering, these homemade sourdough cream puffs offer a satisfying combination of crisp pastry, gentle sourdough flavor, and creamy sweetness.