Who doesn’t love a rich, chocolatey treat that also packs a protein punch? This Chocolate Protein Ice Cream is not only delicious but also a healthier alternative to traditional ice creams. Made in the versatile Ninja Creami, this ice cream recipe is perfect for those who want to enjoy a creamy, chocolate indulgence without feeling guilty. Whether you’re aiming for a post-workout protein boost or a refreshing dessert, this recipe delivers on all fronts.
What You’ll Need for This Chocolate Protein Ice Cream
Before we dive into the step-by-step process, let’s take a look at the ingredients you’ll need for this chocolate protein ice cream:
- 1 Chocolate Premier Protein Shake: A protein-packed, chocolate-flavored base that adds creaminess and richness to your ice cream.
- 1 Tablespoon Unsweetened Cocoa Powder: Enhances the chocolate flavor while keeping it healthy.
- 1 Tablespoon Chocolate Sugar-Free Pudding Mix: This ingredient adds thickness and an extra layer of smoothness.
- 1/2 Cup Whole Milk: Whole milk makes the ice cream creamy and rich, but if you’re lactose intolerant or looking for a dairy-free alternative, you can substitute it with oat milk or any plant-based milk.
Now, let’s get started!
How to make
Step 1: Prepare the Ice Cream Base
To kick off the ice cream-making process, grab a medium-sized mixing bowl. Start by pouring in 1 Chocolate Premier Protein Shake. This will serve as the base for your ice cream, giving it that essential protein kick. The chocolate flavor in this shake provides a rich backdrop for the rest of the ingredients.
Next, whisk in 1 tablespoon of unsweetened cocoa powder. The cocoa powder intensifies the chocolate flavor, making this ice cream truly decadent. Plus, cocoa powder is a great source of antioxidants, giving you an extra health boost.
After the cocoa powder is fully incorporated, add in 1 tablespoon of chocolate sugar-free pudding mix. This pudding mix will give your ice cream an extra silky texture. You don’t need to prepare the pudding beforehand; simply add the powder directly into the mixture.
Finally, pour in 1/2 cup of whole milk. If you’re looking to make this ice cream dairy-free, feel free to swap out the whole milk for oat milk, almond milk, or any other plant-based alternative. The milk not only adds creaminess but also helps to blend all the ingredients together into a smooth consistency.
Once all your ingredients are in the bowl, whisk everything until fully combined and smooth.
Step 2: Freeze the Mixture
Now that your ice cream base is ready, it’s time to freeze it. Carefully pour the mixture into a Ninja Creami pint, ensuring that you don’t fill it beyond the max fill line. This is important to avoid overflow during the freezing and spinning process.
Once the mixture is in the pint, seal it with the lid and place it in your freezer. Make sure to place it on a flat surface to ensure an even freeze. The mixture needs to freeze for a minimum of 24 hours. This freezing time is essential to create a solid block that the Ninja Creami will transform into creamy ice cream.
Step 3: Spinning Time – Turn Your Mixture into Ice Cream
After the long wait, it’s finally time to spin your frozen mixture into a creamy dessert. Take the pint out of the freezer and get ready to assemble your Ninja Creami machine.
First, remove the lid from the pint. Then, place the pint into the Ninja Creami outer bowl. Secure the outer bowl with its lid, making sure it’s tightly in place. Once the pint and bowl are secured, place them into the Ninja Creami machine. Twist the outer bowl to the right until it locks into position.
Now, for the fun part – press the “Lite Ice Cream” button on your Ninja Creami. The machine will start spinning the frozen mixture into smooth, creamy ice cream. Since the recipe doesn’t contain a lot of sugar, using the “Lite Ice Cream” setting works best for getting that perfect texture.
Step 4: Fine-Tune the Creaminess
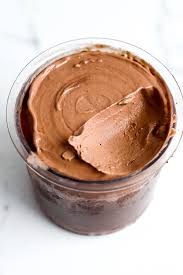
If your ice cream comes out crumbly after the first spin, don’t worry! This can happen when the mixture freezes too solidly. To fix this, add 1 tablespoon of milk (any kind will work) and press the “Re-Spin” button on your Ninja Creami. Continue re-spinning until you achieve your desired level of creaminess.
The texture should be smooth and soft but still hold its shape, just like regular ice cream. Repeat the re-spin process as necessary until you’re happy with the consistency.
Step 5: Serving and Storing Your Ice Cream
Your chocolate protein ice cream is now ready to enjoy! Scoop it out into a bowl and savor the rich, chocolatey goodness. This ice cream can be enjoyed right after it’s spun, but if you have leftovers, you can freeze them for later.
When you’re ready to eat the leftovers, let the pint sit on the counter for about 10 to 15 minutes to soften or microwave it for 10 to 15 seconds. This makes it easier to scoop and enjoy without having to re-spin.
Tips and Tricks for the Best Chocolate Protein Ice Cream
While this recipe is straightforward, there are a few tips and tricks to make sure your chocolate protein ice cream turns out perfect every time:
- Experiment with Different Protein Shakes: Premier Protein is a great option, but feel free to try other protein shakes. Just note that the flavor and texture may vary slightly depending on the brand.
- Mix in Extras: If you’re feeling adventurous, you can mix in extras like chocolate chips, nuts, or a swirl of peanut butter after the initial spin. Simply fold them in before re-spinning for a treat packed with texture and flavor.
- Freezing Leftovers: Leftover ice cream will harden in the freezer, so it’s best to let it sit out or microwave it briefly before serving. The re-spin function is always an option if you want to restore that freshly spun texture.
- Choose Your Milk: Whole milk provides a rich, creamy base, but if you prefer dairy-free, oat milk works well and adds a hint of sweetness. Almond milk and soy milk are also good alternatives, depending on your dietary preferences.
By following these tips, you can customize this chocolate protein ice cream to suit your taste preferences and dietary needs, all while keeping it healthy and protein-rich.
Frequently Asked Questions
Can I use a different protein shake?
Yes! While Premier Protein works great, other brands like Ripple or Orgain can also be used. The results might vary slightly in terms of texture and flavor, but the process will remain the same.
What if the ice cream is too hard or crumbly?
Simply add a tablespoon of milk and use the “Re-Spin” function to soften and smooth it out.
Do I need to re-spin leftovers?
It’s not necessary. Letting the ice cream sit for a few minutes or microwaving it for 10-15 seconds works just as well to soften it up.
What kind of pudding mix should I use?
We recommend Jell-O chocolate sugar-free pudding mix. The powder goes straight into the mixture without needing to be prepared beforehand.
