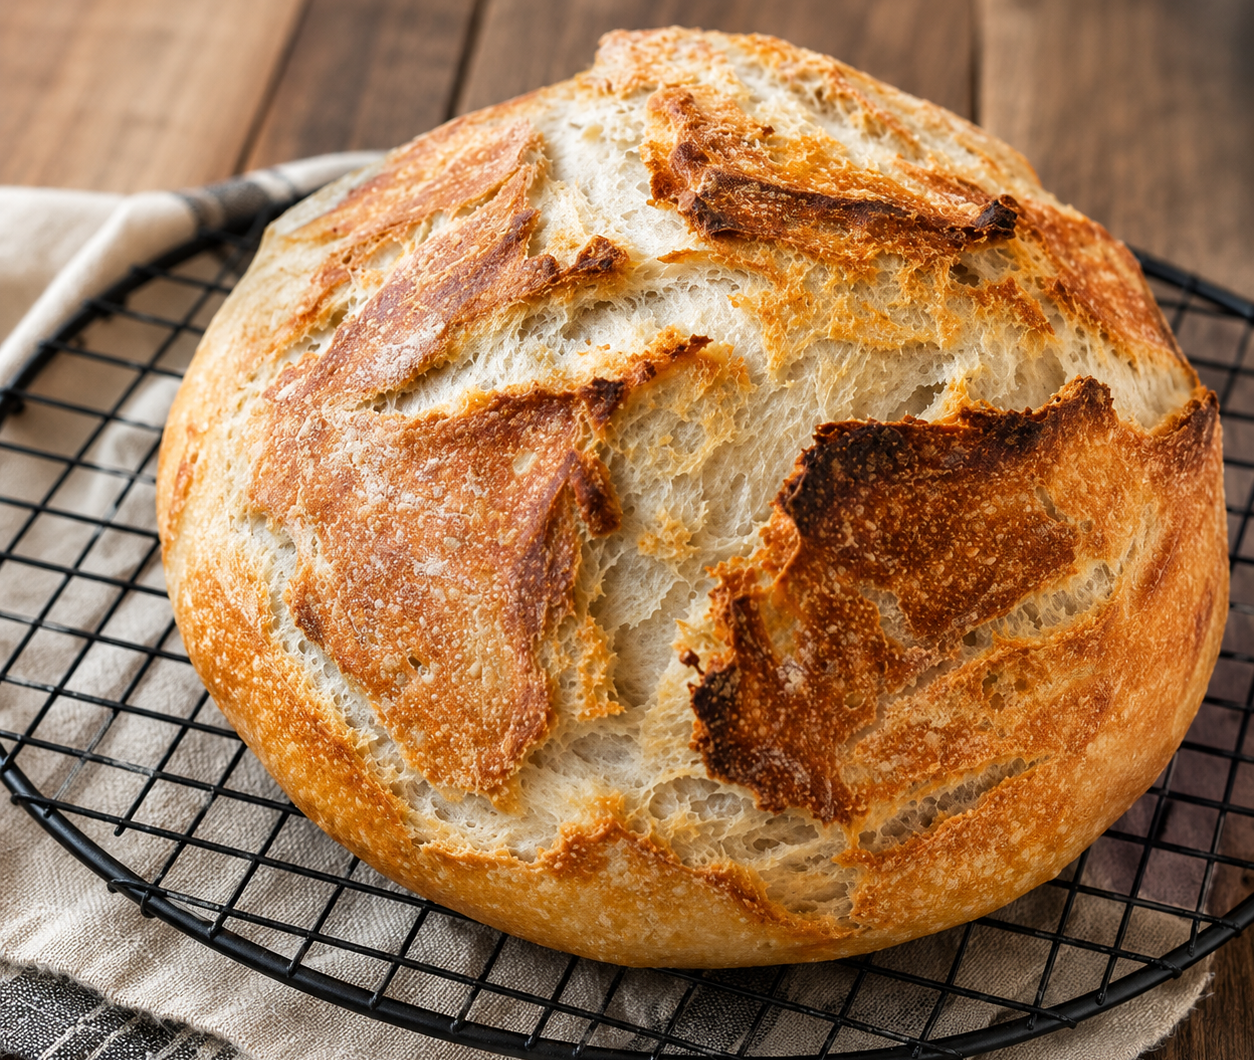
Sourdough discard bread is a simple way to turn leftover sourdough starter into a beautiful homemade loaf with a crisp crust, soft center, and gentle tangy flavor. Unlike traditional sourdough bread that depends entirely on wild yeast for fermentation, this easy sourdough discard bread recipe also uses active dry yeast, making the dough more dependable and approachable. The result is a rustic loaf that looks impressive but requires surprisingly little hands-on work.
Why This Sourdough Discard Bread Is Worth Making
If you regularly feed a sourdough starter, you probably know that discard can accumulate quickly. Instead of throwing it away, you can use it to create delicious homemade bread. This sourdough discard bread is especially convenient because it combines the flavor of fermented starter with the reliable rising power of yeast. The dough is mixed, left to ferment overnight, shaped the following day, and baked in a Dutch oven for a golden, crusty exterior.
What Makes This an Easy Sourdough Bread Recipe
Many people avoid sourdough baking because they assume it requires complicated techniques, precise timing, or a long list of special ingredients. This recipe keeps things much simpler. There is no need for an elaborate sourdough feeding schedule immediately before baking, and there is no complicated series of stretch-and-fold sessions throughout the entire fermentation. The sourdough discard contributes flavor and character, while the yeast helps the dough rise consistently.
The Role of Sourdough Discard in the Dough
Sourdough discard is the portion of starter that remains after feeding or maintaining a sourdough culture. Although discard may not always have enough strength to produce a tall loaf on its own, it is still packed with fermented flavor. In this recipe, the discard works alongside active dry yeast. That combination gives the finished bread a pleasant sourdough taste without requiring a fully naturally leavened dough.
Understanding the Simple Ingredient List
One of the biggest advantages of this homemade sourdough bread recipe is its short ingredient list. You need water, yeast, salt, sourdough discard, and all-purpose flour. These basic ingredients work together to create a rustic loaf with a chewy crumb and crisp crust. Because the ingredient list is uncomplicated, measuring accurately becomes especially important. Using a kitchen scale can make the dough more consistent from one bake to another.
Getting the Yeast Ready for the Dough
The first important step is preparing the yeast mixture. The water should be warm, around 110 degrees, rather than extremely hot. Water that is too hot can damage or kill the yeast, which may prevent the dough from rising properly. Once the active dry yeast is stirred into the warm water, allow it to rest for about five minutes. A bubbly appearance is a useful sign that the yeast is active and ready to use.
Combining the Flour and Salt
While the yeast rests, prepare the dry ingredients. Place the flour and salt into a large bowl and whisk or stir them together. Distributing the salt through the flour before adding the wet ingredients helps ensure that the finished dough is evenly seasoned. Salt also plays an important role in bread dough because it contributes flavor and affects the structure and fermentation of the dough.
Mixing the Sourdough Discard Bread Dough
Once the yeast mixture is ready, add the sourdough discard and the yeast-and-water mixture to the flour and salt. Stir everything together with a large spoon or silicone spatula. At this stage, the mixture will look rough and shaggy rather than smooth and elastic. That is completely normal. The dough does not need to look like a finished loaf immediately after mixing because the long fermentation will give the flour time to hydrate and the dough time to develop.
Why the Overnight Fermentation Matters
The long fermentation is one of the easiest features of this recipe. After mixing, cover the bowl with a lid or plastic wrap and leave it at room temperature for approximately 12 hours. During this time, the yeast works through the dough while the sourdough discard contributes fermented flavor. The dough should become noticeably larger and more developed by the following day. Room temperature can influence fermentation speed, so the exact timing may vary.
How to Shape a Rustic Sourdough Loaf
After the overnight fermentation, the dough will be soft and somewhat sticky. Turn it onto a lightly floured work surface and resist the temptation to add excessive flour. Too much additional flour can make the bread heavier and less tender. Instead, use a gentle shaping method. Pull the sides of the dough toward the center several times, creating a tighter ball. This simple process helps organize the dough and gives the loaf more structure.
Creating Dough Tension for Better Oven Rise
Dough tension is an important part of shaping sourdough discard bread. After bringing the edges toward the center, turn the dough seam-side down and gently pull it toward yourself across the work surface. Rotate the dough and repeat the movement several times. This creates surface tension around the loaf. A well-shaped dough ball is better able to hold its structure as it rises and expands in the hot Dutch oven.
The Short Second Rise
Once shaped, place the dough on parchment paper and cover it with a clean towel. Let it rest in a warm area for approximately 30 minutes to one hour. This shorter second rise gives the shaped loaf time to relax and expand before baking. You do not necessarily need to wait for an enormous increase in size during this stage. The dough will also receive substantial heat-driven expansion once it enters the preheated Dutch oven.
Why a Dutch Oven Creates a Crisp Crust
A Dutch oven is especially useful when making rustic homemade bread because it traps steam around the dough during the first part of baking. Steam helps the crust remain flexible while the loaf expands, which encourages better oven spring. Later, removing the lid allows moisture to escape and gives the crust an opportunity to become deeply golden and crisp. This technique is one of the easiest ways to achieve bakery-style crust at home.
Preheating the Dutch Oven Properly
Before baking, place the Dutch oven and its lid inside the oven while the oven is heating to 450 degrees. Preheating the baking vessel is important because the dough immediately encounters a very hot surface when it is placed inside. After transferring the bread to the Dutch oven, reduce the oven temperature to 400 degrees. This creates a strong initial burst of heat while allowing the loaf to bake thoroughly without burning the crust too quickly.
Scoring the Sourdough Bread
Scoring the surface of the dough is optional, but it can improve the appearance of the finished loaf and provide a controlled place for the bread to expand. A bread lame or sharp knife can be used to make a small slash across the surface. If you prefer a rustic-looking loaf, a simple cut is enough. The most important thing is to handle the risen dough gently so you do not unnecessarily deflate it before baking.
Baking the Loaf Until Golden Brown
The bread begins baking with the Dutch oven covered. Keep the lid on for about 30 minutes, allowing the trapped steam to support the crust and oven spring. After that, remove the lid and continue baking for another 20 to 30 minutes. The bread should develop a rich golden-brown crust. Since ovens vary, watch the loaf closely toward the end of baking and look for a fully baked, deeply colored exterior.
Cooling Homemade Bread Before Slicing
As tempting as it may be to cut into the bread immediately, cooling is an important part of the process. The loaf should cool completely before slicing. The interior continues to settle as it cools, allowing the crumb to develop its final texture. Cutting too soon can cause the inside to appear gummy or compressed. Once fully cooled, use a serrated bread knife to cut clean slices without crushing the delicate crumb.
How to Serve Sourdough Discard Bread
There are countless ways to enjoy this homemade sourdough bread. Thick slices can be served with butter, jam, honey, or your favorite spread. The bread also works beautifully for sandwiches because the chewy crumb provides enough structure to hold fillings. Toasting the slices brings out the flavor of the crust and creates a crisp surface that pairs well with eggs, soups, roasted vegetables, or simple breakfast toppings.
How to Store Homemade Sourdough Bread
For the best texture, allow the loaf to cool completely before storing it. Keep the bread in a suitable bread bag or another container that protects it from excessive moisture while preventing it from becoming unnecessarily dry. If you know you will not finish the loaf quickly, slicing and freezing portions can be a convenient option. Individual slices can be removed as needed and warmed or toasted directly.
How This Bread Uses Sourdough Discard
Recipes that use sourdough discard are useful for reducing food waste while creating something delicious. Instead of treating discard as an unwanted by-product, you can incorporate it into pancakes, crackers, muffins, cakes, or bread. This particular sourdough discard bread is especially practical because it uses a full cup of discard and requires no complicated ingredients. The result is a flavorful loaf that makes regular sourdough maintenance more rewarding.
Choosing the Right Flour
The recipe calls for all-purpose flour, and it is an excellent choice for producing a balanced loaf with a soft, chewy interior. The flour should be measured accurately to avoid adding too much. If flour is scooped directly from a container with a measuring cup, it can become compressed and result in a heavier dough. A digital kitchen scale is the easiest way to maintain consistent measurements and achieve more predictable baking results.
Managing Sticky Bread Dough
A sticky dough does not automatically mean something has gone wrong. Bread dough naturally contains a significant amount of water, and the texture can change throughout fermentation. When shaping the loaf, lightly flour the work surface and your hands if necessary, but avoid adding large amounts of flour. The goal is to create enough surface tension to shape the dough without turning the mixture into a stiff, dry mass.
Notes for Better Sourdough Discard Bread
The shaping stage deserves extra attention because it can make a noticeable difference in the final loaf. Taking a few additional minutes to bring the dough edges toward the center and then create tension by pulling the dough across the work surface helps the dough maintain its shape. The bread can still turn out well without elaborate shaping, but proper tension generally encourages a more attractive rise and stronger structure.
Yeast Temperature and Fermentation Notes
When working with active dry yeast, temperature matters. The water should be warm rather than hot, with approximately 110 degrees being the target used in this recipe. Extremely hot water can interfere with yeast activity. The fermentation period may also change depending on the temperature of your kitchen. A warmer room can speed up the dough, while a cooler environment may require additional time. Focus on the appearance and development of the dough rather than the clock alone.
Why Active Dry Yeast Works Well Here
Active dry yeast is particularly convenient for this recipe because it provides reliable leavening while allowing the sourdough discard to contribute its distinctive flavor. This makes the bread approachable for both experienced sourdough bakers and people who are still learning how fermentation works. The yeast does not replace the sourdough discard; instead, the two ingredients work together to produce a loaf that has both rustic character and dependable rise.
A Practical Bread Recipe for Beginners
If you are searching for an easy sourdough discard bread recipe for beginners, this method is a useful starting point. The process teaches several important bread-making skills without demanding complicated techniques. You learn how to activate yeast, mix a shaggy dough, ferment overnight, shape a loaf, create dough tension, preheat a Dutch oven, and bake with steam. These skills can also be applied to many other homemade bread recipes.
Easiest No-Knead Sourdough Discard Bread
This easy sourdough discard bread is a rustic homemade loaf with a crisp golden crust, soft chewy crumb, and mild tangy sourdough flavor. Active dry yeast helps the dough rise reliably, while sourdough discard adds fermented depth. The dough ferments overnight before being shaped and baked in a preheated Dutch oven for a beautiful crust.
12
servings10
minutes50
minutes174
kcal1
hourIngredients
1 1/4 cup water, 295g
2 1/2 teaspoons yeast or one packet, 7g
2 teaspoons salt, 10g
1 cup sourdough discard, 255g
4 cups all-purpose flour, 575g
Directions
- Prepare the Yeast
- Warm the water to approximately 110°F.
Add the active dry yeast and stir gently.
Leave the mixture for about 5 minutes, or until the yeast becomes bubbly. - Mix the Dough
- Place the flour and salt into a large mixing bowl and combine.
Add the sourdough discard along with the yeast and water mixture.
Stir with a large spoon or silicone spatula until all of the ingredients come together. The dough will look shaggy and sticky. - Overnight Fermentation
- Cover the bowl with a lid or plastic wrap.
Leave the dough at room temperature for approximately 12 hours. - Shape the Loaf
- The following day, preheat the oven to 450°F and place a Dutch oven with its lid inside to heat.
Turn the fermented dough onto a lightly floured work surface.
Pull the edges of the dough toward the center several times to form a tighter round shape.
Turn the dough over so the seam is underneath.
Gently pull the dough toward yourself across the work surface several times, rotating it between pulls to create surface tension. - Second Rise
- Transfer the shaped dough onto parchment paper.
Cover it with a clean towel.
Let it rise in a warm place for 30 minutes to 1 hour. - Bake the Bread
- If desired, make a small slash across the top of the dough using a lame or sharp knife.
Carefully place the parchment and dough into the preheated Dutch oven.
Cover with the lid.
Place the Dutch oven in the oven and reduce the temperature to 400°F.
Bake covered for approximately 30 minutes.
Remove the lid and continue baking for another 20–30 minutes, or until the loaf is beautifully golden brown. - Cool Before Serving
- Remove the bread from the Dutch oven.
Allow the loaf to cool completely before slicing.
Serve with butter, spreads, as sandwich bread, or alongside your favorite meals.
Notes
- Notes
For Better Dough Structure
Spend a little extra time creating tension during shaping. Bringing the edges toward the center and then gently pulling the dough toward yourself helps create a tighter surface and can encourage better oven rise.
Yeast Temperature
Keep the water around 110°F when dissolving the yeast. Water that is excessively hot may damage the yeast and interfere with the rise.
For a Crisp Crust
A Dutch oven is recommended because the covered environment traps steam around the dough during the first part of baking. Removing the lid later allows the crust to dry and become golden and crisp.
Flour and Sticky Dough
The dough may feel sticky after the overnight fermentation. Use only a light amount of flour on the work surface and avoid adding excessive flour, which can make the finished bread dense.
Cooling
Let the loaf cool completely before cutting. Cooling allows the interior crumb to finish setting and helps prevent a gummy texture.
Nutrition Facts
- Serving Size: 1 g
- Total number of serves: 12
- Calories: 174kcal
- Fat: 1g
- Saturated Fat: 0.1g
- Polyunsaturated Fat: 0.2g
- Cholesterol: 0.5mg
- Sodium: 480mg
- Potassium: 55mg
- Carbohydrates: 36g
- Fiber: 1g
- Sugar: 0.2g
- Protein: 5g
- Calcium: 8mg
- Iron: 2mg