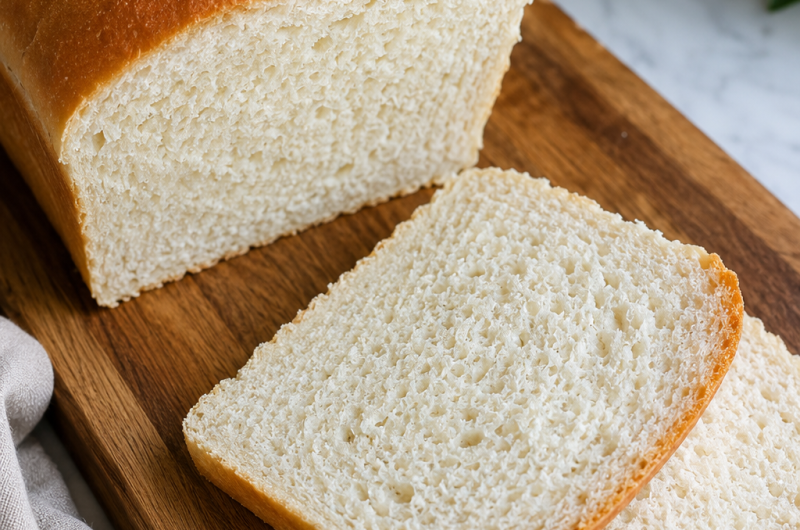
Fluffy sourdough sandwich bread is one of those homemade breads that earns a permanent place in the kitchen. This Amish-style sourdough bread has a soft crumb, tender texture, lightly sweet flavor, and a golden crust that makes it suitable for everyday sandwiches, toast, breakfast, or a simple slice spread with butter and jam. The dough uses a sourdough preferment rather than commercial yeast, giving the loaf its characteristic fermented flavor while maintaining a soft, approachable texture.
This easy sourdough sandwich bread recipe is especially useful for anyone who wants to bake a soft white loaf at home without ending up with an overly dense or crusty artisan-style bread. The combination of whole milk, butter, honey or sugar, and a properly prepared sourdough preferment creates a tender loaf that slices neatly once completely cooled. It is a practical recipe for family breakfasts, school lunches, sandwiches, and homemade toast.
What Makes This Sourdough Bread So Soft
The texture of homemade sandwich bread depends on several factors, including hydration, kneading, fermentation, shaping, and baking. In this recipe, whole milk and butter help create a softer crumb, while honey or sugar contributes sweetness and supports the tender texture. The sourdough preferment provides the fermentation needed to develop the dough while adding the deeper flavor associated with naturally leavened bread.
Unlike a rustic sourdough boule, this loaf is designed to be baked in a 9 x 5-inch loaf pan. The pan supports the dough as it rises, helping create the familiar rectangular shape needed for sandwiches. Proper fermentation is equally important because the dough needs enough time to become airy and expanded before baking. Rushing the rising stages can result in a heavier loaf with a tighter crumb.
Understanding the Sourdough Preferment
The first major stage of this recipe is preparing the sourdough preferment. It combines slightly warm water, fed sourdough starter, and all-purpose flour, bread flour, or all-purpose Kamut flour. The mixture is left to rise until it becomes doubled in size and bubbly. This process prepares an active base that can provide the fermentation needed for the final bread dough.
A lively sourdough starter is essential for good results. The starter should have been fed and should show clear signs of activity before it is used. The original recipe recommends feeding the starter approximately 8 to 12 hours before making the preferment. The exact timing can vary according to room temperature and starter activity, so visual signs such as bubbles and a significant increase in volume are more useful than relying only on the clock.
Preparing an Active Starter
For naturally leavened sandwich bread, the starter should be active rather than freshly removed from the refrigerator or completely dormant. A fed starter that has doubled in size and contains visible bubbles indicates that fermentation is underway. This active starter is what allows the preferment to rise and eventually helps the final dough develop its structure.
The original recipe provides a typical starter feeding ratio using sourdough starter, slightly warm water, and all-purpose flour. The important point is that the starter used for the preferment should be fed and active. If your starter is slow to rise, the preferment may also require more time. Watch the dough rather than forcing it to follow a fixed schedule.
Making the Overnight-Style Preferment
To prepare the preferment, combine the slightly warm water, fed sourdough starter, and flour in a dough tub, large jar, or bowl. Stir thoroughly so the flour is evenly hydrated and there are no obvious dry areas. Once mixed, cover the container and leave it at room temperature until the mixture has doubled and become bubbly.
The preferment may take approximately 8 to 12 hours according to the original instructions. A warmer kitchen can encourage faster fermentation, while a cooler environment may require more time. The goal is an active, expanded mixture rather than a specific number of hours. Using the preferment when it is lively helps establish a strong foundation for the final sourdough bread.
Warming the Milk and Butter Mixture
Once the preferment is ready, the wet ingredients for the bread dough are gently warmed. The butter, honey or sugar, whole milk, and sea salt are placed in a small saucepan over low heat. The mixture should become warm enough for the butter to melt, but it should not be overheated.
After warming, allow the mixture to cool until it is slightly warmer than room temperature, around 105°F. This temperature is specifically provided in the original instructions. Allowing the mixture to cool before combining it with the sourdough preferment is an important step because excessively hot ingredients can interfere with the natural fermentation process.
Combining the Bread Dough
The prepared preferment goes into the bowl of a stand mixer fitted with a dough hook, followed by the warmed milk mixture. The ingredients are mixed together before the dough is allowed to sit for approximately 20 minutes. This short resting period gives the flour time to begin absorbing the liquid and helps prepare the dough for kneading.
After the initial rest, the flour is added. The dough is then kneaded using the stand mixer on medium-low speed. Proper kneading develops gluten, which gives the dough the elasticity and strength needed to hold fermentation gases. A well-developed dough should become smoother and should pull away from the sides of the mixing bowl.
Getting the Dough Consistency Right
The dough should feel soft rather than stiff. This is an important characteristic of the recipe because adding too much flour can create a dense finished loaf. The original instructions allow for an additional ¼ cup of flour if the dough is not pulling away from the sides of the stand mixer bowl.
It is better to evaluate the dough before adding extra flour rather than automatically adding more. Flour absorbs liquid differently depending on the type, brand, humidity, and storage conditions. If the dough is soft and gradually becoming elastic during kneading, it may not need additional flour. The objective is a workable, supple dough rather than a dry one.
Kneading for a Tender Crumb
The dough is kneaded for approximately 10 to 12 minutes on medium-low speed. During this stage, the gluten network develops and the dough becomes more cohesive. Proper kneading is especially important for sandwich bread because the loaf needs enough strength to rise vertically in the pan while still producing a soft, sliceable crumb.
Avoid judging the dough only by how long it has been mixing. Look at its texture and behavior. The finished dough should be soft and elastic and should pull away from the sides of the bowl. If it remains extremely loose, the additional flour suggested in the original instructions can be incorporated carefully rather than adding a large quantity all at once.
The First Sourdough Rise
After kneading, the dough begins its first fermentation period. Cover the dough and allow it to rise at room temperature for approximately 2 to 3 hours. During this stage, the natural fermentation from the sourdough starter develops flavor and causes the dough to expand.
Temperature plays a major role in sourdough fermentation. A warm kitchen can speed up the process, while a cool kitchen can slow it down. Rather than expecting the dough to behave exactly according to a timer, observe its volume and texture. The original recipe recommends allowing the dough to rise until it has progressed significantly before moving on to the next stage.
Stretching and Folding the Dough
After the initial 2 to 3 hours of rising, the dough is gently punched down and stretched and folded a few times. This helps redistribute the fermentation activity and can strengthen the dough. Stretch-and-fold movements are a simple way to handle sourdough without aggressively kneading it again.
The dough should be treated gently during this stage. There is no need to completely flatten it or remove every bubble. The purpose is to reorganize the dough and give it additional strength before the second fermentation. Once the folds are complete, the dough is allowed to rise again.
Completing the Bulk Fermentation
The dough receives another 2 to 3 hours of rising time after the stretch-and-fold stage. During this period, it should become noticeably larger and more aerated. The original instructions indicate that the dough should double in size, and it should spring back when checked.
If the dough does not appear ready, give it additional fermentation time. Sourdough bread does not always follow an exact timetable because starter strength, room temperature, flour, and dough temperature all affect fermentation. A loaf that is properly fermented generally has a better texture than one that has been rushed simply to meet a specific clock time.
Shaping the Sandwich Loaf
Once the dough has completed its main rise, it is shaped into a loaf and transferred to a 9 x 5-inch loaf pan. Shaping is important because it determines how the dough sits inside the pan during its final rise. A properly shaped loaf will generally rise upward and create a more even sandwich-bread structure.
The dough should be handled with enough care to maintain its developing structure. Shape it into a cohesive loaf that fits comfortably in the pan. Once it has been placed into the pan, it is ready for the final rise. Keeping the dough covered during this stage helps prevent the surface from drying out.
The Final Proof
The shaped dough rests in the loaf pan for approximately 2 hours, or until it has doubled in size. This final proof is important because it allows the dough to become sufficiently airy before entering the oven. Underproofed dough can produce a dense loaf, while properly fermented dough should look noticeably expanded and ready for baking.
The original recipe mentions placing the dough tub upside down over the loaf pan while the dough rises. This provides a simple way to cover the dough without letting plastic wrap or a cloth rest directly against its surface. Whatever covering method you use, the main objective is to prevent the dough from drying while allowing enough room for it to expand.
Preparing the Oven
When the final rise is nearly complete, preheat the oven to 375°F. The oven should be fully heated before the loaf goes inside because consistent baking temperature helps the bread rise properly during the early part of baking.
Before baking, make a small cut across the top of the risen loaf. This gives the bread a controlled area for expansion during baking. Once the oven reaches the required temperature, the loaf can be transferred carefully into the oven and baked for approximately 45 minutes.
Baking the Sourdough Sandwich Bread
The bread bakes at 375°F for approximately 45 minutes. During baking, the dough expands, the crumb sets, and the crust develops a golden color. Because ovens vary, it is worth keeping an eye on the loaf during the final part of baking.
If the top begins to brown too quickly, the original instructions recommend covering the loaf with foil. This protects the surface while allowing the inside of the bread to continue baking. The goal is a fully baked loaf with a pleasantly golden top rather than an excessively dark crust.
Cooling the Freshly Baked Loaf
After baking, let the bread cool in the pan for approximately five minutes. The top can then be brushed with butter while the loaf is still warm. This adds a soft finish to the crust and gives the freshly baked bread an appealing buttery surface.
After the brief rest, carefully turn the loaf out onto a cooling rack. Allow it to finish cooling completely before slicing. Cutting homemade bread too soon can compress the crumb because the interior continues to set as the loaf cools. Waiting patiently results in cleaner slices and a better overall texture.
How to Use This Homemade Sandwich Bread
This fluffy sourdough sandwich bread is versatile enough for everyday meals. Its soft texture makes it suitable for classic sandwiches, grilled sandwiches, toast, breakfast plates, and simple snacks. Because the loaf has a mild sweetness from honey or sugar and a tender crumb from milk and butter, it also works particularly well with fruit preserves or jam.
For breakfast, slices can be toasted and topped with butter, jam, or another favorite spread. At lunchtime, the bread can be paired with sandwich fillings without overwhelming them. The soft crumb is also convenient for children and adults who prefer traditional white sandwich bread over a firm artisan loaf.
Honey or Sugar in the Bread
The ingredient list provides a choice of raw honey or sugar. Either option contributes sweetness to the dough while complementing the richness of milk and butter. Since the recipe specifically allows both, you can use the option that is already available in your kitchen without changing the quantity specified.
The sweetener is not intended to make the loaf taste like cake. Instead, it gives the sandwich bread a mild sweetness that works well with both savory and sweet toppings. This balance is one of the characteristics that makes the loaf suitable for everyday sandwiches as well as breakfast toast.
Choosing the Flour
The recipe gives flexibility for the flour used in the preferment, listing all-purpose flour, bread flour, or all-purpose Kamut flour. For the main bread dough, all-purpose flour or bread flour can be used. These choices allow the recipe to fit different pantry preferences while keeping the basic method unchanged.
Regardless of the flour selected from the original options, measuring by weight with a digital kitchen scale is helpful. Weight measurements provide more consistency than relying on cups, particularly for sourdough recipes where hydration affects dough texture and fermentation. The original recipe specifically includes a digital kitchen scale among the recommended equipment.
Why a Digital Kitchen Scale Helps
Sourdough baking benefits greatly from accurate measurements because even small changes in flour or liquid can affect the dough. A digital scale allows the water, starter, flour, butter, honey or sugar, and salt to be measured precisely according to the recipe. This can make the dough easier to reproduce from one bake to the next.
Using grams is particularly helpful when maintaining a sourdough starter because starter hydration and feeding ratios are generally easier to manage by weight. Once you become accustomed to weighing ingredients, the process becomes quick and straightforward, and it reduces the guesswork that can come from measuring flour by volume.
Notes for Better Sourdough Sandwich Bread
Use an active, recently fed sourdough starter that has doubled and become bubbly before preparing the preferment. Give the preferment enough time to become fully active rather than using it simply because a certain number of hours has passed. During the final proof, look for a noticeable increase in volume. These visual cues are valuable because sourdough fermentation changes with temperature and starter strength.
Keep the dough soft rather than making it stiff with excessive flour. If necessary, follow the original instruction and add up to ¼ cup more flour when the dough does not pull away from the mixer bowl. During baking, protect the top with foil if it begins to brown too quickly. Finally, allow the finished loaf to cool on a rack before slicing so the crumb has time to set properly.
Frequently Asked Questions About Sourdough Sandwich Bread
Can I use bread flour instead of all-purpose flour?
Yes. The original recipe specifically provides all-purpose flour or bread flour as options for the main dough. The preferment also allows all-purpose flour, bread flour, or all-purpose Kamut flour. Use the flour option specified in the ingredient list that best suits your pantry and preferred baking method.
How do I know when my sourdough starter is ready?
The starter should have been fed and should have doubled in size with visible bubbles. These are signs of active fermentation. The original instructions suggest feeding the starter 8 to 12 hours before using it to make the preferment, but the actual readiness of the starter is best judged by its activity and volume.
Why is my sourdough sandwich bread dense?
Dense bread can result from insufficient fermentation, an inactive starter, excessive flour, or stopping the rising process too early. Make sure the preferment is bubbly and doubled before using it, and allow the dough enough time to rise during both fermentation stages and the final proof.
Can I make this bread without a stand mixer?
The original recipe lists a stand mixer with a dough hook as equipment and uses it for kneading. If you do not have one, the dough can generally be handled manually, but the kneading process will require more hands-on work. The important goal is to develop a soft, elastic dough rather than relying solely on a specific mixing machine.
Why should I let the bread cool before slicing?
Freshly baked bread continues to set after it leaves the oven. Slicing immediately can compress the warm crumb and make the interior appear gummy or uneven. Allowing the loaf to cool fully on a wire rack gives the crumb time to stabilize, resulting in cleaner slices and a better sandwich-bread texture.
Serving Ideas for Fluffy Sourdough Bread
Fresh slices of this sourdough sandwich bread can be served in many ways. For a simple breakfast, toast a slice and spread it with butter and jam. For lunch, use two slices to create a traditional sandwich filled with your favorite ingredients. The mild flavor of the bread makes it flexible enough for both sweet and savory combinations.
The loaf can also be cut into thicker slices for French toast or toasted until lightly crisp for breakfast plates. Its soft texture makes it a useful everyday bread rather than a loaf reserved for special occasions. Once you have a successful batch, you may find yourself using it for nearly every meal that calls for sliced bread.