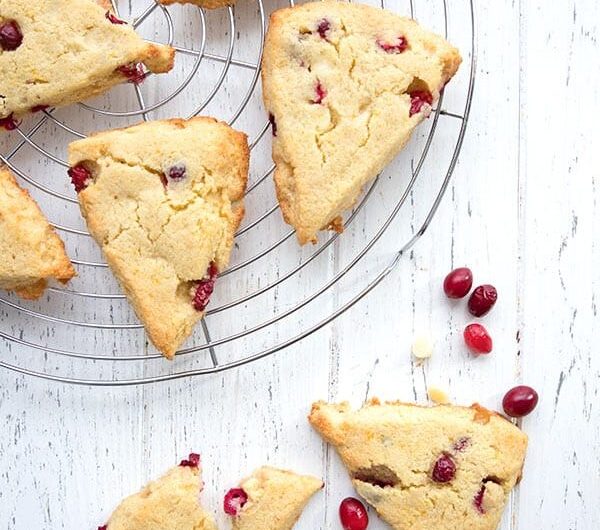
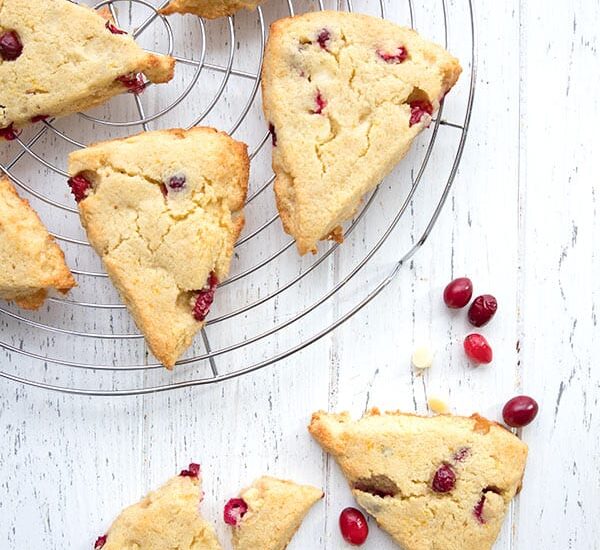
These gluten-free cranberry orange scones are soft, flaky, and brimming with the vibrant flavors of fresh cranberries and zesty oranges. The buttery crumb and sweet orange glaze make them an irresistible treat, perfect for breakfast, brunch, or even a cozy afternoon snack. Whether you’re gluten-free or not, these scones will soon become a go-to holiday favorite, especially with their simple preparation process and versatile ingredients.
Ingredient Insights
Gluten-Free Flour
Choosing the right gluten-free flour blend is crucial for achieving the perfect texture in these scones. Look for a flour blend that provides structure and isn’t too starchy, like Bob’s Red Mill 1-to-1 Gluten-Free Baking Flour or a homemade mix. Avoid blends that contain too much cornstarch, such as Cup4Cup, as they can create a denser batter. If the flour blend does not include xanthan gum, be sure to add a teaspoon to improve binding and texture.
Fresh Oranges
To get the best orange flavor, use both the zest and juice from fresh oranges. Organic oranges are recommended, especially when using the zest, as they are free from pesticides. Always zest your oranges before juicing, as zesting is much easier when the fruit is whole.
Cranberries
Fresh cranberries offer a tart, bright flavor that balances the sweetness of the orange and glaze. If you’re using frozen cranberries, there’s no need to thaw them—just give them a rough chop before mixing into the batter. While dried cranberries can be used, they won’t provide the same sharpness or intensity as fresh ones.
Buttermilk
For soft, tender scones, buttermilk is a must. If you don’t have buttermilk, you can make a homemade substitute by adding 1 tablespoon of vinegar or lemon juice to 1 cup of milk. However, the texture and flavor of scones made with actual buttermilk tend to be superior.
Cold Butter
Using cold, unsalted butter helps create the signature flaky texture of scones. The cold butter creates steam pockets as it melts during baking, leading to a light, airy crumb. For a non-dairy option, use a dairy-free butter substitute, but ensure it’s the solid type and not a spreadable version.
Step-by-Step Instructions to Make Gluten-Free Cranberry Orange Scones
1. Prep Your Baking Sheet
Line a baking sheet with parchment paper. This prevents the scones from sticking and allows for easy cleanup.
2. Combine Dry Ingredients
In a small bowl, sift or whisk together the gluten-free flour, baking powder, and kosher salt. Set this aside. This process helps to evenly distribute the leavening agents and salt throughout the mixture, ensuring an even rise during baking.
3. Prepare the Cranberries
Rinse the fresh cranberries and pat them dry with a clean kitchen towel. Remove any that look past their prime, and give the rest a rough chop. For frozen cranberries, skip the thawing process—simply chop and use them as is.
4. Infuse Sugar with Orange Zest
In a large bowl, combine the granulated sugar and freshly grated orange zest. Use your fingers to rub the zest into the sugar, releasing the essential oils and infusing the sugar with a vibrant orange flavor.
5. Mix in the Butter
Cut the cold butter into small cubes, or if it’s easier, grate it using a box grater. Add the butter to the dry mixture and incorporate it using a pastry blender, fork, or your clean hands. You’re aiming for pea-sized crumbs that will melt into flaky layers during baking.
6. Prepare Wet Ingredients
In a separate bowl, whisk together the buttermilk, cold egg, vanilla extract, and freshly squeezed orange juice until frothy. This mixture will provide moisture and flavor while helping to bind the ingredients together.
7. Combine Wet and Dry Ingredients
Pour the wet ingredients into the bowl with the flour and butter mixture. Add the chopped cranberries. Stir everything gently with a spatula until the dough just comes together. The dough may look shaggy, but this is normal.
8. Shape the Dough
Transfer the dough onto the prepared baking sheet. Knead it briefly—about 30 seconds—until it forms a cohesive ball. Shape the dough into a 7-inch circle, about ¾ to 1 inch thick. If the dough is sticky, sprinkle a bit of extra gluten-free flour to make it easier to handle.
9. Chill the Dough
Place the dough in the fridge for at least 10 minutes. Chilling the dough firms up the butter, which will help create the flaky texture you want in a scone. If desired, you can refrigerate the dough for up to 48 hours before baking.
10. Preheat the Oven
While the dough is chilling, preheat your oven to 400°F (200°C).
11. Cut and Brush
Once the dough is chilled, remove it from the fridge and cut it into eight wedges using a sharp knife. Arrange the wedges on the prepared baking sheet. Lightly brush the tops of each scone with buttermilk and sprinkle with raw sugar for extra crunch and sweetness.
12. Bake
Bake the scones in your preheated oven for 22–26 minutes or until golden brown. The scones should be slightly firm to the touch, with a light golden hue on the edges. Let them cool for at least 10 minutes on the baking sheet before transferring to a wire rack.
Sweet Orange Glaze
1. Prepare the Glaze
In a small bowl, whisk together the powdered sugar and freshly squeezed orange juice until smooth. If the glaze is too thick, add more juice a little at a time until it reaches a drizzling consistency.
2. Drizzle and Decorate
Once the scones have cooled completely, use a spoon to drizzle the glaze over the top. If desired, sprinkle additional orange zest on top for an extra burst of color and flavor. Allow the glaze to set before serving.
Storing and Freezing
Storage Tips
Scones are best enjoyed fresh, but you can store leftovers in an airtight container at room temperature for up to three days. To refresh them, warm them in the oven or microwave before serving.
Freezing Tips
To freeze baked scones, place them in a freezer-safe container for up to two months. Thaw at room temperature before serving. Alternatively, you can freeze the unbaked dough. Cut the dough into wedges, freeze them until solid, then transfer to a freezer bag. When ready to bake, place the frozen scones directly in the oven and add an additional 4–6 minutes to the baking time.
Expert Tips for the Perfect Scones
Brush with Buttermilk: This adds a golden color and helps the sugar topping adhere.
Use Cold Ingredients: Cold butter, eggs, and buttermilk create the flakiest scones.
Chop the Cranberries: This prevents large pieces of fruit from sinking to the bottom.
Avoid Overmixing: Stir just until the dough comes together to avoid tough scones.
Chill the Dough: A quick chill before baking helps the scones rise better and stay flakier.
Gluten Free Cranberry Orange Scones
These easy-to-make gluten-free cranberry orange scones are tender and flaky with fresh cranberries and a sweet orange glaze. Perfect for breakfast, brunch, or a holiday treat!
25
minutes25
minutes50
minutesIngredients
Zest from 2 oranges (about 1 tbsp)
100 g granulated sugar
300 g gluten-free all-purpose flour
14 g baking powder
½ tsp kosher salt
113 g unsalted butter, cold
125 g buttermilk
1 large egg, cold
25 g fresh orange juice
1 tsp vanilla extract
100 g fresh cranberries, roughly chopped
Raw sugar (for topping)
Extra buttermilk (for brushing)
- Sweet Orange Glaze
120 g powdered sugar
30-40 g orange juice
Directions
- Prepare baking sheet: Line with parchment paper.
- Mix dry ingredients: Whisk flour, baking powder, and salt.
- Chop cranberries: Prepare fresh or frozen cranberries.
- Infuse sugar: Mix sugar and orange zest.
- Cut in butter: Add cold butter and work into dry ingredients.
- Mix wet ingredients: Whisk buttermilk, egg, orange juice, and vanilla.
- Form dough: Combine wet and dry ingredients. Add cranberries.
- Shape: Knead dough and form a circle.
- Chill: Refrigerate dough for 10 minutes.
- Preheat oven: Set to 400°F (200°C).
- Cut and bake: Slice into wedges, brush with buttermilk, and sprinkle with sugar. Bake for 22–26 minutes.
- Cool and glaze: Once cool, drizzle with orange glaze.

