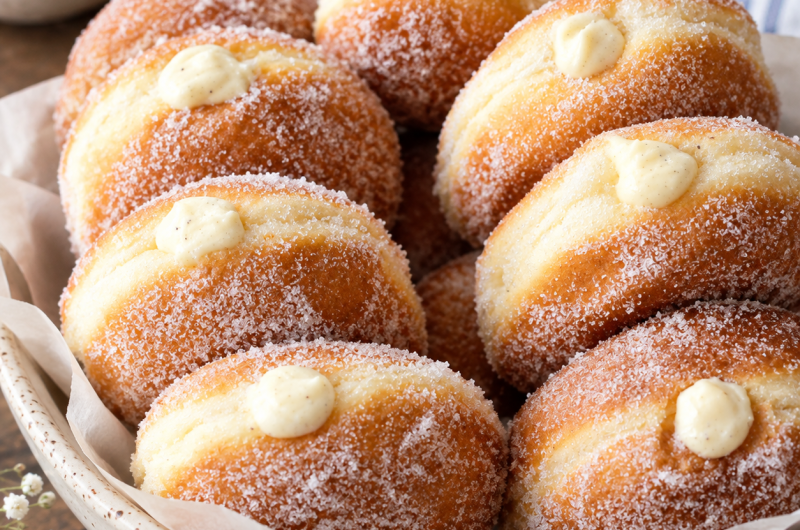
Sourdough discard custard-filled donuts bring together two irresistible textures in one homemade treat: a tender, fluffy fried donut and a smooth vanilla custard tucked inside. The dough uses unfed sourdough discard, which adds subtle depth while also giving leftover starter a useful purpose. Once the donuts are fried until golden, they are coated in granulated sugar and filled with chilled custard for a bakery-style finish. These donuts are especially enjoyable for breakfast, brunch, weekend baking, or whenever you want something more special than an ordinary glazed donut. The combination of warm fried dough, crisp sugar coating, and creamy vanilla filling makes every bite rich without requiring complicated decorating techniques.
Why Sourdough Discard Works So Well in Donuts
Sourdough discard is especially useful in enriched dough recipes because it contributes flavor without requiring the dough to rely entirely on natural fermentation for its rise. In this recipe, active dry yeast provides the main lift, while the unfed sourdough discard adds its characteristic mild tang. This combination creates a donut with a pleasantly rounded flavor that is different from a standard yeast donut. Because the discard is unfed, it does not need to be bubbly or recently refreshed before it is incorporated. That makes this recipe a practical way to use sourdough starter discard that might otherwise be thrown away. The result is a soft, tender donut with enough structure to hold a generous amount of vanilla custard.
What Makes These Custard-Filled Donuts Special
The filling is what turns these homemade donuts into something truly memorable. Instead of relying on a simple sugar glaze, each donut is filled with a silky vanilla custard made from egg yolks, cornstarch, whole milk, sugar, salt, and vanilla. The custard becomes thick enough to pipe but remains creamy rather than stiff. This texture works beautifully with the light donut dough because it provides a cool, smooth contrast to the slightly crisp fried exterior. The sugar coating adds another layer of sweetness and a delicate crunch. Together, the sourdough discard dough, vanilla custard, and sugar coating create a balanced pastry that looks impressive while using straightforward ingredients.
Understanding the Vanilla Custard Before You Begin
The vanilla custard should be prepared first because it needs plenty of time to cool completely before it is piped into the donuts. Egg yolks and cornstarch provide the structure, while whole milk gives the custard its creamy body. Granulated sugar sweetens the mixture, and a small amount of salt helps balance the flavor. The most important part of preparing the custard is tempering the egg yolks. Adding hot milk gradually while whisking prevents the yolks from cooking too quickly. Once the tempered mixture returns to the saucepan, constant whisking allows the cornstarch and egg yolks to thicken the custard evenly. Proper chilling is equally important because warm custard is too loose for filling.
How to Temper the Egg Yolks Correctly
Tempering sounds technical, but the process is simple when handled gradually. First, whisk the egg yolks and cornstarch until the mixture is smooth. Meanwhile, heat the milk, sugar, and salt until the liquid is steaming but not boiling. Take approximately one cup of the hot milk and slowly drizzle it into the egg mixture while whisking continuously. This gradually raises the temperature of the yolks instead of exposing them immediately to very hot liquid. Once combined, the tempered egg mixture can be returned to the saucepan. Continue whisking as the custard cooks so it thickens smoothly without sticking or developing cooked egg pieces. Taking your time during this stage gives the finished vanilla custard its desirable silky texture.
Cooling the Custard for the Best Filling
After the custard has thickened and the vanilla has been incorporated, transfer it to a clean bowl. Press plastic wrap directly against the surface of the custard before refrigerating it. This helps prevent a thick skin from forming as the custard cools. The filling should be completely chilled before it is transferred to a piping bag. Chilled custard is easier to control and less likely to become runny when it is piped into the donuts. Allow at least two hours for refrigeration according to the recipe timing. Preparing the custard ahead is convenient because the filling can be ready before the dough is mixed. This breaks the recipe into manageable stages and makes the final assembly much easier.
Building the Sourdough Discard Donut Dough
The donut dough begins with warm milk, active dry yeast, and granulated sugar. The milk should be warm rather than hot, around 105–110°F, so the yeast can activate properly. After combining these ingredients, give the mixture five to ten minutes to become foamy. The foaming indicates that the yeast has begun working. The yeast mixture is then combined with the egg, salt, sourdough discard, and all-purpose flour. At this point, the mixture will develop into a soft dough. The dough should not be treated like a firm bread dough because these donuts depend on a tender, enriched texture. The addition of butter later in the mixing process helps create a smooth, rich dough.
Adding Butter Without Making the Dough Greasy
Room-temperature salted butter is incorporated gradually rather than being added all at once. Adding the butter one tablespoon at a time gives the dough time to absorb the fat between additions. This is important because a large quantity of butter introduced suddenly can make the dough appear greasy or separated. Once all of the butter has been incorporated, continue kneading until the dough becomes soft, smooth, and begins pulling away from the sides of the mixing bowl. A stand mixer fitted with a dough hook makes this stage convenient, especially because the dough requires several minutes of kneading. The finished dough should feel supple and elastic rather than dry or stiff.
The First Rise and What to Look For
Once kneaded, transfer the donut dough to a lightly oiled bowl and cover it. Let it rise in a warm place for about two hours, or until it has approximately doubled in size. The exact timing can vary depending on the temperature of the room, the freshness of the yeast, and the temperature of the dough. Rather than relying only on the clock, look at the dough itself. A noticeably expanded dough with a soft, airy appearance indicates that fermentation has progressed well. If your kitchen is cool, the first rise may take longer. Avoid rushing this stage because sufficient fermentation contributes to the light texture that makes homemade yeast donuts so appealing.
Rolling and Cutting the Donut Shapes
After the first rise, gently turn the dough onto a lightly floured work surface. Roll it to approximately half an inch thick. Use a cookie cutter or the rim of a glass to cut individual rounds. Keep the cuts relatively close together so you do not have to rework the dough excessively. Any remaining scraps can be gathered and rolled again to make additional donuts. The goal is to create pieces with reasonably consistent thickness because evenly sized donuts will fry at a similar rate. Once shaped, place each round on its own square of parchment paper arranged on a baking sheet. This small preparation step makes transferring the delicate risen dough into the hot oil considerably easier.
Giving the Donuts Their Second Rise
The second rise is what helps the shaped donuts become noticeably puffy and light. Cover the rounds loosely with plastic wrap or a light towel and leave them in a warm location for one to two hours. They should look expanded, soft, and airy by the end of this period. Avoid pressing or handling them unnecessarily because the dough can lose some of the air it has developed. Proper proofing helps prevent dense donuts after frying. At the same time, avoid letting them become excessively overproofed, as very fragile dough can be difficult to move and may collapse. Watching the appearance of the dough is more useful than relying on a strict minute-by-minute schedule.
How to Fry Sourdough Discard Donuts
Frying is one of the most important stages because the oil temperature directly affects the finished texture. Heat approximately two to three inches of neutral oil in a heavy-bottomed pot and bring it to 340–360°F. This temperature range allows the donuts to cook through while developing a golden exterior. If the oil is too cool, the dough can absorb excessive oil and become heavy. If the oil is too hot, the outside may brown before the center has cooked properly. Fry the donuts in batches rather than overcrowding the pot. Carefully lower each donut into the oil and fry for about one to two minutes per side, watching the color closely.
Getting a Golden Exterior Without Overcooking
The ideal fried donut should have a golden surface with a cooked, fluffy interior. As each donut fries, turn it carefully once the first side has developed a rich golden color. Cooking time may vary slightly depending on the size and thickness of the donuts and how consistently your oil maintains its temperature. A heavy-bottomed pot helps reduce sudden temperature changes. After frying, transfer the donuts to a wire rack with parchment underneath to catch excess oil. While they are still warm, roll them in granulated sugar. Coating them immediately allows the sugar to adhere naturally to the surface, producing the classic sweet exterior associated with many filled yeast donuts.
Filling the Donuts with Vanilla Custard
Once the fried donuts have cooled completely, it is time for the most satisfying part: filling them. Transfer the chilled vanilla custard into a piping bag fitted with a round tip. Use a butter knife to create a small opening in the side or center of each donut. Insert the piping tip carefully and squeeze the custard into the donut until you can feel the pastry become pleasantly full. Avoid forcing too much filling into one spot because excessive pressure can split the donut. A gradual squeeze helps distribute the custard through the interior. Because the custard is already chilled and thickened, it should remain inside the donut without leaking when the pastry is handled gently.
How to Create Bakery-Style Filled Donuts at Home
A bakery-style appearance comes mostly from careful shaping, consistent frying, and neat filling rather than complicated equipment. Keeping the dough at an even thickness before cutting produces donuts that rise uniformly. Allowing enough time for both rises creates the airy interior needed for a generous custard filling. Frying at a controlled temperature gives the outside an even golden color. Finally, using a piping bag makes it possible to fill each donut neatly without cutting it open. The sugar coating provides the finishing touch. Once assembled, the donuts should have a light exterior, a soft center, and a creamy vanilla custard core. These details make homemade donuts look polished enough for brunch gatherings and special occasions.
Common Problems When Making Filled Donuts
Several small issues can affect the finished result, but most are easy to prevent. Dense donuts often result from insufficient proofing, while greasy donuts may indicate that the oil was not hot enough. Very dark exteriors can occur when the oil temperature is too high. If the custard is runny, it may not have been cooked long enough or chilled sufficiently. If the custard contains small cooked egg pieces, the egg mixture may have been heated too quickly during tempering. Dough that feels excessively sticky can usually be managed with a lightly floured work surface, but adding large amounts of extra flour can make the donuts heavy. Following the original ingredient quantities and paying attention to texture at each stage gives you the best chance of achieving soft, balanced results.
Notes for Consistent Results
For the most reliable sourdough discard donuts, keep the milk within the recommended warm temperature range when activating the yeast. Milk that is excessively hot can interfere with yeast activity, while milk that is too cool may slow the process considerably. During kneading, allow the butter to become fully incorporated before judging the dough texture. For the custard, constant whisking is particularly important once the tempered egg mixture returns to the saucepan. When frying, use a thermometer if possible because visual judgment alone can be difficult. Finally, prepare the custard far enough in advance that it has time to become thoroughly cold. These small details make the process much more predictable and help produce soft, golden, custard-filled donuts.
Storage and Serving Suggestions
These donuts are best enjoyed on the day they are made because the fried exterior and creamy filling are at their freshest shortly after assembly. If you have leftovers, place them in an airtight container and refrigerate them for up to three days. Since the filling contains dairy and egg, refrigeration is important for safe storage. Allow refrigerated donuts to come closer to room temperature before serving if desired, although they should not be left out for extended periods. For breakfast or brunch, serve them alongside coffee, tea, or fresh fruit. They also make a lovely dessert for gatherings because each donut can be picked up and enjoyed without additional plating or decoration.
Why This Recipe Is a Great Use for Sourdough Discard
Recipes that use sourdough discard can be a practical way to reduce waste while adding character to familiar baked goods. Instead of treating unfed starter as something that must be discarded, it can become part of a flavorful donut dough. In this recipe, the discard works alongside commercial yeast, so the preparation is more predictable than a fully naturally leavened donut. The resulting dough still benefits from the distinctive flavor of sourdough, while the yeast supplies the dependable rise needed for a soft fried pastry. Combined with vanilla custard and sugar, the discard becomes part of a dessert that feels indulgent and bakery-inspired while remaining approachable for home bakers.
A Simple Way to Plan the Recipe
Because the recipe contains several stages, planning ahead makes the process easier. Begin by preparing the vanilla custard and refrigerating it for at least two hours. Once the custard is chilled, prepare the donut dough and allow it to complete its first rise. Shape the dough into rounds and give the pieces their second rise while you prepare the frying setup. When the donuts are puffed, fry them in batches, coat them in sugar, and let them cool. Finally, pipe in the cold vanilla custard. Organizing the recipe this way keeps each stage manageable and prevents you from trying to prepare the filling, dough, frying oil, and piping equipment simultaneously.
The Final Texture and Flavor
A successful batch of sourdough discard custard-filled donuts should have several contrasting qualities in every bite. The exterior is lightly crisp from frying and coated with granulated sugar, while the interior remains soft and airy. The sourdough discard gives the dough a subtle tang that prevents the sweetness from becoming one-dimensional. Inside, the vanilla custard is creamy, rich, and smooth, creating a soft center that contrasts with the fried dough. The combination is especially satisfying when the donuts are freshly assembled. Although the recipe requires several hours because of the rising and chilling stages, much of that time is hands-off, allowing you to work on other kitchen tasks while the dough and custard develop.