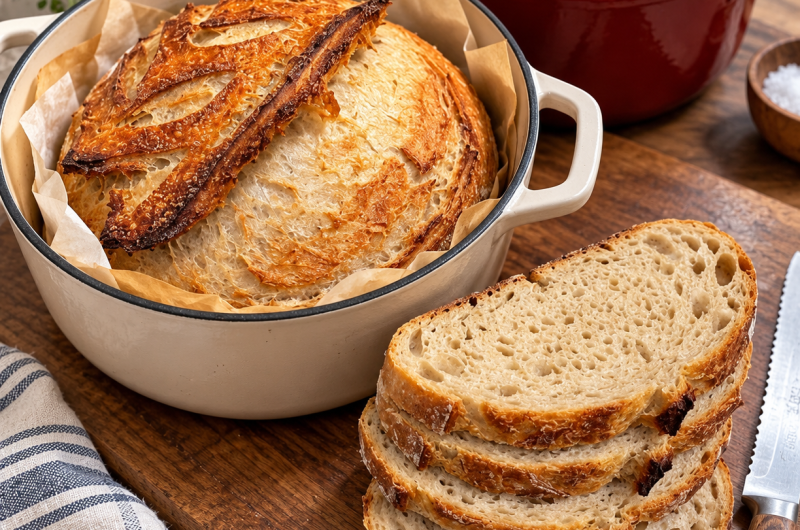
Making homemade sourdough bread becomes much easier when the dough is firm enough to handle without constantly sticking to your hands or work surface. This Lower Hydration Sourdough Bread Recipe is designed for home bakers who want the traditional flavor of naturally fermented bread without the challenges of working with very wet dough. Made with all-purpose flour, water, active sourdough starter, and salt, this simple four-ingredient sourdough bread develops a beautiful golden crust and a tender, pleasantly chewy interior. The lower water content makes the dough easier to strengthen, shape, and transfer into a Dutch oven. It is particularly helpful for beginners who are learning how sourdough fermentation works and want a more manageable introduction to artisan bread baking. With a straightforward mixing process, gentle stretch-and-fold techniques, and a hot Dutch oven, this homemade sourdough loaf delivers the satisfying texture and flavor associated with traditional artisan bread.
Why Lower Hydration Sourdough Is Easier for Beginners
One of the most common difficulties in sourdough baking is handling dough that feels extremely wet, sticky, or difficult to shape. High-hydration dough can produce beautiful bread, but it often requires more experience with gluten development, fermentation, and shaping techniques. This easy lower hydration sourdough recipe offers a more forgiving alternative by using a smaller proportion of water compared with the flour. The resulting dough feels firmer, holds its shape more readily, and generally requires less flour during handling. These qualities make it easier to practice essential sourdough skills without feeling overwhelmed by a sticky mixture. A firmer dough is also useful when learning how to create surface tension during shaping, which helps the loaf maintain its structure as it rises and bakes. Although lower hydration does not eliminate the need for proper fermentation, it provides a practical starting point for anyone who wants to develop confidence in homemade sourdough bread baking.
Understanding Hydration in Homemade Sourdough Bread
Hydration is one of the most important measurements in bread baking because it describes the relationship between the amount of water and flour in a dough. In this recipe, the main mixture contains 1000 grams of all-purpose flour and 600 grams of water, which creates a 60 percent water-to-flour ratio before accounting for the sourdough starter. If the 200 grams of active starter is maintained at 100 percent hydration, it contributes approximately 100 grams of additional flour and 100 grams of additional water. That makes the overall dough hydration approximately 63.6 percent. This distinction is useful because starter hydration affects the final dough consistency. Even with that additional moisture, the recipe remains relatively firm compared with many artisan sourdough formulas that use substantially more water. The dough should feel soft and flexible rather than dry or crumbly, but it should also be easier to handle than a very wet sourdough mixture. Understanding hydration helps bakers recognize why different recipes produce different textures.
Four Simple Ingredients for a Traditional Sourdough Loaf
A major advantage of this homemade sourdough bread recipe is its short ingredient list. The dough contains only all-purpose flour, water, active sourdough starter, and salt. Each ingredient serves an important purpose, and none requires a complicated preparation method. The flour provides the structure, while the water hydrates the flour proteins and allows gluten to develop. The active starter supplies the naturally occurring yeast and bacteria responsible for fermentation, helping the bread rise and develop its characteristic flavor. Salt improves taste and contributes to dough strength. Unlike recipes that rely on commercial yeast, sugar, butter, or milk, this version follows a traditional sourdough approach that allows the flavor of fermented wheat dough to remain the focus. Using accurate measurements is especially important with a simple recipe because small differences in water or flour can noticeably change the dough’s texture. A kitchen scale is therefore one of the most useful tools for achieving consistent results.
Choosing All-Purpose Flour for Lower Hydration Bread
All-purpose flour is the primary ingredient in this sourdough recipe, with 1000 grams used to create the dough. Although bread flour is commonly associated with artisan sourdough, all-purpose flour can also produce excellent homemade bread when fermentation and dough development are managed carefully. Its protein content varies by brand, which can influence how much water the flour absorbs and how strong the dough becomes. Some all-purpose flours create a firmer mixture, while others produce a softer and slightly stickier dough with the same amount of water. Because this recipe uses a relatively modest hydration level, all-purpose flour is a practical choice for beginners who want to avoid difficult handling. During mixing, the flour should absorb the water evenly without leaving dry patches. As the dough rests and undergoes stretch-and-fold sessions, it becomes smoother and more cohesive. Using fresh flour and measuring it by weight helps maintain consistency from one baking session to the next.
The Importance of Using an Active Sourdough Starter
An active sourdough starter is essential because it provides the natural fermentation needed for the bread to rise. This recipe uses 200 grams of active starter, which should be healthy, bubbly, and capable of expanding after feeding. A starter that has recently reached its peak activity is generally a reliable choice because it contains an active population of yeast and bacteria. The yeast produces gas that becomes trapped inside the dough, while fermentation contributes the complex aroma and tangy flavor associated with sourdough bread. If the starter is weak or has not been fed appropriately, the dough may ferment slowly and produce a dense loaf. Starter activity is influenced by room temperature, flour type, feeding schedule, and overall maintenance. For predictable results, use a starter that consistently rises after feeding and has a pleasant fermented aroma. The recipe does not require commercial yeast, so the strength of the starter plays a central role in the bread’s final volume and texture.
Why Water Temperature Matters During Dough Mixing
Water is responsible for hydrating the flour and helping the sourdough starter disperse throughout the mixture. The recipe uses 600 grams of water, which should be measured carefully rather than estimated by volume. Water temperature can also influence how quickly fermentation begins. In a cool kitchen, slightly warm water may help the dough reach a comfortable fermentation temperature, while room-temperature water is often sufficient in warmer conditions. Excessively hot water should be avoided because high temperatures can damage the microorganisms in the starter. When the starter and water are combined first, the starter becomes easier to distribute evenly through the dough. This helps prevent concentrated pockets of starter and supports more consistent fermentation. Once the flour and salt are added, the mixture gradually becomes firm and cohesive. Because all-purpose flour varies in absorbency, the dough may feel slightly different from one batch to another, but the original water quantity should be maintained for this specific recipe.
How Salt Improves Sourdough Flavor and Dough Strength
Salt may seem like a small ingredient compared with flour and water, but it plays several important roles in sourdough bread. This recipe includes 20 grams of salt, which balances the flavor of the flour and enhances the natural tanginess created during fermentation. Without enough salt, sourdough bread can taste flat even when the starter is healthy and the loaf has developed a good crust. Salt also affects dough structure by helping gluten become more organized and resistant to stretching. This contributes to a dough that feels stronger and holds its shape more effectively during fermentation and shaping. In addition, salt influences fermentation activity, helping the dough develop at a controlled pace. The recipe adds salt during the initial mixing stage, making preparation simple and ensuring it becomes distributed throughout the dough. Measuring salt accurately is important because excessive salt can slow fermentation, while too little may affect flavor and dough handling.
Mixing the Dough Without Complicated Kneading
The initial mixing stage is straightforward and does not require a stand mixer or advanced bread-making equipment. Begin by placing the active sourdough starter and water in a large mixing bowl. Stir until the starter loosens and disperses through the liquid, creating a cloudy mixture. Add the all-purpose flour and salt, then mix with a dough whisk, wooden spoon, or your hands until no dry flour remains. The dough may look rough and uneven at first, which is normal. At this stage, the goal is simply to combine the ingredients rather than create a perfectly smooth dough. As the flour absorbs moisture, the mixture becomes more cohesive and easier to handle. Covering the dough and allowing it to rest gives the flour additional time to hydrate. This resting period also makes the subsequent stretch-and-fold sessions more effective. Because the dough contains less water than many artisan sourdough recipes, it should feel relatively firm without being stiff or difficult to stretch.
Developing Gluten with Gentle Stretch-and-Fold Sessions
Stretching and folding is a useful method for strengthening sourdough dough without continuous kneading. After the initial mixing and resting period, lift one side of the dough gently until it stretches upward, then fold it over the center. Rotate the bowl and repeat the movement on the remaining sides. This process helps organize the gluten network, which is responsible for trapping the gas produced during fermentation. Several sets of folds are performed during the early part of bulk fermentation, with approximately 30 minutes between sessions. The dough should gradually become smoother, stronger, and more elastic. Lower hydration dough may resist stretching more than a very wet dough, so gentle handling is important. Pull only as far as the dough comfortably allows rather than forcing it until it tears. As gluten develops, the dough should hold its shape more effectively and become easier to handle. These improvements are useful signs that the strengthening process is working.
Recognizing Proper Gluten Development in Firmer Dough
A well-developed sourdough dough should feel noticeably different from the rough mixture created during the first few minutes of mixing. After several stretch-and-fold sessions, the surface generally becomes smoother, and the dough begins holding together as a single elastic mass. When lifted gently, it should stretch without immediately breaking, although a lower hydration dough may never feel as extensible as a very wet artisan dough. The purpose of gluten development is to create enough strength for the bread to retain gas during fermentation and expand in the oven. If the dough tears easily, it may benefit from additional rest before another gentle fold. If it becomes very tight and resists movement, allowing it to relax is often more useful than forcing further stretching. Proper gluten development does not mean the dough must become perfectly smooth or pass every advanced bread-making test. For this beginner-friendly sourdough loaf, a cohesive, elastic dough that maintains its shape is a practical goal.
Understanding Bulk Fermentation in Sourdough Baking
Bulk fermentation is the period when the mixed dough develops flavor, structure, and volume before final shaping. During this stage, the microorganisms in the active sourdough starter consume available nutrients and produce gases and organic acids. These changes help the dough expand and create the characteristic aroma of naturally fermented bread. The recipe includes approximately eight to twelve hours for fermentation and proofing combined, but the actual timing depends heavily on room temperature and starter strength. A warm kitchen may encourage faster fermentation, while a cool kitchen can slow the process considerably. Rather than relying exclusively on the clock, observe the dough for changes in appearance and texture. It should become noticeably larger, slightly domed, and more airy. Small bubbles may appear around the edges or beneath the surface. The dough should also feel lighter than it did immediately after mixing. Learning to recognize these signs is one of the most valuable skills in sourdough baking.
How Kitchen Temperature Changes Fermentation Time
Room temperature has a significant effect on how quickly sourdough dough ferments. In a warm kitchen, the starter’s microorganisms generally become more active, allowing the dough to rise more quickly. In a cooler environment, the same dough may require several additional hours to reach a similar level of fermentation. This is why a fixed fermentation schedule cannot guarantee identical results in every home. The activity of the starter, the temperature of the water, and the temperature of the dough after mixing also influence the process. A kitchen thermometer can help bakers understand these conditions and recognize patterns over time. During bulk fermentation, keep the dough covered to prevent the surface from drying out. Place the bowl somewhere with a reasonably stable temperature, away from direct heat or strong drafts. Check the dough periodically for increased volume, a puffy appearance, and visible signs of gas production. These observations provide more useful information than time alone.
Avoiding Under-Fermentation and Over-Fermentation
Correct fermentation is essential for producing a loaf with good volume and a pleasant interior texture. Under-fermented sourdough may feel tight and heavy because the dough has not developed enough gas before shaping and baking. The finished bread can have a dense crumb and limited oven spring. Over-fermented dough presents a different challenge because excessive fermentation can weaken its structure and make it difficult to shape. Even a lower hydration dough can become overly soft or lose strength when fermentation continues too long. To avoid these problems, monitor the dough throughout bulk fermentation rather than waiting for an exact number of hours. Look for a noticeable increase in volume, a lighter texture, and an airy appearance. The dough should still have enough strength to hold its shape when turned onto the work surface. Fermentation is affected by many variables, so experience with your own starter and kitchen environment will help you identify the most reliable stopping point.
Shaping a Round or Oval Artisan Sourdough Loaf
Shaping is the stage when fermented dough is transformed into a loaf that can maintain its structure during proofing and baking. After bulk fermentation, turn the dough onto a lightly floured work surface. Handle it gently to preserve some of the gas developed during fermentation. For a round loaf, bring the outer edges toward the center and create a compact shape before turning the dough over and gently tightening the surface. For an oval loaf, fold and roll the dough into an elongated form that fits the chosen proofing basket. The goal is to create surface tension without aggressively pressing out the air. Lower hydration dough is often easier to shape because it spreads less and responds more predictably to gentle tightening movements. A bench scraper can help lift and reposition the dough without excessive handling. Once shaped, transfer it to a well-floured banneton or proofing basket, positioning it according to the basket and shaping method used.
Why Surface Tension Helps Sourdough Hold Its Shape
Surface tension refers to the gentle tightness created around the outside of a shaped dough. It helps the loaf maintain a rounded or oval form while the interior continues developing during proofing. Without sufficient tension, sourdough dough may spread outward instead of rising upward, especially when it is transferred to a hot baking vessel. This lower hydration recipe makes surface tension easier to develop because the dough has enough firmness to respond to gentle shaping movements. However, excessive tightening can damage the dough and cause the outer surface to tear. The ideal technique involves controlled movements that bring the dough together without squeezing it forcefully. During shaping, the surface should become smoother and slightly taut while the loaf remains flexible. If the dough resists tightening, allow it to relax briefly before continuing. Building surface tension is a skill that improves with practice, and it contributes significantly to a loaf’s appearance, oven spring, and overall structure.
Proofing the Shaped Dough Before Baking
After shaping, the sourdough loaf needs a final proofing period before it enters the oven. This stage allows fermentation to continue and gives the dough time to become lighter and more relaxed. The shaped dough is placed in a floured banneton or proofing basket, which supports its form and helps prevent excessive spreading. Cover the basket to protect the dough from drying out while it proofs. The amount of time required depends on how much fermentation occurred before shaping, the activity of the starter, and the surrounding temperature. A dough that is already well fermented may need a shorter final proof than one that was shaped earlier in the fermentation process. Watch for a slightly expanded appearance and a dough that feels aerated rather than tightly compressed. The loaf should still have enough strength to maintain its shape when transferred for baking. Proofing too briefly can limit oven spring, while excessive proofing may cause the dough to weaken.
Using a Banneton for Better Bread Structure
A banneton, also called a proofing basket, is a useful piece of equipment for home sourdough baking because it supports the shaped dough during its final rise. The basket helps maintain the loaf’s round or oval form while allowing the surface to become slightly firmer. This support is particularly useful when preparing artisan bread that will be transferred into a Dutch oven. Before placing the dough inside, dust the basket thoroughly with flour to reduce sticking. The dough should be positioned so it can be turned out easily when baking begins. A banneton is convenient but not the only possible proofing container. A suitably sized bowl lined with a well-floured clean cloth can also provide support when a proofing basket is unavailable. The important consideration is that the container should hold the dough securely without compressing it. Proper proofing support makes transferring and scoring easier and contributes to a more attractive finished loaf.
Baking Sourdough in a Preheated Dutch Oven
A Dutch oven is one of the most effective tools for baking artisan sourdough bread in a home kitchen. Its heavy construction retains heat, while the fitted lid traps moisture released by the dough during the first stage of baking. This creates a steamy environment that allows the loaf to expand before its outer crust becomes firm. For this recipe, the Dutch oven is preheated inside an oven set to 450°F. The baking vessel should be thoroughly heated before the shaped dough is transferred inside. A hot Dutch oven encourages strong initial baking activity and helps the bread develop an attractive crust. Because the vessel becomes extremely hot, thick oven mitts and careful handling are essential. Parchment paper can make transferring the loaf easier and reduce direct contact with the hot pot. Always check that the Dutch oven and its lid are rated for the required temperature, particularly if the cookware has a nonmetal handle or decorative components.
Scoring the Dough for Controlled Oven Expansion
Scoring is the process of cutting the surface of a shaped loaf immediately before baking. As sourdough bread enters a hot oven, the gases inside expand and the loaf begins to rise rapidly. Without a deliberate opening, the crust may split unpredictably as the dough stretches. A bread lame or sharp razor allows the baker to create a controlled expansion point. For this lower hydration sourdough loaf, one confident score is sufficient, although a simple decorative design can also be used. Turn the proofed dough onto parchment paper and make the cut shortly before transferring it into the Dutch oven. A decisive movement generally creates a cleaner opening than repeatedly dragging the blade across the surface. The dough should have enough structure to hold the cut without immediately collapsing. Scoring is both practical and decorative, contributing to the distinctive appearance of homemade artisan bread while allowing the loaf to expand naturally during the covered baking stage.
Why the First 25 Minutes Are Baked with the Lid On
The covered baking stage is essential for developing a well-risen sourdough loaf. Once the scored dough has been transferred into the preheated Dutch oven, the lid is placed on top and the bread bakes at 450°F for 25 minutes. During this period, moisture released from the dough becomes trapped inside the vessel, creating steam around the loaf. Steam delays the formation of a rigid outer crust, allowing the dough to expand more freely as the internal gases heat. This process contributes to oven spring, which is the rapid increase in bread volume during the early part of baking. The covered environment also helps prevent the exterior from becoming too dark before the center has had enough time to cook. The lid should remain in place throughout this stage unless a specific problem requires attention. Avoid opening the oven unnecessarily because stable heat helps the loaf bake consistently and supports the development of a strong crust.
Developing a Deep Golden Crust During Uncovered Baking
After the first 25 minutes, the Dutch oven lid is removed and the bread continues baking at 450°F for another 25 minutes. This uncovered stage allows moisture to escape and encourages the surface to develop a deeper golden color. As the crust dries, it becomes firmer and more aromatic, creating the familiar crisp exterior associated with artisan sourdough bread. The exact color may vary depending on the flour, fermentation, oven performance, and baking vessel. Some bakers prefer a lighter golden crust, while others enjoy a darker, more robust finish. The important goal is to bake the bread thoroughly without allowing the exterior to burn. A kitchen thermometer can help confirm doneness, with an internal temperature of approximately 205°F serving as a useful guide. The finished loaf should feel firm, have an attractive browned crust, and release a pleasant baked-bread aroma. Carefully remove it from the Dutch oven once baking is complete.
Checking Internal Temperature for Properly Baked Bread
Visual appearance is helpful when determining whether sourdough bread is finished, but internal temperature provides an additional way to assess doneness. This recipe recommends checking for a temperature of approximately 205°F near the center of the loaf. Insert a clean kitchen thermometer into the thickest part of the bread, taking care to avoid touching the hot Dutch oven. The reading should be taken from the interior rather than the crust because the surface becomes much hotter during baking. A temperature near the recommended range generally indicates that the center has cooked through, although texture also depends on fermentation and cooling. If the loaf looks deeply browned but the center is not yet fully baked, additional baking may be necessary. Oven performance can vary, so the stated 50-minute baking time should be treated as a guide rather than an absolute guarantee. Combining the thermometer reading with the loaf’s color and firmness provides a more reliable assessment.
Cooling Sourdough Bread Before Cutting the First Slice
Fresh sourdough bread smells wonderful when it comes out of the oven, but cutting it immediately can affect the texture of the crumb. During baking, the interior undergoes important changes as starches absorb moisture and the dough becomes a structured loaf. After removal from the oven, the bread continues cooling and its internal moisture gradually redistributes. Slicing too early can produce a gummy or sticky appearance, even when the loaf has been baked properly. For this reason, the finished bread should be placed on a cooling rack and allowed to cool completely before cutting. A rack provides airflow around the bottom, preventing trapped moisture from softening the crust. Larger loaves require more cooling time than smaller ones, so patience is particularly important with this recipe’s substantial dough quantity. Once fully cooled, the bread should slice more cleanly and reveal a tender, cohesive crumb. Proper cooling is one of the simplest ways to improve the final eating experience.
Understanding the Crumb of Lower Hydration Sourdough
The interior texture of lower hydration sourdough bread differs from that of many high-hydration artisan loaves. Very wet doughs are often associated with large, irregular holes, while firmer doughs commonly produce a more even crumb with smaller air pockets. This does not mean lower hydration bread is necessarily heavy or dry. When properly fermented and baked, it can have a soft, tender interior with a pleasant chew and enough structure for everyday slicing. The exact crumb depends on several factors, including starter strength, gluten development, fermentation, shaping, and baking. This recipe is particularly suitable for people who prefer sourdough bread that can support sandwich fillings without allowing spreads or toppings to fall through large holes. Its relatively firm dough also makes the shaping process easier to control. The finished loaf should have a balanced texture that combines the rustic character of artisan sourdough with the practical qualities of a dependable homemade bread.
Serving Lower Hydration Sourdough for Breakfast and Lunch
One of the greatest advantages of homemade sourdough bread is its versatility. A well-baked loaf can be enjoyed plain, lightly toasted, or paired with a wide range of sweet and savory foods. For breakfast, slices can be served with butter, fruit preserves, nut butter, or eggs. The bread’s mild sourdough tang complements both sweet toppings and richer savory ingredients. For lunch, the more even crumb of lower hydration sourdough makes it useful for sandwiches filled with cheese, vegetables, chicken, or other preferred ingredients. Toasted slices also provide a sturdy foundation for avocado toast or open-faced sandwiches. At dinner, sourdough bread can accompany soups, stews, and salads, adding a satisfying texture to simple meals. Because the recipe uses only four ingredients, the bread has a straightforward flavor that works with many different dishes. Freshly baked slices are delicious on their own, while day-old bread often becomes especially enjoyable after toasting.
Storing Homemade Sourdough Bread to Maintain Freshness
Proper storage helps preserve the texture and flavor of homemade sourdough bread after it has cooled. For short-term storage, keep the loaf in a bread bag, clean bread container, or suitable wrapping that protects it from drying out excessively. Store it in a cool, dry place away from direct sunlight. The bread is generally best enjoyed within the first few days after baking, when its crust and crumb are closest to their original texture. Refrigeration is not usually the preferred method for ordinary bread storage because it can accelerate staling, although food safety and local conditions should always be considered. For longer storage, slicing the loaf before freezing is a convenient option. Place the slices in a freezer-safe bag or container, separating them if necessary so individual portions can be removed easily. Frozen sourdough slices can be thawed or toasted when needed. This approach reduces waste and makes homemade bread available for future breakfasts and meals.
Notes on Dough Stickiness and Flour Absorption
Although this recipe is designed to create a firmer dough, the exact consistency can vary depending on the all-purpose flour used. Different flour brands contain different protein levels and absorb moisture at different rates. A dough made with one flour may feel smooth and manageable, while another may remain slightly tacky even when the same measurements are followed. This variation is normal and does not automatically mean the recipe needs additional flour. During the initial mixing stage, allow enough time for the flour to absorb the water before judging the dough’s texture. The resting and stretch-and-fold periods will also improve its strength. Avoid adding large amounts of extra flour simply because the dough sticks lightly to your fingers. Excess flour can make the bread unnecessarily dense and change the intended hydration. A bench scraper and lightly floured work surface can make handling easier during shaping without significantly altering the ingredient balance.
Notes on Making One Large Loaf or Managing Dough Size
The original recipe specifies a yield of one large sourdough loaf, using 1000 grams of flour, 600 grams of water, 200 grams of starter, and 20 grams of salt. Together, these ingredients create approximately 1820 grams of dough before baking. This is considerably larger than many standard home sourdough loaves, so the size of the Dutch oven is an important practical consideration. A small baking vessel may not provide enough space for the dough to expand safely during baking. The proofing basket must also be large enough to hold the shaped dough without restricting its rise. If using the full recipe as one loaf, confirm that the baking equipment can accommodate its size and allow enough time for the center to bake completely. The original baking schedule calls for 25 minutes covered and 25 minutes uncovered, but a particularly large loaf may need additional baking depending on its shape and the oven. The internal temperature and overall appearance should guide the final decision.
Notes on Troubleshooting a Dense or Flat Sourdough Loaf
A dense sourdough loaf can result from several factors, and identifying the cause helps improve future baking results. One common reason is using a starter that is not sufficiently active. If the starter cannot reliably expand after feeding, it may struggle to produce enough gas during bulk fermentation. Another possibility is under-fermentation, which can leave the dough tight and heavy before shaping. Insufficient gluten development may also limit the dough’s ability to retain gas, while excessive fermentation can weaken its structure and cause spreading. Shaping technique is another important consideration because the loaf needs enough surface tension to hold its form. Finally, baking in a Dutch oven that has not been properly preheated may reduce oven spring. When troubleshooting, consider the entire process rather than changing several ingredients at once. This recipe’s relatively firm dough makes handling easier, but successful sourdough still depends on an active starter, appropriate fermentation, careful shaping, and thorough baking.
Notes on Building a Consistent Sourdough Baking Routine
Consistency is one of the most valuable habits a home sourdough baker can develop. Using the same flour, starter feeding routine, water temperature, and baking equipment makes it easier to understand how the dough behaves. A kitchen scale helps ensure accurate ingredient measurements, while a thermometer provides useful information about dough temperature and baking doneness. Recording approximate fermentation times and room temperatures can also help identify patterns between successful loaves. For example, a dough that rises quickly in a warm kitchen may require a shorter bulk fermentation than the same recipe prepared during cooler weather. Observing the dough’s texture and appearance is more reliable than expecting every bake to follow an identical schedule. Lower hydration sourdough is particularly useful for developing these skills because its firmer structure makes changes in elasticity and fermentation easier to recognize. Over time, these observations help transform sourdough baking from an uncertain process into a more predictable and enjoyable routine.
Why This Four-Ingredient Sourdough Bread Is Worth Baking Again
This easy lower hydration sourdough bread combines the simplicity of traditional ingredients with a dough consistency that is more approachable for many home bakers. The recipe requires only all-purpose flour, water, active sourdough starter, and salt, yet it produces a flavorful artisan-style loaf with a golden crust and a tender interior. Its relatively firm dough makes mixing, folding, shaping, and transferring easier than many high-hydration formulas, while natural fermentation develops the distinctive taste that makes sourdough bread so appealing. Baking in a preheated Dutch oven supports oven spring and crust development, and cooling the finished loaf thoroughly helps create clean, attractive slices. Whether you are learning to make sourdough for the first time or looking for a dependable recipe that is easier to handle, this method provides a practical foundation. With careful attention to starter activity, fermentation, and baking temperature, homemade sourdough can become a rewarding part of regular meal preparation.