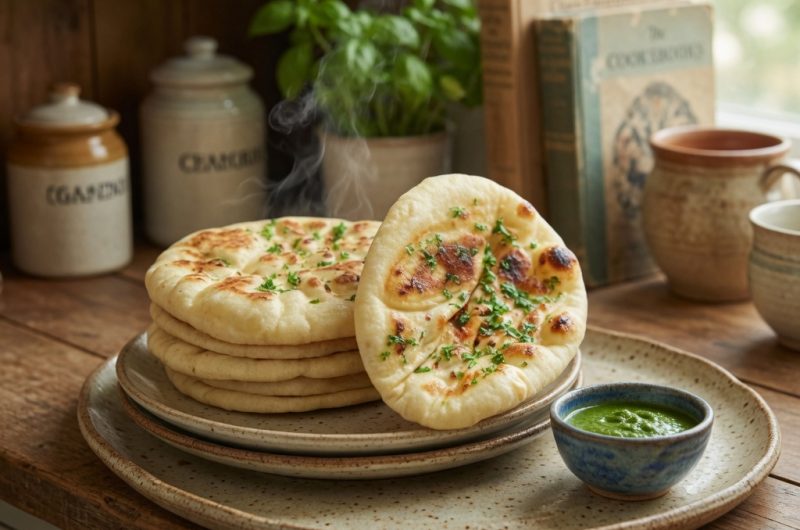
Turkish flatbread represents one of the most versatile and practical breads you can make in a home kitchen, offering countless serving options and flavor combinations. This beloved bread works wonderfully as a pizza base for creative toppings, transforms into sandwich wraps filled with your favorite ingredients, or serves as a side dish that complements soups and stews perfectly. The traditional method of making Turkish flatbread involves yeast, rising time, and careful oven management, making it impractical for busy weeknights when you need dinner quickly. Air fryers have revolutionized home cooking by offering faster cooking times and healthier preparation methods compared to traditional frying techniques. This air fryer adaptation of traditional Turkish flatbread reduces cooking time to just thirteen minutes from start to finish, making fresh, homemade bread accessible even on your most hectic days. Unlike many quick bread recipes that sacrifice flavor or texture, this version maintains the soft, slightly chewy interior and golden exterior that characterizes authentic Turkish flatbread. Whether you are cooking for a family dinner, preparing lunch for yourself, or hosting guests for casual entertaining, this straightforward recipe delivers impressive results that taste like you spent considerable time in the kitchen.
Understanding Why Air Fryers Create Superior Flatbread Results
Air fryer technology uses rapid air circulation to cook food quickly and evenly, producing results that rival traditional oven baking but in significantly less time. The circulating hot air creates the perfect environment for flatbread cooking, browning the exterior while keeping the interior soft and tender. Unlike conventional ovens that heat from one direction, air fryers surround the flatbread with heat from multiple angles, ensuring even cooking across the entire surface. The compact cooking chamber also heats up faster than traditional ovens, reducing preheating time and getting your flatbread on the table quicker. Air fryers require minimal oil compared to deep frying methods, making this a genuinely healthier cooking approach without sacrificing the delicious golden color and appealing texture. The rapid heat transfer also creates a light, slightly crispy exterior that contrasts beautifully with the soft inside, offering textural interest with every bite. Many home cooks are surprised by how perfectly suited air fryers are for bread cooking, as the combination of intense heat and air circulation creates results that seem impossible in such a short timeframe. This technology has transformed what was once a time-consuming baking project into something feasible for weeknight meals.
The Simplicity of Self-Rising Flour in Quick Bread Making
Self-rising flour simplifies bread making by combining all-purpose flour with baking powder and salt in one convenient ingredient. This eliminates the need for commercial yeast, which requires rising time and precise temperature control that complicates quick breads. Using self-rising flour means your flatbread begins cooking within minutes of mixing ingredients rather than waiting hours for dough to rise. For people intimidated by traditional bread baking with yeast, self-rising flour removes a significant barrier to successful homemade bread production. If self-rising flour is not available in your pantry, you can easily make it by combining two cups of all-purpose flour with one tablespoon of baking powder and one teaspoon of salt, then mixing thoroughly. This homemade version works identically to commercial self-rising flour, allowing flexibility if you prefer buying ingredients separately. The baking powder in self-rising flour activates immediately when combined with wet ingredients, creating lift in the dough that produces light, airy flatbread. Understanding how self-rising flour works helps you appreciate why this recipe is so quick and accessible to home cooks of all skill levels.
The Role of Plain Yogurt in Creating Perfect Flatbread Texture
Plain yogurt serves multiple purposes in this flatbread recipe, functioning as both a liquid component and a flavor enhancer that transforms the final bread. The yogurt provides moisture that activates the baking powder and helps create the dough’s tender crumb structure. Beyond moisture, yogurt adds a subtle tanginess that deepens the bread’s flavor profile, preventing it from tasting one-dimensional or plain. The acidic nature of yogurt also helps activate the baking powder more effectively than water would, creating better rise and texture. Both low-fat and full-fat yogurt work equally well in this recipe, though full-fat versions create slightly richer, more luxurious bread. The yogurt also contributes to the flatbread’s soft, pliable texture that makes it perfect for wrapping around fillings or using as a sandwich base. Using yogurt instead of water or milk is a traditional approach in Middle Eastern and Mediterranean flatbread baking, reflecting centuries of culinary wisdom about what creates the best results. The small amount of yogurt required means even a single container will provide enough for multiple batches of flatbread, making this an economical choice.
Olive Oil and Its Contribution to Flavor and Appearance
Olive oil plays an important role in both the dough mixture and as a finish that creates the appealing golden color flatbread should have. The one teaspoon of olive oil mixed into the dough helps bind ingredients together while adding subtle flavor that enhances the wheat notes. The additional one tablespoon of olive oil brushed onto the flatbread surface before air frying creates that beautiful golden-brown exterior that signals properly cooked bread. Beyond aesthetics, the olive oil adds richness and creates a slightly crispy texture on the surface while maintaining softness inside. Extra virgin olive oil provides superior flavor compared to refined varieties, though any quality olive oil works acceptably in this recipe. The oil also helps the flatbread develop those appealing brown spots and marks that indicate proper cooking and add visual interest. For people watching their oil intake, brushing oil before cooking rather than mixing it into the dough allows easier control of total oil content while maintaining the visual results.
Preparing and Kneading the Dough for Optimal Results
Combining self-rising flour, plain yogurt, and the teaspoon of olive oil in a large mixing bowl creates a somewhat rough, shaggy mixture initially. Using your hands to work these ingredients together gradually incorporates everything into a cohesive dough that comes together within two to three minutes. The kneading process during this initial mixing develops enough gluten to give the flatbread structure without creating the tough texture that extensive kneading produces. Over-kneading at this stage can create dense, chewy flatbread rather than the light, tender bread desired. Working the dough by hand gives you tactile feedback about when enough development has occurred; the dough should feel smooth and slightly elastic without being sticky. If the dough seems too sticky, adding a small amount of flour gradually helps achieve the right consistency. If it seems too dry, adding yogurt or water one tablespoon at a time helps reach the proper moisture level. Understanding these basic dough characteristics helps troubleshoot issues and adapt the recipe to your specific flour and yogurt brands, which can vary slightly.
Dividing and Shaping Dough into Eight Individual Portions
Dividing the dough into eight equal portions ensures each flatbread cooks in the same amount of time and achieves consistent results. Rolling each portion into a smooth ball before flattening helps distribute ingredients evenly and removes any air pockets that could create uneven texture. Using a lightly floured work surface prevents sticking without adding excessive flour that could toughen the dough. Rolling each ball into a circular flatbread approximately four inches across creates the ideal size for cooking in most air fryers and serving purposes. This size is large enough to be substantial but small enough to cook through completely in eight minutes. The circular shape is traditional for Turkish flatbread and also cooks more evenly than irregular shapes that have thick and thin areas. Working quickly during the shaping stage prevents the dough from drying out and becoming difficult to work with, so organizing your workspace in advance helps maintain momentum.
Preheating the Air Fryer to the Correct Temperature
Setting the air fryer to three hundred degrees Fahrenheit and allowing it to preheat for three minutes ensures the cooking chamber reaches proper temperature before flatbread is added. This preheating is essential because adding cold flatbread to an adequately preheated air fryer ensures immediate cooking rather than gradual heat penetration. The three hundred degree Fahrenheit temperature is specifically calibrated for flatbread cooking, high enough to brown the exterior while low enough to cook the interior without burning. Different air fryer models have slight temperature variations, so using an oven thermometer inside the air fryer basket can help verify actual temperatures. Skipping the preheating step often results in pale, undercooked flatbread that lacks the appealing golden color and crispy exterior. The three minutes required for preheating is minimal compared to traditional ovens, which often require ten to fifteen minutes.
Brushing Oil and Optional Flavor Enhancements
Lightly brushing both sides of each flatbread with olive oil before air frying creates the beautiful golden-brown exterior and contributes to the bread’s appealing appearance. This step is technically optional but highly recommended for best results and traditional appearance. The oil also adds a subtle richness that enhances the flatbread’s flavor profile. Beyond basic olive oil brushing, this is the perfect time to add optional flavor enhancements like sesame seeds, za’atar spice blend, garlic powder, or dried herbs. These additions should be applied after brushing oil, as the moisture helps them adhere to the surface rather than falling off during cooking. Sesame seeds add nuttiness and texture, za’atar provides Middle Eastern herbaceous flavor, garlic powder adds savory depth, and herbs like oregano or thyme complement the bread beautifully. These customizations allow creating different flavored flatbreads from the same basic dough, adding interest across multiple batches or servings.
Cooking Flatbreads in Batches for Even Results
Depending on your air fryer’s basket size, you may need to cook the eight flatbreads in two batches to ensure each one has adequate space for proper heat circulation. Overcrowding the basket prevents air from circulating effectively, resulting in uneven cooking with some flatbreads browning while others remain pale. Arranging flatbreads in a single layer with space between each one ensures the air can reach all surfaces. Some air fryers have removable racks that allow stacking flatbreads, though this requires careful monitoring to ensure both layers cook evenly. Single-layer cooking, even if it requires batching, generally produces more consistent results. The first batch cooks while you prepare the second batch, so the total time remains reasonable despite the batching requirement. Keeping cooked flatbreads warm on a plate wrapped with a clean kitchen towel preserves heat and softness while the second batch cooks.
The Eight-Minute Cooking Process with Mid-Point Flipping
Placing prepared flatbreads into the preheated air fryer basket and cooking for eight minutes produces flatbread with properly cooked exteriors and soft interiors. Flipping the flatbread halfway through the cooking time, after four minutes, ensures both sides brown evenly and cook uniformly. The flipping also prevents the bottom from browning too much while the top remains pale. After flipping, the remaining four minutes of cooking completes the process, with both sides achieving the golden-brown color that indicates proper doneness. Different air fryer models may cook slightly faster or slower depending on heating element design and air circulation patterns, so the first batch helps you understand your specific air fryer’s characteristics. If flatbreads seem undercooked after eight minutes, adding another two to three minutes should complete cooking. Conversely, if they brown excessively, reducing the temperature by ten to fifteen degrees for the next batch helps achieve better balance.
Serving Options and Immediate Enjoyment
Once flatbreads come out of the air fryer, they should be served immediately while still warm for the best eating experience. The flatbread is soft and pliable when warm but gradually becomes firmer as it cools, which is fine but less ideal than enjoying it fresh. Stacking cooked flatbreads on a clean plate and covering with a kitchen towel keeps them warm and soft until all batches are finished cooking. This presentation also makes serving convenient for multiple people, allowing everyone to grab a flatbread easily. The warmth of fresh flatbread makes it perfect for immediate wrapping around fillings or dipping into accompaniments.
Using Flatbread as a Pizza Base with Toppings
Turkish flatbread serves wonderfully as a personal pizza base, allowing creative topping combinations and quick preparation. Adding pizza sauce, cheese, and vegetable toppings directly to the flatbread and returning it to the air fryer for an additional five to eight minutes creates a complete meal. This approach is faster than traditional pizza dough preparation and offers creative possibilities, as you can make multiple flavored pizzas simultaneously. Different family members or guests can customize their own pizzas with preferred toppings, ensuring everyone enjoys exactly what they want. The thin flatbread cooks quickly even with toppings, making this an ideal solution for pizza cravings without extensive preparation.
Pairing with Dips and Traditional Accompaniments
Turkish flatbread pairs beautifully with hummus, baba ganoush, tzatziki, and other Middle Eastern dips that highlight the bread’s neutral flavor. These combinations work wonderfully for appetizers, light meals, or snacking occasions. The soft texture of the flatbread makes tearing into pieces and dipping convenient and mess-free. These pairings connect to authentic Turkish and Mediterranean dining traditions, making them culturally appropriate choices that enhance the culinary experience. Fresh herbs like mint or cilantro can be added to dips for additional freshness and flavor complexity.
Creating Sandwich Wraps with Savory Fillings
The pliable nature of warm Turkish flatbread makes it perfect for wrapping around grilled meats, roasted vegetables, fresh produce, and sauce combinations. Chicken shawarma, lamb kebab, falafel, grilled vegetables, and fresh salads all work beautifully when wrapped in flatbread. The bread’s slight chewiness prevents it from falling apart under the weight of fillings, though it tears easily if preferred. These wraps can be prepared ahead and wrapped in foil, making them convenient for packed lunches or casual entertaining. The customizable nature means each person can create their perfect wrap based on personal preferences.
Storage Methods for Maintaining Freshness
Cooled flatbreads can be stored in an airtight container for up to three days without significant quality loss. The flatbreads gradually lose softness over time but remain edible and can be reheated. Reheating in the air fryer for two to three minutes at three hundred degrees Fahrenheit restores the bread’s warmth and softness, though microwave reheating works if time is limited. Stacking flatbreads with parchment paper between each one in the storage container prevents them from sticking together, making removal easier. Proper storage ensures you can enjoy leftover flatbreads across multiple days without waste.
Freezing Dough for Future Convenience
The prepared dough freezes beautifully for up to two months, allowing you to make flatbread whenever desired without mixing new dough. Dividing the dough into portions and wrapping each tightly in plastic wrap prevents freezer burn and moisture loss. Thawing overnight in the refrigerator before rolling and cooking works best, as this allows the dough to reach room temperature gradually. Some people thaw at room temperature instead, which takes a few hours but works equally well. Having frozen dough portions on hand means fresh flatbread is accessible whenever cravings strike, requiring only eight minutes of actual cooking time.
Understanding Temperature and Cooking Time Adjustments
Different air fryer models vary in actual cooking temperature and air circulation patterns, so the first batch of flatbread helps you understand your specific unit’s characteristics. If your flatbread seems undercooked or pale after eight minutes, your air fryer likely runs cooler than the specified temperature, requiring longer cooking time or higher temperature settings for future batches. If flatbread browns excessively or seems to cook too quickly, your air fryer likely runs hot, requiring temperature reduction or shorter cooking times. Making these adjustments after the first batch helps ensure subsequent batches cook perfectly. Keeping notes about adjustments helps replicate success across multiple cooking sessions.
Avoiding Common Mistakes and Achieving Perfect Results
Over-flouring the work surface during shaping can dry out the dough and create tough, chewy flatbread rather than tender bread. Using just enough flour to prevent sticking without excessive application maintains proper moisture balance. Not preheating the air fryer results in pale, undercooked flatbread that lacks the appealing golden color. This step seems small but significantly impacts final results. Forgetting to flip the flatbread halfway through cooking produces uneven browning with one side darker than the other. Working slowly during shaping can allow the dough to dry out, making it harder to work with and potentially creating stiff flatbread. These common mistakes are easily avoided by understanding their causes and planning accordingly.

Turkish bread
Turkish flatbread is a versatile and flavorful bread that complements a variety of dishes. Whether you’re using it as a pizza base, sandwich bread, or a side dish for soups
Ingredients
2 cups self-rising flour
1 cup plain yogurt (low-fat or full-fat)
1 teaspoon olive oil (plus 1 tablespoon for brushing)
Directions
- Combine flour, yogurt, and 1 teaspoon olive oil in a large bowl. Knead until a soft dough forms.
- Place the dough on a floured surface, divide into 8 portions, and roll each into a ball. Flatten each ball into a 4-inch circle.
- Preheat the air fryer to 300°F (150°C) for 3 minutes.
- Brush both sides of each flatbread with olive oil and place them in the air fryer basket. Cook for 8 minutes, flipping halfway through.
- Enjoy warm with your favorite dips, as a pizza base, or as sandwich bread.