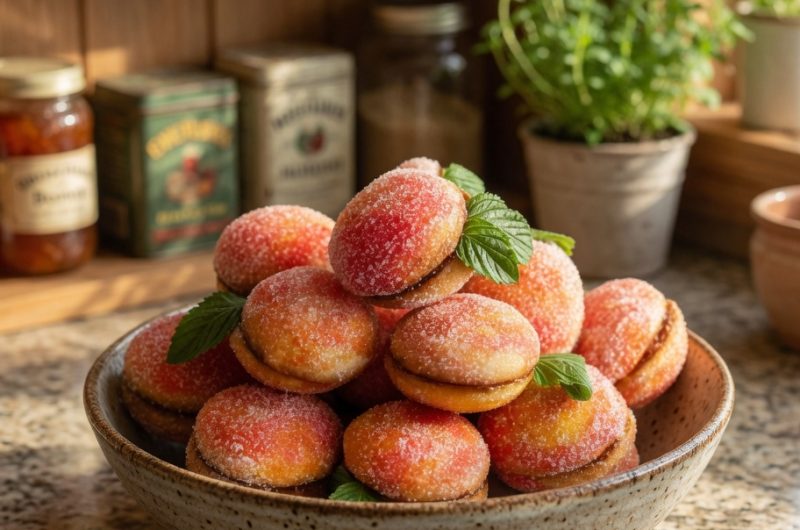
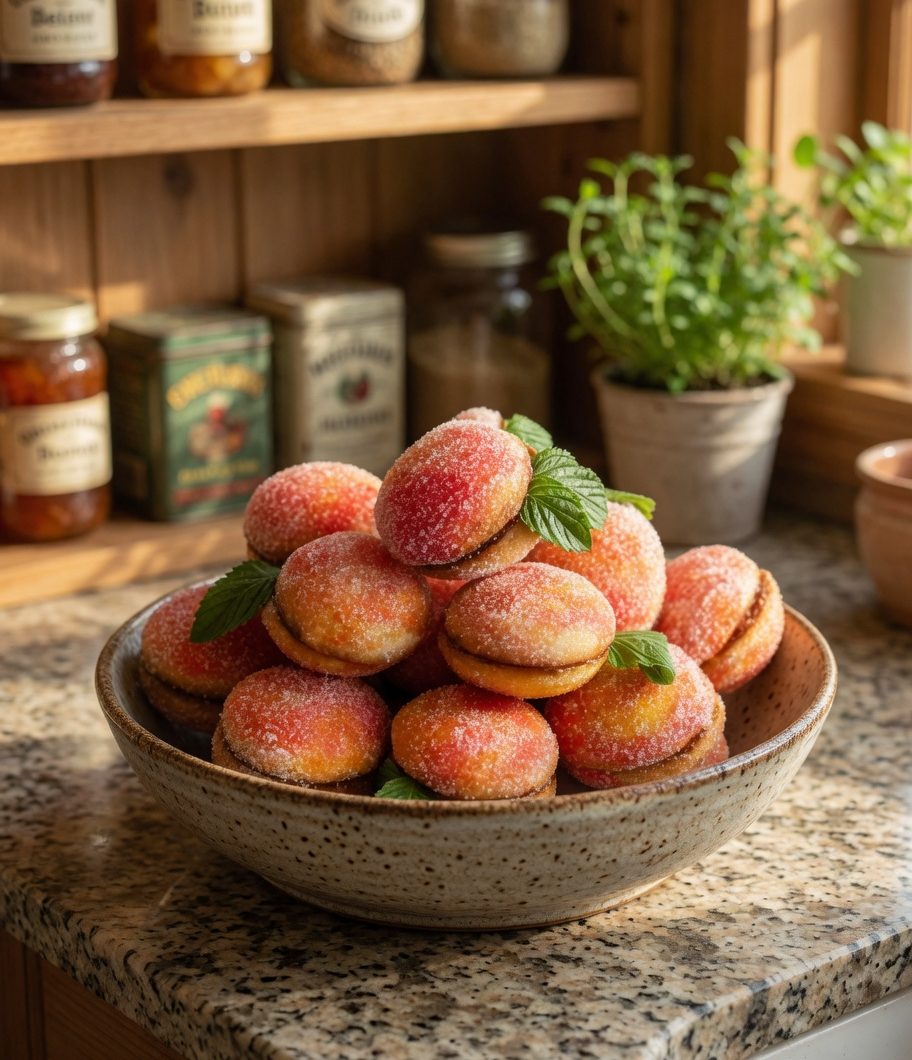
Italian peach cookies are beautiful pastries shaped like peaches that bring joy to celebrations throughout the year. Despite their name, these cookies get their identity from their appearance rather than strong peach flavor. Families serve these traditional treats at weddings, bridal showers, Christmas gatherings, and other important events. The combination of soft cake-like cookies, sweet vanilla cream filling, and flavored syrup creates a dessert that looks impressive and tastes wonderful. Making these cookies takes time and effort, but the result is worth it when you see the smiles on your guests’ faces.
What Makes These Cookies Special
These Italian pastries stand out from regular cookies because they require multiple components working together. You need to prepare the cookie dough, bake and carve the cookies, make vanilla pastry cream for filling, and create a flavored syrup for dipping. Each part plays an important role in the final product. The cookies themselves are sturdy enough to hold the cream filling without falling apart. The pastry cream adds richness and smooth texture. The dipping syrup gives moisture, color, and extra flavor. When assembled together and decorated with sugar and leaves, these cookies look like real peaches sitting on your serving platter.
Planning Your Time To Make These Cookies
Because this recipe involves several steps, many bakers prefer spreading the work over two days instead of rushing through everything at once. On the first day, you can focus on making the cookie dough, baking the cookies, carving them out, and preparing the pastry cream. This takes most of the work and leaves everything ready for assembly. On the second day, you prepare the dipping syrup and then fill and decorate all the cookies. This schedule makes the process less overwhelming and gives you time to rest between major tasks. You can also adjust this timeline based on your own schedule and preferences.
Gathering Your Equipment And Tools
Before starting this recipe, make sure you have all the necessary equipment ready. You will need a stand mixer with both a whisk attachment and a paddle attachment for mixing different components. Cookie sheets or baking sheets are essential for baking the cookies. Parchment paper or silicone baking mats prevent sticking and make cleanup easier. A small knife with a pointed tip helps you carve out the cookie bottoms cleanly. You need several bowls for dunking the cookies in syrup and holding different ingredients. A sugar shaker makes the final decoration step easier, though you can use a spoon instead. Having everything organized before you start makes the whole process run more smoothly.
Making The Cookie Dough From Scratch
The cookie dough for these Italian peach pastries starts with eggs and sugar beaten together until light and fluffy. This step takes about two minutes with your stand mixer using the whisk attachment. After that, you add vegetable oil all at once and mix until everything blends together smoothly. Next comes the milk, which you mix in until fully incorporated. In a separate step, you combine the baking powder with all the flour before adding it to the wet ingredients. Mix everything together until a very soft dough forms. This dough will feel quite sticky, which is normal and expected. Cover the bowl with plastic wrap and refrigerate for at least two hours before working with it.
Baking The Cookies Properly
After your dough has chilled for at least two hours, you can start forming and baking the cookies. Heat your oven to three hundred fifty degrees and prepare your baking sheets with parchment paper or silicone mats. Use a cookie scoop or tablespoon to portion out the dough into approximately sixty to sixty-four pieces. You want each piece round with a slightly flattened top. Because this dough is sticky, keep cooking spray nearby and spray your hands as needed to prevent the dough from sticking while you shape the cookies. Bake them for twenty-five to twenty-eight minutes. These cookies need to be baked longer than typical cookies so they can withstand the dipping process without falling apart.
Carving The Cookies While Warm
Timing is important when carving out the cookie bottoms to create space for the cream filling. You need to carve the cookies while they are still warm but cool enough to handle safely. If you wait until the cookies cool completely, they become more likely to break when you try to carve them. If you try to carve them too hot, you might burn your hands or the cookies might be too soft. The ideal window is when they are warm enough to cut easily but cool enough to touch. Use a small knife with a pointed tip and carefully carve out the bottom of each cookie, creating a hollow space that will hold the pastry cream later.
Preparing The Vanilla Pastry Cream
The pastry cream filling requires careful attention to avoid scorching or creating lumps. Start by combining milk with the first portion of sugar in a medium saucepan and heat over medium-high heat until it reaches a slight boil. While the milk heats, mix the cornstarch with the second portion of sugar, then add this to the egg yolks and combine well without beating in too much air. When the milk mixture comes to a slight boil, pour about one third of it into the egg mixture while whisking constantly and vigorously. Return this combined mixture back to the pot with the remaining milk and heat over medium-high heat for two minutes, whisking constantly. The mixture will become very thick, so whisk continuously and make sure to scrape the bottom and edges of the pot to prevent scorching.
Finishing And Storing The Pastry Cream
After cooking the pastry cream for two minutes and achieving a thick consistency, remove the pot from the heat immediately. Add the butter and stir well until it melts completely into the cream. If you choose to use peach liquor, add it now and combine thoroughly. The liquor adds depth and enhances the peach theme, though it remains optional. Cover the finished cream with plastic wrap, making sure the plastic touches the surface of the cream directly. This direct contact prevents a skin from forming on top. Let the cream cool to room temperature, then store it in the refrigerator until you are ready to fill the cookies. This cream can be made up to two days ahead of time.
Creating The Flavored Dipping Syrup
The dipping syrup gives these cookies their peach color and adds moisture and flavor. Combine one cup of water with sugar, lemon peel, orange peel, cinnamon stick, peach-flavored gelatin, and vanilla extract in a pan. Heat this mixture over medium flame for about five minutes while stirring. Add red food coloring one drop at a time until you reach the desired peach color. Remove the pan from the heat and add the remaining cup of water to dilute the syrup and cool it down. If you want to use peach liquor, add it two tablespoons at a time and taste as you go until you like the flavor. The syrup should be sweet and flavorful but not too thick.
Setting Up Your Cookie Assembly Station
Before you start dipping and filling cookies, organize your workspace to make the process efficient. Set out all the carved cookies, the bowl of dipping syrup, and the pastry cream. Keep paper towels nearby in case the syrup drips. Prepare a baking tray lined with parchment paper or aluminum foil where you will place the finished cookies. Although most cookies should be similar in size, it helps to match up pairs before you start the assembly process. Having everything within easy reach prevents you from scrambling around with sticky fingers looking for what you need next. A small, deep container works best for the dipping syrup, especially as the level gets lower.
Dipping And Filling The Cookies
The assembly process works best when you complete one cookie at a time from start to finish. Take two matched cookie halves and dunk each one three times in the flavored syrup, letting excess drip off between dunks. The cookies should absorb the syrup and take on that peach color. Fill each carved-out half with pastry cream, using enough to create a generous layer but not so much that it oozes out excessively when you press the halves together. Join the two halves like a sandwich, pressing gently but firmly. Wipe away any cream that squeezes out with your finger. Place the assembled cookie on your prepared baking sheet. Continue this process until all cookies are dipped, filled, and joined together.
Drying And Decorating The Finished Cookies
After assembling all the cookies, you need to let them dry slightly before adding the final decorations. Place the tray of cookies in the refrigerator for about two hours. This drying time is important because if you try to sprinkle sugar on wet cookies, the sugar will simply dissolve and disappear. Once the cookies have dried enough, sprinkle them generously with regular granulated sugar. A sugar shaker makes this step easier and creates an even coating, but you can use a tablespoon if you do not have one. Insert artificial or real leaves into the top of each cookie where the two halves meet to complete the peach appearance. The leaves add a nice finishing touch that makes these cookies look even more realistic.
Understanding Common Challenges With This Recipe
The sticky dough can frustrate first-time makers of these cookies, but cooking spray solves this problem easily. Keep a can nearby and spray your hands whenever the dough starts sticking while you form the cookies. Another challenge is carving the cookies at the right time. Set a timer to remind yourself to start carving while the cookies are still warm. If some cookies cool too much and start breaking, you can briefly warm them in the oven for a minute or two to make them more pliable. When making the pastry cream, constant whisking prevents lumps and scorching. Do not walk away from the stove during those two minutes of cooking. Stay focused and keep whisking, paying special attention to the bottom and edges of the pot.
How Far Ahead Can You Make These
These Italian peach cookies store well, which makes them perfect for party planning. You can make the complete cookies three or four days before your event and keep them in the refrigerator. They stay moist and do not dry out quickly, so you do not even need to cover them tightly. The pastry cream can be prepared two days ahead and stored in the refrigerator until you need it. You can freeze the carved cookies before filling them, which extends your preparation timeline even further. However, do not freeze the pastry cream because it changes texture when thawed. If you freeze the cookies, thaw them the day before your event and then fill and decorate them.
Portion Sizes And Yield Information
This recipe makes approximately thirty finished peach cookies, which means you need to portion the dough into about sixty to sixty-four pieces total since each cookie uses two halves. Each finished cookie contains around three hundred twenty calories. The recipe creates more pastry cream than you actually need to fill the cookies. You will have about one pound of extra cream, which you can enjoy on its own like pudding or use with other desserts. If you need more cookies for a larger gathering, you can double the entire recipe. Just make sure you have enough refrigerator space to store everything and enough time to complete all the steps.
Tips For Making The Process Easier
Working over two days makes this recipe much more manageable than trying to do everything at once. The dough needs refrigeration time anyway, so use that waiting period to clean up or prepare other parts of your meal. When carving the cookies, work in batches so some cookies stay warm while you work on others. If any cookies cool too much, you can rewarm them briefly. Use a small melon baller or small spoon to help scoop out the cookie bottoms if a knife feels awkward. When making pastry cream, having all ingredients measured and ready before you start helps you work quickly when timing matters. Keep a damp towel nearby during assembly to wipe your hands between cookies.
Notes About This Recipe
This recipe works best when spread over two days, with the cookies and cream made on day one and assembly on day two. The dough is naturally sticky, so keep cooking spray available to prevent it from sticking to your hands during shaping. These cookies need to be baked slightly longer than typical cookies so they can absorb the dipping syrup without falling apart or becoming mushy. Carve the cookie bottoms while they are still warm to reduce the risk of breaking them. Before sprinkling the finished cookies with sugar, let them dry in the refrigerator for one to two hours or the sugar will melt away. A sugar shaker helps create an even coating but is not required. You will have leftover pastry cream that can be eaten like pudding.
Lilla’s Peach Cookies
Traditional Italian pastries shaped and decorated to look like peaches. These special occasion cookies feature soft cake-like cookies filled with vanilla pastry cream and dipped in flavored syrup.
30
servings30
minutes30
minutes320
kcalIngredients
- For the cookie dough:
4 large eggs, at room temperature
2 cups granulated sugar
1 cup vegetable oil
1/2 cup milk
6.5 cups all-purpose flour
4 teaspoons baking powder
- For the flavored dipping syrup:
1 cup granulated sugar
2 cups water, divided (1 cup plus 1 cup)
1 cinnamon stick
2 tablespoons vanilla extract
1 medium orange, peel only
1 medium lemon, peel only
1 box peach-flavored gelatin
1/2 teaspoon red food coloring, more as needed
Peach liquor, optional
- For the vanilla pastry cream:
4 cups milk
3.5 tablespoons sugar (first portion)
12 large egg yolks
7 tablespoons cornstarch
3/4 cup sugar (second portion)
1/2 cup butter
1/3 cup peach liquor, optional
- For decorating:
1 cup granulated sugar
30 leaves, real or artificial
Directions
- Add eggs and sugar to the bowl of a stand mixer fitted with the whisk attachment. Beat for about two minutes until light and fluffy. Add all the vegetable oil at once and mix until blended completely. Pour in the milk and mix until fully incorporated. Combine the baking powder with the flour in a separate bowl, then add to the egg mixture. Mix until a very soft dough forms. Cover the bowl with plastic wrap and refrigerate for at least two hours.
- Heat your oven to three hundred fifty degrees. Line baking sheets with parchment paper or silicone baking mats. Use a cookie scoop or tablespoon to portion the dough into approximately sixty to sixty-four pieces. Shape each piece into a round ball with a slightly flattened top. Spray hands with cooking spray if dough sticks. Bake for twenty-five to twenty-eight minutes until golden. The cookies should be slightly overbaked so they can withstand dipping without falling apart. While cookies are still warm but cool enough to handle, use a small pointed knife to carve out the bottom of each cookie to create space for filling. Store carved cookies in a sealed container until ready to use.
- Combine milk and the first portion of sugar in a medium saucepan. Heat over medium-high heat until slightly boiling. Mix cornstarch with the second portion of sugar, then add to the egg yolks and combine well without beating in too much air. When milk reaches a slight boil, pour about one-third of it into the egg mixture while whisking vigorously. Return the egg mixture to the pot with the remaining milk. Heat over medium-high heat for two minutes while whisking constantly. The mixture will become very thick. Whisk continuously and scrape the bottom and edges of the pot to prevent scorching. Remove from heat, add butter, and stir until completely melted. Add peach liquor if using. Cover with plastic wrap pressed directly onto the surface of the cream. Cool, then refrigerate until needed.
- Add one cup of water, sugar, lemon peel, orange peel, cinnamon stick, peach gelatin, and vanilla extract to a pan. Heat over medium flame for about five minutes while stirring. Add red food coloring one drop at a time until desired peach color is reached. Remove from heat and add the remaining cup of water to dilute and cool the mixture. Add peach liquor if desired.
- Set up your workspace with carved cookies, dipping syrup, pastry cream, paper towels, and a parchment-lined baking tray. Match up cookie pairs by size. Dip two cookie halves in the syrup three times each, letting excess drip off. Fill each carved half with pastry cream and press the two halves together like a sandwich. Wipe away excess cream. Place assembled cookies on the prepared baking tray. Repeat until all cookies are assembled.
- Refrigerate assembled cookies for about two hours to dry slightly. Sprinkle dried cookies with granulated sugar and insert leaves for decoration.
Nutrition Facts
- Serving Size: 1 g
- Total number of serves: 30
- Calories: 321kcal
- Fat: 8g
- Carbohydrates: 55g
- Fiber: 1g
- Sugar: 32g
- Protein: 6g