Italian Easter bread represents far more than just a recipe—it embodies centuries of tradition, family connection, and the celebration of springtime renewal. This bread has been prepared in Italian households for generations, with families passing down their unique versions from mothers to daughters and grandmothers to grandchildren. The bread’s special place in Easter celebrations stems from its rich ingredients and beautiful presentation, which make it feel festive and worthy of holiday tables. The combination of citrus, anise, and eggs creates flavors that are distinctly Italian while feeling luxurious and celebratory. Understanding the cultural context of this bread helps you appreciate why it remains so beloved across Italian communities worldwide. When you bake Italian Easter bread, you’re participating in a tradition that connects you to countless families who have made this same bread for centuries.
Why Orange Zest and Anise Create Distinctive Flavors
The flavor profile of Italian Easter bread depends heavily on two key ingredients that give it its distinctive character: orange zest and anise oil. Orange zest provides bright, citrusy notes that feel fresh and springlike, which is appropriate for Easter baking. The natural oils in orange zest are released when you grate the peel, creating an intensity that fresh orange juice alone cannot achieve. Anise oil adds a subtle licorice-like flavor that might sound unusual but creates wonderful complexity when combined with the orange. These two flavors work together beautifully, with the anise providing warmth while the orange adds brightness. Many people who have never tasted anise in bread find themselves pleasantly surprised by how the flavors combine into something that tastes familiar and comforting rather than strange. The balance between these two ingredients is important—too much anise becomes overpowering, while too little makes its presence almost undetectable.
Preparing Your Ingredients and Creating Proper Dough Temperature
Success with bread baking begins before you even start mixing, with careful preparation of your ingredients and understanding proper temperatures. Placing your flour in a large mixing bowl gives you plenty of space to work with the dough as it develops. Warming milk to the correct temperature—comfortably warm to the touch but not hot—is crucial because yeast is a living organism that dies in temperatures above one hundred twenty degrees Fahrenheit. Testing milk temperature with your inner wrist, like you would test a baby’s bottle, provides a reliable way to confirm it’s warm enough without being too hot. This step of combining sugar with orange zest before adding it to the milk might seem unnecessary, but it allows the sugar to absorb the citrus oils from the zest, distributing orange flavor more evenly throughout the dough. Taking time with these preparatory steps prevents the frustration of yeast that won’t activate or dough that develops unevenly.
Activating Yeast and Recognizing Proper Fermentation
Adding yeast to your warm milk and sugar mixture is the moment when fermentation begins. Allowing the mixture to sit for ten minutes gives yeast time to activate, which you’ll recognize by the foamy or bubbly appearance that develops on the surface. This foam confirms that the yeast is alive and ready to help your dough rise throughout the baking process. If no foam appears after ten minutes, your yeast is likely expired, and you should start over with fresh yeast rather than continuing with a dough that won’t rise properly. The yeast activation step might feel like a small detail, but it’s actually one of the most important quality checks you can do before investing time in mixing and kneading your dough. Understanding what proper yeast activation looks and smells like helps you recognize when something isn’t right before you’ve already added all your ingredients.
Incorporating Wet and Dry Ingredients to Create Smooth Dough
Once your yeast is activated and foamy, incorporating it into the flour begins the actual dough-making process. Adding the yeast mixture to the flour starts forming a shaggy, rough dough that gradually becomes more cohesive as you continue mixing. The melted margarine and orange juice, added next, contribute fat and moisture that help develop the dough’s texture and flavor. Adding these ingredients gradually rather than all at once allows them to distribute evenly throughout the dough. The eggs, beaten separately with salt and anise oil, add richness and help create a tender crumb once the bread is baked. Beaten eggs also contribute moisture and structure that makes the finished bread more tender than breads made without eggs. Stirring all these wet ingredients together thoroughly ensures that no flour pockets remain unmixed, which would create lumps or dense areas in your finished bread.
Kneading Technique and Developing Proper Dough Consistency
Kneading your dough on a floured surface for about five minutes develops the gluten structure that gives bread its characteristic texture. The dough should become noticeably softer and more elastic as you knead, developing from a shaggy mass into something smooth and cohesive. Proper kneading creates tiny gluten strands that stretch and allow the dough to expand as it rises, trapping carbon dioxide gas produced by fermenting yeast. The dough remaining slightly tacky, rather than becoming completely dry and stiff, is actually desirable for Italian Easter bread because it will bake into a more tender crumb. Adding too much flour during kneading can result in dough that’s too stiff, which bakes into bread that’s less tender than desired. Learning to recognize when dough has been kneaded enough comes from experience—you’re looking for dough that feels smooth, springs back when poked, and holds together without being sticky or difficult to work with.
Understanding First Rising and Creating Ideal Proofing Conditions
Placing your kneaded dough in an oiled bowl and covering it loosely with plastic wrap begins the first rise, during which yeast ferments the dough and develops flavor. The loose covering prevents the dough from drying out while still allowing it to expand and rise. A draft-free area is important because cold air slows yeast activity and creates uneven rising. Many home bakers achieve this by turning off their oven, leaving the light on, and placing the bowl inside—the residual heat and protected environment create ideal conditions for rising. The dough should roughly double in volume during this rise, which typically takes about one hour depending on kitchen temperature. Understanding that warmer kitchens create faster rising while cooler kitchens require more time helps you adjust your expectations based on your specific conditions. Overproofing—allowing the dough to rise too long—can result in dough that collapses when shaped or doesn’t rise properly during the second rise.
Shaping Dough into Beautiful Braided Rings
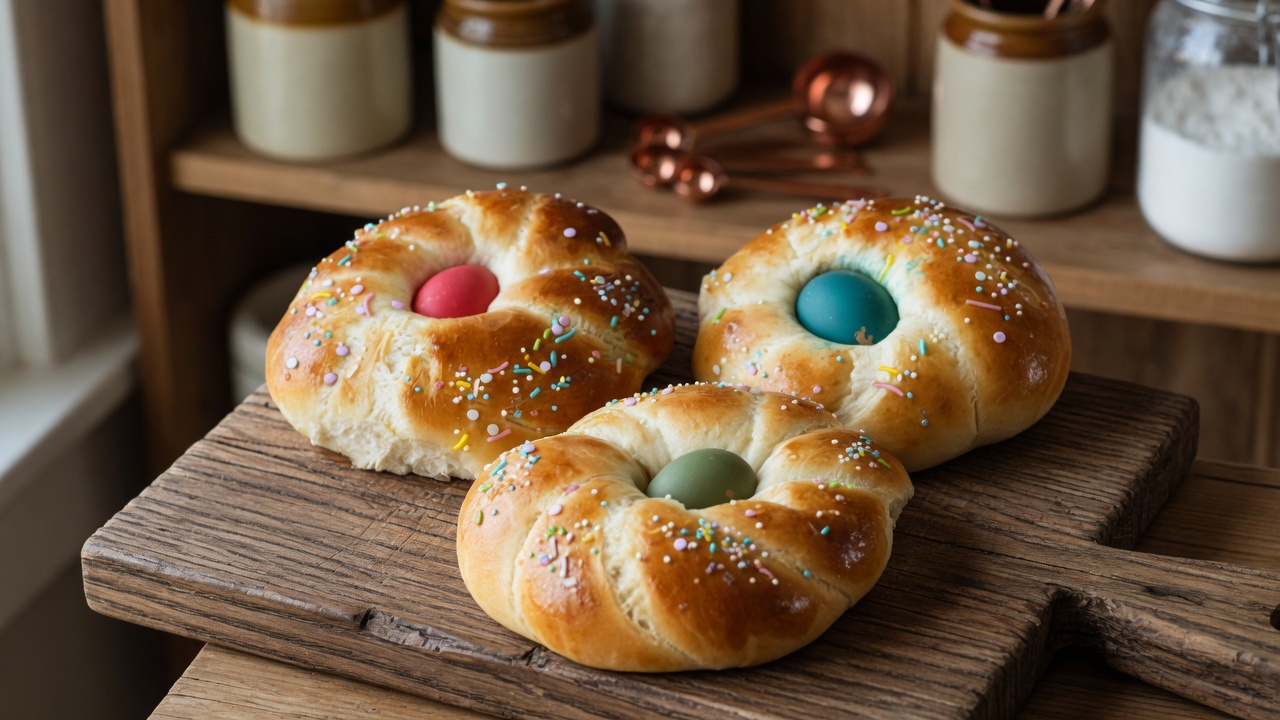
The shaping process for Italian Easter bread creates its distinctive presentation and ensures even baking. Dividing the dough into four equal portions gives you manageable pieces to work with. Rolling each portion into a twenty-four-inch rope requires gentle handling to avoid overworking the dough, which could result in a tougher finished bread. Twisting two ropes together loosely creates the beautiful braided pattern that makes this bread visually distinctive. Shaping the braided dough into a ring and pinching the ends to seal creates the traditional circular loaf shape. Working gently throughout this shaping process respects the dough’s development and prevents degassing—the loss of air bubbles that yeast has spent time creating. Some people find it helpful to flour their work surface lightly before shaping to prevent sticking, though too much flour can result in a tough finished bread.
Second Rise and Recognizing When Dough Is Properly Proofed
After shaping, your bread requires a second rise, during which the yeast continues fermenting and the dough expands further. Brushing the tops with melted butter adds richness and helps the tops brown beautifully during baking. Covering loosely with plastic wrap during this second rise prevents the dough from drying out while still allowing expansion. The dough should rise until nearly doubled in size, which typically takes forty-five minutes to one hour. Testing for proper proofing by gently poking the dough—your finger should leave an indentation that springs back slowly—helps you determine when the dough is ready for baking. Baking dough that hasn’t risen enough results in dense bread with a heavy crumb, while overproofed dough sometimes collapses during baking. Learning to recognize the feel and appearance of properly proofed dough comes with experience and helps ensure consistent results.
Preheating Your Oven and Understanding Baking Temperature
Preheating your oven to three hundred fifty degrees Fahrenheit before your bread finishes rising ensures the oven reaches the correct temperature by the time your dough is ready for baking. Baking at the correct temperature creates even browning and allows the interior to bake through while the exterior develops that golden-brown crust. If your oven temperature is too high, the outside browns too quickly while the inside remains undercooked. If it’s too low, the bread takes much longer to bake and may not develop proper color. Using an oven thermometer occasionally verifies that your oven’s temperature dial accurately reflects the actual temperature inside, since many home ovens run hotter or cooler than indicated. Baking each loaf individually, rather than trying to fit both on one rack, ensures even heat circulation and prevents one loaf from baking differently than the other.
Recognizing Proper Browning and Internal Doneness
Golden-brown exterior color indicates that your bread has baked properly, though you should also check that the interior is fully cooked. The baking time of thirty to forty minutes is approximate because oven temperatures vary and bread size can affect cooking time. Tapping the bottom of a finished loaf—it should sound hollow—confirms that the interior has baked through. You can also insert a toothpick or small skewer into the bread; it should come out clean or with just a few moist crumbs rather than wet dough. The aroma of baking bread provides another clue to doneness—when the smell transitions from raw dough to baked bread, you’re getting close to completion. Removing bread from the oven too early results in dough that’s still sticky and difficult to slice, while leaving it too long can result in excessively dark crusts.
Cooling Bread Properly Before Glazing
Transferring your baked loaves to a cooling rack allows air to circulate underneath, preventing steam from creating a soggy bottom crust. Allowing bread to cool completely before applying glaze is important because glaze applied to hot bread will melt and run off rather than setting nicely. Complete cooling also allows you to handle the bread without burning yourself and gives you a better sense of the final texture and color. During cooling, the crumb continues to set and become firmer, which means it will slice more cleanly than warm bread would. Many people find that bread tastes better once it’s completely cooled, as the flavors have time to settle and develop fully. Patience during cooling is worth it because it results in better texture and appearance once you add your glaze.
Creating and Applying Glaze for Finished Appearance
The glaze that finishes your Italian Easter bread is simple but effective—whisking together powdered sugar and milk creates a smooth coating that adds sweetness and visual appeal. The ratio of sugar to milk affects the glaze’s consistency; it should be thick enough to coat the bread without running off, but thin enough to spread smoothly. Some people add a tiny bit of vanilla extract or orange extract to the glaze for additional flavor, though plain sugar and milk glaze is traditional. Brushing the glaze over cooled bread distributes it evenly, and you can add colorful sprinkles on top for a festive appearance if desired. The glaze sets as it cools, creating a sweet, finished appearance that makes the bread look bakery-quality. Some bakers skip the glaze entirely and prefer the bread without added sugar, which is perfectly acceptable and still looks beautiful.
Storage Methods and Shelf Life
Storing leftover bread wrapped in plastic wrap at room temperature keeps it fresh for up to three days. The plastic wrap prevents air exposure, which causes drying and staleness. Some people prefer storing bread in an airtight container, which works equally well. Bread stored at room temperature gradually becomes drier day by day, so using it within three days provides the best eating experience. If you want to keep bread longer, freezing works well—wrap the completely cooled bread tightly in plastic wrap and then aluminum foil, and it will keep for several weeks in the freezer. Thawing frozen bread at room temperature and then briefly reheating in a warm oven restores the warm, fresh-baked quality. Slicing bread before freezing allows you to thaw individual portions rather than entire loaves, which is convenient for smaller households or longer storage periods.
Why Italian Easter Bread Suits Celebration Occasions
The festive nature of Italian Easter bread makes it appropriate for holiday tables and special celebrations beyond just Easter. The bright flavors and beautiful appearance make it a showstopping addition to any Easter brunch or dinner. The bread also works wonderfully for spring celebrations, afternoon tea parties, or anytime you want to serve something special and homemade. Sharing homemade Italian Easter bread with friends and family creates connection and shows genuine care. The traditional nature of the recipe makes it particularly special for families with Italian heritage, helping them maintain cultural traditions and pass them to younger generations. Whether you’re celebrating Easter specifically or simply wanting to bake something beautiful and delicious, Italian Easter bread delivers on both fronts.
Customizing Italian Easter Bread for Different Preferences
While the traditional recipe is delicious as written, several customizations allow you to adapt it to different tastes. Some people add candied orange peel or dried fruit to the dough for additional texture and flavor. Others increase the anise slightly if they particularly enjoy that flavor. Some bakers substitute butter for margarine if they prefer the taste of butter. Using freshly squeezed orange juice instead of store-bought juice provides brighter, fresher citrus flavor. Some people add a small amount of rum or brandy to the dough for subtle complexity. These modifications allow you to make the recipe your own while maintaining its essential character. Experimenting with different variations helps you discover what flavors you enjoy most and creates a version that reflects your personal preferences.
Italian Easter Bread
The sweet glaze finish adds the perfect touch to this show-stopping dessert bread. Ideal for Easter gatherings, spring celebrations, or anytime you want to serve something special that tastes homemade and impressive. The aromatic combination of citrus and anise creates flavors that feel both comforting and sophisticated, making this bread appropriate for casual family meals and formal holiday tables alike.
24
servings3
hours40
minutes327
kcal3
hours40
minutesIngredients
- For the Glaze:
¼ cup (61 ml) whole milk
2 cups (240 g) powdered sugar
Sprinkles (optional)
- For the Dough:
8 cups (1 kg) all-purpose flour
1½ cups (366 ml) whole milk
½ cup (100 g) granulated sugar
Zest and juice of 2 oranges
1 cup (227 g) melted margarine
4½ teaspoons (2 envelopes) active dry yeast
8 eggs
1 teaspoon salt
½ teaspoon anise oil
2 tablespoons melted unsalted butter (for brushing)
Directions
- Place eight cups of all-purpose flour in a large mixing bowl and set aside. Pour one and one-half cups of whole milk into a small saucepan and warm it over low heat until it feels comfortably warm to the touch but not hot. Test the temperature with your inner wrist—it should feel similar to a warm bath. Remove from heat once it reaches the right temperature.
- In a separate bowl, combine one-half cup of granulated sugar with the zest from two oranges. Blend them together thoroughly until the sugar becomes moistened with the citrus oils and develops a pleasant orange aroma. This step helps distribute orange flavor evenly throughout your dough.
- Pour the warmed milk into the bowl with the orange-sugar mixture. Add four and one-half teaspoons of active dry yeast and stir gently to combine. Allow this mixture to sit undisturbed for ten minutes until foam forms on the surface, indicating that the yeast is alive and ready to work. This foamy appearance is essential—if no foam appears, your yeast is expired.
- Pour the activated yeast mixture into the bowl of flour and stir together, forming a shaggy dough. Add one cup of melted margarine and the juice from the two oranges you zested earlier. Continue stirring and mixing until the ingredients are starting to combine into a more cohesive mass.
- In a separate bowl, lightly beat together eight large eggs, one teaspoon of salt, and one-half teaspoon of anise oil until well combined. Pour this egg mixture into the dough and stir thoroughly until it becomes fully incorporated throughout. The dough should be fairly wet and sticky at this point.
- Turn the dough out onto a lightly floured work surface and knead for about five minutes until it becomes noticeably smoother and more elastic. The dough should remain slightly tacky but hold together without being impossible to work with. If the dough feels too sticky to handle, add small amounts of flour gradually while continuing to knead.
Nutrition Facts
- Calories: 327kcal
- Fat: 11g
- Cholesterol: 58mg
- Sodium: 216mg
- Fiber: 1g
- Sugar: 16g
- Protein: 7g
- Calcium: 42mg